15
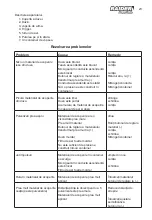
5. Turn on the machine and spray the solvent or water into a container or a cloth.
6. Repeat the above procedure until the solvent or water emerging from the nozzle is clear.
7. Turn the machine off.
8. Then empty the container completely. Always keep the container seal free of coating material
residue and check for damage.
9. Clean the outside of the spray gun and container with a cloth soaked in solvent or water.
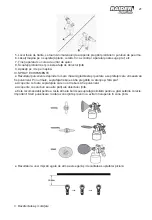
10. Unscrew the union nut and remove the air cap and nozzle. Clean the air cap and nozzle with
a brush and solvent or water.
Caution! Never clean nozzle or air holes in the spray gun with sharp metal objects.
Assembly.
Put the nozzle onto the gun body and find the correct position by turning it. The rib on the
nozzle should fit into the groove on the gun body. Put the air cap onto the nozzle and tighten
it using the union nut.
Maintenance.
Change the air filter if it is soiled.
WARNING! Never operate the machine without the air filter; dirt could be sucked in and
interfere with the function of the machine.
VI. Environmental protection.
Never place any electric tools in your household refuse.
To comply with European Directive 2002/96/EC concerning old electric and electronic
equipment and its implementation in national laws, old electric tools have to be separated
from other waste and disposed of in an environment-friendly fashion, e.g. by taking to a
recycling depot.
Recycling alternative to the demand to return electrical devices:
As an alternative to returning the electrical device, the owner is obliged to cooperate in ensuring
that the device is properly recycled if ownership is relinquished. This can also be done by
handing over the used device to a returns center, which will dispose of it in accordance with
national commercial and industrial waste management legislation. This does not apply to the
accessories and auxiliary equipment without any electrical components which are included
with the used device.
Layout.
1. Cover of the nozzle.
2. Nozzle.
3. Painting gun.
4. Trigger.
5. Air hose.
6. On/Off switch.
7. A container for paint.
Summary of Contents for RD-SGC06
Page 2: ...2 www raider bg 1 2 3 4 5 6 7 3 4 7 2 1 6 5...
Page 4: ...4 www raider bg I 1 p 2 3 4 5 6 7 8 9 10 11 12 13 14 15 16 17 18 p 19...
Page 5: ...5 20 21 21 C 21 C 32 II III...
Page 6: ...6 www raider bg II 2 III 1 DIN s 25 30 25 30 25 30 25 30 25 30 e DIN s 2 3 4...
Page 7: ...7 B 5 6 7 8 IV...
Page 8: ...8 www raider bg V 1 2 3 4 21 C 5 6 7 8 9 10 VI 2002 96 EC...
Page 9: ...9...
Page 25: ...25 1 p 2 3 4 5 6 7 8 9 10 p x 11 12 13 14 15 16 17 18...
Page 26: ...26 www raider bg 19 p 20 21 22 21 C 21 C 32 II III...
Page 27: ...27 II 2 III 1 2 3 4...
Page 28: ...28 www raider bg 5 6 7 8 9 3...
Page 29: ...29 V 1 2 3 4 21 C 5 6 7 8 9 10...
Page 30: ...30 www raider bg VI 11 2 3 4 5 6 7...
Page 31: ...31...
Page 41: ...41 1 2 3 4 5 6 7 I elektoinstrumenti 1 tpudovi 2 3 4 5 6 7 8 9 10 11 12 13 14 15 16 17 18 19...
Page 42: ...42 www raider bg povliayat 20 21 21 C 21 C 32 C...
Page 43: ...43 2 III 1 izteche 2 3 4...
Page 44: ...44 www raider bg 5 6 7 8 IV V 1 2 3 4 21 C 5 6 7 8...
Page 45: ...45 9 10 VI 2002 96...
Page 68: ...68 www raider bg...
Page 69: ...69 45...
Page 70: ...70 www raider bg...
Page 77: ...77 1 5 2 bar Raider 18 Raider Industrial Raider Pro 12 Raider Power Tools Raider Garden Tools...
Page 78: ...78 112 115 112 1 2 1 2 3 113 1 2 3 2 114 4 5 114 1 113 1 2 2 3 115 4 115 1 2 1 3 1 1...
Page 79: ...79 246 0700 44 155 e mail info euromasterbg com...


