background image

RADIUS


 Product 

Description 


PDR 121


iom_pdr121_04_r02.doc  

Rev 02 

Page 2 (67)


Contents 


1


General ________________________________________________________________ 4


1.1


Document History________________________________________________________________ 4


1.2


RADIUS Contact Information _______________________________________________________ 4


2


Find Your Way in The Manual ______________________________________________ 5


3


Introduction _____________________________________________________________ 6


3.1


Typical Application Areas__________________________________________________________ 7


3.1.1


Examples Of Typical Application Networks __________________________________________________8


4


Technical Specifications _________________________________________________ 11


5


Quick Start Guide _______________________________________________________ 12


6


Glossary Of Terms ______________________________________________________ 13


6.1


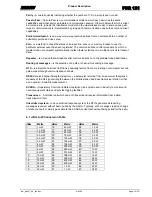
dBm to W Conversion Table ______________________________________________________ 14


7


The PDR 121 Radio Transceiver Functionality________________________________ 15


7.1


PDR 121 Operation Blocks _______________________________________________________ 15


7.2


FEC - Forward Error Correction____________________________________________________ 15


7.3


CRC – Cyclic Redundancy Checksum ______________________________________________ 15


7.4


Communication ________________________________________________________________ 16


7.5


Radio Receiver Sensitivity ________________________________________________________ 17


7.5.1


PDR 121 Receiver Sensitivity____________________________________________________________17


7.6


Radio Transmitter Power _________________________________________________________ 17


7.7


RSSI – Received Signal Strength Indication __________________________________________ 18


7.8


Differences between PDR 121 Models ______________________________________________ 19


8


Operating the PDR 121 ___________________________________________________ 20


8.1


LED Indicators and Connectors ____________________________________________________ 20


8.2


Peer-To-Peer __________________________________________________________________ 21


8.3


Collision Avoidance _____________________________________________________________ 21


8.4


Remote frequency change________________________________________________________ 23


8.5


Remote Tx power change ________________________________________________________ 24


8.6


Multiple RTU addressing to one radio _______________________________________________ 24


8.7


Radio Link Test ________________________________________________________________ 24


8.8


Split transmitting and receiving frequencies __________________________________________ 24


8.9


Split Tx Uplink Frequency ________________________________________________________ 25


8.9.1


Split Tx Uplink Example Network _________________________________________________________25


8.10


Repeating Alternative Systems _________________________________________________ 26


9


Installation_____________________________________________________________ 27


9.1


General ______________________________________________________________________ 27


9.2


Power Supply __________________________________________________________________ 27


9.2.1


Recommended minimum demands: _______________________________________________________27


9.3


Battery Power Supply ___________________________________________________________ 28


9.4


Serial Interface _________________________________________________________________ 29


9.4.1


PDR 121 Serial Interface Characteristics ___________________________________________________29


9.4.2


Serial Cable Configurations _____________________________________________________________30


9.4.3


EIA RS323 Conversion Table ____________________________________________________________33


9.5


Cabinet Mounting _______________________________________________________________ 34


9.5.1


PDR 121 mounted in cabinet ____________________________________________________________34


10


Accessories____________________________________________________________ 35


11


Radio Networking _______________________________________________________ 36


11.1


Antennas __________________________________________________________________ 36


11.1.1


Antenna Gain _______________________________________________________________________36


11.1.2


Antenna Types ______________________________________________________________________37


11.1.3


Antenna Gain versus Radio Output Power _________________________________________________38


11.2


Fade Margin ________________________________________________________________ 39


11.3


Radio Link Calculations _______________________________________________________ 40


11.3.1


No Line of Sight Calculations ___________________________________________________________40


11.3.2


Line Of Sight Calculations______________________________________________________________43


12


Configuration __________________________________________________________ 45


12.1


Equipment _________________________________________________________________ 45


12.2


Getting Started ______________________________________________________________ 45


12.3


Configuration Menus Overview _________________________________________________ 46


Summary of Contents for PDR 121

Page 1: ...Packet Data Radio Installation and Operation Manual PDR 121 RADIUS RADIO NETWORK TECHNOLOGY ...

Page 2: ...___ 24 8 7 Radio Link Test ________________________________________________________________ 24 8 8 Split transmitting and receiving frequencies __________________________________________ 24 8 9 Split Tx Uplink Frequency ________________________________________________________ 25 8 9 1 Split Tx Uplink Example Network _________________________________________________________25 8 10 Repeating Alterna...

Page 3: ...______________________________________________________52 12 8 3 Tx Frequency _______________________________________________________________________52 12 8 4 Split Tx Uplink_______________________________________________________________________53 12 8 5 Split Tx Uplink Frequency______________________________________________________________53 12 8 6 Split Tx Uplink Id_______________________________...

Page 4: ...t Update 2004 12 10 Approved Anders Grahn Template revision 01 001024 Revision Date Updated by Amendment 01 2004 10 13 Arto Valtonen First revision 02 2004 12 10 Arto Valtonen Second revision added new configuration menus Advanced 1 2 RADIUS Contact Information RADIUS US Inc 10700 W Venture Drive Unit B Franklin WI 53132 USA Phone 1 414 427 7010 Fax 1 414 427 7015 Email support radius us com Web w...

Page 5: ...apter 8 describes how the PDR 121 features can should be used Chapter 9 contains installation guidelines including the serial interface Chapter 10 contains information about radio network accesories provided by Radius Chapter 11 gives an introduction to general antenna and radio technique and calculations This chapter is inteded for those who want to learn more about those subjects Chaper 12 descr...

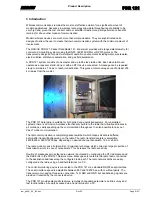
Page 6: ...unsolicited systems For unsolicited systems there is a Collision Avoidance functionality built in to the radio that virtually eliminates in air collisions vastly speeding up the communication throughput It is also possible to carry out Peer To Peer communication The radio communication is completely packet switched which means all data is buffered before after transmitting receiving on the radio T...

Page 7: ...afforded by their wireless technology Our products are a result of the close relationship with our customers and partners and reflect the current and future needs of the market Examples of why to go wireless Replacing a cable in situations where installation of a cable is difficult expensive or even impossible Replacing a dialled up link to reduce costs Network provider independence Example applic...

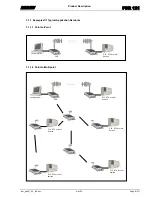
Page 8: ... Examples Of Typical Application Networks 3 1 1 1 Point to Point 3 1 1 2 Point to Multipoint PDR PLC RTU or other devices Control system PDR PLC RTU or other devices Control system PLC RTU or other devices PLC RTU or other devices PLC RTU or other devices PLC RTU or other devices ...

Page 9: ... iom_pdr121_04_r02 doc Rev 02 Page 9 67 3 1 1 3 Water Wastewater Network The example above shows two substations communicating Peer To Peer PDR Reservoir PDR Waste water plant Control system Pump house Water treatment plant Peer To Peer ...

Page 10: ...RADIUS Product Description PDR 121 iom_pdr121_04_r02 doc Rev 02 Page 10 67 3 1 1 4 Electrical Distribution Network Control system Capacitor switch Substation Recloser Metering points Substation ...

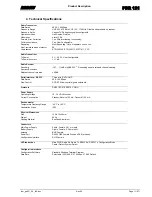
Page 11: ...annel spacing Spurious Emissions Adjacent channel rejection 60dB Serial Interface RS232 Three wire Rx Tx GND Data Rates 600 19200 bps Flow Control DCD CTS flow control signals selectable Protocols DNP3 IEC870 RP570 COMLI Power Supply Operating voltage 10 16 VDC Nominal Current Consumption Standby Receive 165 mA Transmit 1100 mA Environmental Temperature Operating Range 40 C to 60 C Capsulation Cla...

Page 12: ...e RTU cabinet Install the PDR 121 cabinet See chapter 9 3 Connect the antenna cable ground wire RS232 cable and power supply to the PDR 221 See chapter 9 4 Configure the PDR 121 by using a hand held terminal or a PC Standard Windows terminal software 56700 N 8 1 The unit can also be pre configured before installation Normally the below listed parameters are the only ones needing configuration See ...

Page 13: ...nnel DTE includes terminals computers protocol converters and multiplexers Fade Margin The greatest tolerable reduction in average received signal strength that will be anticipated under most conditions This measurement provides an allowance for reduced signal strength due to multi path slight antenna movement or changing atmospheric losses A fade margin of 10 20 dB is usually sufficient in most s...

Page 14: ...rminal Unit that is physically remote from a main station or computer but can gain access through communication channels RSSI Received Signal Strength Indication a parameter returned from a transceiver that gives a measure of the RF signal strength between the mobile station and base transceiver station either as an uplink or downlink measurement SCADA Supervisory Control and Data Acquisition is a...

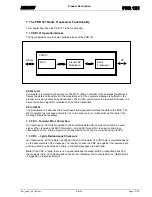
Page 15: ... it on to the serial port or re transmits via the radio if the message should be repeated 7 2 FEC Forward Error Correction On transmission FEC bits are added to the transmitted data before being converted to a 4 level signal When receiving the FEC information and an FEC algorithm is used to correct any transmission errors A large proportion of transmission errors can be corrected using the FEC 7 3...

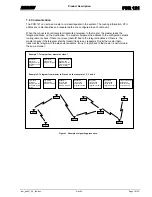
Page 16: ...ters if any A reply back to the master is performed in the same manner Figure 1 Example of signalling procedure Master Slave 3 Slave 6 Slave 7 Slave 5 Slave 4 Slave 2 Slave 1 The master receives a telegram from the connected control system The master transmits the telegram via radio Repeater 1 receives and transmits the telegram via radio Repeater 2 receives and transmits the telegram via radio Re...

Page 17: ...hat a very sensitive radio cannot compensate for a poor antenna installation The sensitivity can be used in propagation studies for radio network planning 7 5 1 PDR 121 Receiver Sensitivity Model Frequency Range MHz Channel Bandwidth kHz Radio Data Speed bps Sensitivity BER 1x10 6 PDR 121 A VHF 132 150 12 5 4800 9600 111 dBm 109 dBm PDR 121 B VHF 132 150 25 9600 19200 114 dBm 107 dBm PDR 121 C VHF...

Page 18: ... value can be used to determine the quality of a radio link The RSSI values can be retrieved by executing the Radio Link Test in the configuration menus see 12 7 6 The PDR 121 measures the RSSI value using an A D converter The received signal strength is measured in volts and is translated to a dBm value The graph below shows a typical RSSI voltage value as a function of the signal level Figure 2 ...

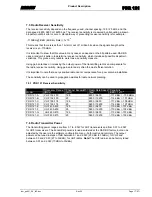
Page 19: ... Model Frequency Range MHz Channel Bandwidth kHz Radio Data Speed bps Article Number PDR 121 132 150 12 5 4800 9600 305154 9 PDR 121 132 150 25 9600 19200 305155 8 PDR 121 150 174 12 5 4800 9600 305156 7 PDR 121 150 174 25 9600 19200 305157 6 PDR 121 403 422 12 5 4800 9600 305164 7 PDR 121 403 422 25 9600 19200 305165 6 PDR 121 435 450 12 5 4800 9600 305158 5 PDR 121 435 450 25 9600 19200 305159 4...

Page 20: ...D Yellow When lit the PDR receives data from another radio unit in the system H TX LED Red When lit the PDR transmits data via radio I RS232 Tx LED Red When lit the PDR transmits serial data to connected device J RS232 Rx LED Green When lit the PDR receives serial data from connected device K RS 232 connection For connection of the serial cable 9 pole D sub plug L Configuration Mode Yellow Lit whe...

Page 21: ...c strategy is that the PDR 121 always listens to the radio channel If it detects a transmission from another radio it will not start a transmission until the ongoing transmission is finished Though it is still possible that two or more radios listens to the channel consider it free and start transmitting simultaneously Configuring a random back off delay time called Collision Avoidance Delay solve...

Page 22: ...f the RTU Example 1 Collision Avoidance Min 1 s Collision Avoidance Max 3 s The radio will always wait 1 second plus a 0 to 2 seconds random time 3 1 2 sec The CA Delay time will be Min 1 second and Max 3 seconds This method can be used if one or more RTU s have priority The highest priority RTU s should be set to CA Delay Min 0 see example 2 and the lower priority ones to a higher value Example 2...

Page 23: ...changed to the new frequencies 3 The user can then choose to abort or continue 4 If the frequency change is continued the remote radio units are asked to change to the new frequency and an acknowledgement is requested Note The remote units will not switch to the new frequencies until after 20 seconds This delay is so the master radio can execute re transmissions to units not responding to the freq...

Page 24: ...S485 interface is needed A RS232 to RS485 converter is available from RADIUS 8 7 Radio Link Test The Radio Link Test is used to check the RSSI levels Received Signal Strength Indication and the Tx power levels of the radios on a chosen link in the radio network See chapter 14 3 8 8 Split transmitting and receiving frequencies If desired the PDR 121 can be configured to operate with separate Tx and...

Page 25: ... 02 will transmit on 440 MHz when transmitting RTU messages and repeating to the master Uplink When repeating from the master downlink the transmit frequency is 442 MHz If a system frequency change is performed on this network the new master frequencies are entered at the master For example Rx 445 MHz Tx 450 MHz The result of the frequency change will be RaId Rx Freq MHz Tx Freq MHz Split Tx Uplin...

Page 26: ...ever it is possible to configure up to four alternative system ids This allows two or more parallel systems to use one another s radio units as repeaters Note It is not recommended to use this feature in a polled network since it will introduce a risk of radio message collisions See chapter 12 5 4 for configuration of this feature Master Slave Slave Slave Slave Master Master Slave Slave Slave ...

Page 27: ...at this ground connector is internally connected to the negative pole of the power supply Note It is of vital importance that the negative pole of the power supply the earth terminal and the antenna are connected to the same earth potential The negative pole of the power supply and the radio housing are internally connected 9 2 Power Supply The power supply unit in a radio system must be chosen wi...

Page 28: ..._pdr121_04_r02 doc Rev 02 Page 28 67 _ _ 9 3 Battery Power Supply If a re chargeable battery is to be used the connection shall be made as follows Note The Battery Input shall only be used for non rechargeable batteries Battery Power Supply ...

Page 29: ...ctive high when the PDR is ready to receive data It is deactivated low from when a message is completely received on the serial port until the message is completely transmitted on the radio It is also deactivated low from when a message is detected on the radio until it is completely transmitted on the serial interface See Figure 6 Figure 7 and Figure 8 Note It is not necessary to use the CTS sign...

Page 30: ...E DB9F PDR DCE DB9M DCD 1 RD 2 TD 3 DTR 4 DSR 6 RTS 7 CTS 8 RI 9 GND 5 1 DCD 2 RD 3 TD 4 DTR 6 DSR 7 RTS 8 CTS 9 RI 5 GND DTE DB9F PDR DCE DB9M DCD 1 RD 2 TD 3 DTR 4 DSR 6 RTS 7 CTS 8 RI 9 GND 5 1 DCD 2 RD 3 TD 4 DTR 6 DSR 7 RTS 8 CTS 9 RI 5 GND DTE DB9F PDR DCE DB9M DCD 8 RD 3 TD 2 DTR 20 DSR 6 RTS 4 CTS 5 RI 22 GND 7 1 DCD 2 RD 3 TD 4 DTR 6 DSR 7 RTS 8 CTS 9 RI 5 GND DTE DB25F PDR DCE DB9M DCD 8...

Page 31: ... 9 GND 5 1 DCD 2 RD 3 TD 4 DTR 6 DSR 7 RTS 8 CTS 9 RI 5 GND DCE DB9M PDR DCE DB9M DCD 1 RD 2 TD 3 DTR 4 DSR 6 RTS 7 CTS 8 RI 9 GND 5 1 DCD 2 RD 3 TD 4 DTR 6 DSR 7 RTS 8 CTS 9 RI 5 GND DCE DB9M PDR DCE DB9M DCD 8 RD 3 TD 2 DTR 20 DSR 6 RTS 4 CTS 5 RI 22 GND 7 1 DCD 2 RD 3 TD 4 DTR 6 DSR 7 RTS 8 CTS 9 RI 5 GND DCE DB25M PDR DCE DB9M DCD 8 RD 3 TD 2 DTR 20 DSR 6 RTS 4 CTS 5 RI 22 GND 7 1 DCD 2 RD 3 T...

Page 32: ...dio Tx CTS PDR121 receives a serial message from the control system PDR121 transmits the message on the radio CTS becomes low while the message is transmitted on the radio Radio Rx RS232 Tx CTS DCD PDR121 receives a radio message PDR121 transmits the message across the serial interface to the control system CTS is low during detection of the message until it has been transmitted across the serial ...

Page 33: ... from DTE CTS 106 Clear To Send to DTE DSR 107 Data Set Ready to DTE DTR 108 2 Data Terminal Ready from DTE DCD 109 Data Carrier Detect to DTE RI 125 Ring Indication to DTE GND Signal Ground Radio Rx RS232 Tx DCD CTS Post DCD Pre DCD PDR121 receives a radio message PDR121 transmits the message on the serial interface after configured Pre DCD time DCD is high during the Pre DCD time the serial tran...

Page 34: ... up as shown below Figure 9 PDR 121 mounted in cabinet Object Name Description A Packet Data Radio Data radio B Connection block For connection of mains Phase neutral or earth C Power supply Converts mains to 12VDC D Coaxial connector N jack For connection of the antenna cable E Cable gland duct For leading cables through the cabinet The cabinet can be equipped with heater and or UPS D C B A E ...

Page 35: ... be appropriate for use with RADIUS radios and have been selected by people with many years of radio network experience Contact RADIUS for detailed technical information and pricing Accessory examples Antennas o Directional o Omni directional o Gain Antenna Cables Cabinets o Indoor o Outdoor stainless Cabinet Heaters o For operation down to 40 degrees Celsius Backup Batteries Power Supplies o Suit...

Page 36: ...ed to an isotropic radiator An isotropic radiator is an antenna transmitting signals equally in all directions including up and down vertically An antenna of this type has 0dBi gain An isotropic antenna is only a theoretical model that has no real design The higher the decibel number is the higher the gain will be of the antenna For instance a 6dBi gain antenna will receive a signal at a higher le...

Page 37: ...tenna should not be confused with an isotropic radiator While an isotropic radiator will radiate in all 3 dimensional directions an omni directional antenna may not radiate vertically up or down 11 1 2 1 Directional Antenna Below is an example of a 14 dBi gain directional antenna The field strength diagrams show the direction of maximum radiation of the antenna The E plane represents the electric ...

Page 38: ...ncreasing the receiver sensitivity by 3dBm is equal to doubling the output power The receiver sensitivity is except from the radio design itself depending on the antenna and the antenna installation Using a high gain antenna is in many cases much more effective than increasing the transmitter power For example using a 6dBm gain antenna instead of a 0dBm gain on a 2W radio transmitter is equivalent...

Page 39: ...argin In very noisy environments the level of the noise floor can be higher than the receiver sensitivity For example greater than 110 dBm in the above example In this case it does not help to increase the receiver sensitivity or using a higher gain receiving antenna The only solution if the source of the noise cannot be eliminated is then to increase the power of the transmission so that signal s...

Page 40: ...gation loss This value tells how much the signal strength is decreased due to the distance between the transmitter and the receiver For this we use the Egli model The Egli model is a simplified model that assumes gently rolling terrain with average hill heights of approximately 50 feet 15 meters Land Mobile Radio Systems Edward N Singer PTR Prentice Hall 1994 p 196 Because of this assumption no te...

Page 41: ...ceiver dBm using dBm instead of dBm Ptx Transmitter RF output power dBm Gtx TX Antenna Gain dB A Over Air Attenuation dB see above Grx Receiver RX Antenna Gain dB Cl Cable Connector Loss dB Note To simplify we use an average Cable Connector loss value including both the Tx and Rx site of 4dB This is in some cases a high value but still assumes a correct antenna cable installation Example 2 Increas...

Page 42: ...e margin is 19 dB which is an acceptable level The radio link should be possible Example 2 How high should the master antenna be mounted Distance 12 5 miles 20km Antenna height 1 X Antenna height 2 64 feet 20 meters Radio Tx Power 33 dBm 2W Radio Rx Sensitivity 110 dBm Frequency 142 000 MHz Antenna Gain 1 3dBd Antenna Gain 2 6dBd Cable Connector losses 4 dB total Fade Margin 20dB Calculating highe...

Page 43: ...that can interfere with the radio signal line of sight The first calculation to be made is the FSL Free Space Loss The FSL value tells how much the signal strength is decreased due to the distance between the transmitter and the receiver FSL Free Space Loss FSL dB 20 LOG λ 4π R Where R Distance between Rx and Tx Antenna Line of sight in meters λ C f 300 f Conclusion using Ex2 If the transmission p...

Page 44: ...e Connector loss including both the Tx and Rx site of 4dB This is a high value for most installations but still assumes a correct antenna cable installation Example 5 Receiver sensitivity needed Using Ex2 above and assuming 3dB antennas at each site FM Srx Ptx Gtx FSL Grx Cl Srx Ptx Gtx FSL Grx Cl FM Srx 33dBm 3dBd 111 7dB 3dBd 4dB 20dB 96 7 dBm Example 6 Total antenna gain needed Using Example 4 ...

Page 45: ...rogInt cable to the PDR Rbus jack 4 Start the terminal program on the PC 5 Select an available PC COM port 6 Configure the communication settings to 57600 8 N 1 7 Press C capital to enter the PDR 121 configuration menus Note After configuration Exit Configuration must be chosen or else the PDR 121 will remain in the configuration mode and will not operate in the normal mode If the PDR is powered u...

Page 46: ...te 9600 bps 3 Parity No 4 Inter Character Timeout 990 ms 5 Pre DCD 40 ms 6 Post DCD 0 ms Radio 1 Collision Avoidance Delay OFF 2 Collision Avoidance Delay Min 0 ms 3 Collision Avoidance Delay Max 0 ms 4 Bit Error Rate Test 5 Communication Test 6 Radio Link Test 7 Receiver Test 8 Transmitter Test Rx Frequency 465 000000 MHz Tx Frequency 465 000000 MHz Advanced 1 Detected Radio Type UHF 450 470 MHz ...

Page 47: ...9600 8N1 Inter Character Timeout 250 ms Pre DCD 0 ms Post DCD 0 ms Collision Avoidance Delay OFF Collision Avoidance Delay Min 0 ms Collision Avoidance Delay Max 0 ms Rx Frequency 0 000000 MHz Tx Frequency 0 000000 MHz Split Tx Uplink OFF Split Tx Uplink Frequency 0 000000 MHz Split Tx Uplink Id Radio Bitrate 9600 bps Tx Power Level 20 dBm 0 10 W Non Intrusive Diagnostics OFF Press any key to cont...

Page 48: ...ystem shall have the same System Id The System ID range is 01 99 Entering 00 will clear the System ID See also chapter 12 5 4 Repeat Alternative Systems 12 5 2 Radio ID The Radio ID is used to identify each radio in the network All radios in the network shall have different Radio ID s The Radio ID range is 01 99 Thus one PDR radio network can contain 99 radio units Entering 00 will clear the Radio...

Page 49: ...s contain only the RTU address Comli messages always contain the address 0 zero when transmitted to the control system When the PDR 121 master receives a message on the serial port it checks if the protocol address is configured in the RTU Id list If the address is listed the message will be transmitted to the radio Id tied to the RTU Id address in the list The example below tells the radio to tra...

Page 50: ...s required before the network information will be cleared 12 6 Serial The serial menu contains configuration parameters for the serial RS 232 interface 12 6 1 Protocol This feature is for the selection of the serial interface RTU SCADA protocol Available protocols are IEC870 RP570 DNP3 or COMLI 12 6 2 Bitrate This feature is for the selection of the serial interface communication speed 600 1200 24...

Page 51: ...ral control Master SCADA should have the Collision Avoidance Delay set to OFF This setting requirement is because none of the messages from the SCADA master should be handled as unsolicited messages 12 7 2 Collision Avoidance Delay Min Minimum waiting time before transmission of unsolicited messages only used if collision avoidance delay is set to ON Time could be set between 0 9 9 s 12 7 3 Collis...

Page 52: ...is selected 12 8 2 Rx Frequency Selection of desired receiving frequency is achieved by pressing 2 The software performs calculations of radio frequency parameters and displays the result 12 8 3 Tx Frequency Selection of desired transmitting frequency is achieved if 3 is pressed The software performs calculations of radio frequency parameters and displays the result Note that the Rx and Tx frequen...

Page 53: ...o modules Tx power level range is limited to 20 33 dBm 0 1 2 0 W 12 8 9 Non Intrusive Diagnostics When this feature is activated the radio will receive diagnostic parameters from all radio units in the network and write them out on the Rbus 57600 N81 In order to be able to read the diagnostics the RADIUS Windows based network tool is needed The diagnostic parameters are RSSI temperature transmitte...

Page 54: ...ave both the Rx and Tx frequency set to the masters Tx frequency 12 8 13 Remote Tx Power Level Change This feature is used to change Tx power level on a remote unit in the network 12 8 14 Radio VCO Lock Test The configured Rx and Tx frequencies are continuously checked for positive VCO lock If a negative VCO lock is detected this is displayed as Rx Failure Tx Failure respectively If split Tx uplin...

Page 55: ...llision Avoidance Delay OFF Collision Avoidance Delay Min 0 ms Collision Avoidance Delay Max 0 ms Rx Frequency 0 000000 MHz Tx Frequency 0 000000 MHz Split Tx Uplink OFF Split Tx Uplink Frequency 0 000000 MHz Split Tx Uplink Id Radio Bitrate 9600 bps Tx Power Level 20 dBm 0 10 W Non Intrusive Diagnostics OFF Press any key to continue System Id 00 Radio Id 00 Protocol DNP3 Serial Interface 9600 8N1...

Page 56: ...ation adresses control system and RTU adresses The IEC870 and RP570 protocol contain the RTU address only Even on reply to the control system The COMLI protocol uses the adress zero for messages from the RTU to the control system 13 1 Network Layout This network example is used for all configuration examples below PDR Ra ID 99 Adr 00099 SCADA PDR Ra ID 03 PDR Ra ID 04 PDR Ra ID 05 PDR Ra ID 02 PDR...

Page 57: ...slave radio network menus shall contain the DNP3 control system address the radio ID connected to the control system and eventual repeater radio ID s Radio 99 Master Radio 01 02 03 Radio 04 Radio 05 RTU Id Radio Id R1 R2 R3 R4 R5 R6 01 00001 01 02 00002 02 03 00003 03 04 00004 04 03 05 00005 05 03 04 06 RTU Id Radio Id R1 R2 R3 R4 R5 R6 01 00099 99 02 RTU Id Radio Id R1 R2 R3 R4 R5 R6 01 00099 99 ...

Page 58: ...ed IEC870 RP570 RTU address the radio ID connected to the control system and eventual repeater radio ID s Radio 99 Master Radio 01 Radio 02 Radio 03 Radio 04 Radio 05 RTU Id Radio Id R1 R2 R3 R4 R5 R6 01 00001 01 02 00002 02 03 00003 03 04 00004 04 03 05 00005 05 03 04 06 RTU Id Radio Id R1 R2 R3 R4 R5 R6 01 00001 99 02 RTU Id Radio Id R1 R2 R3 R4 R5 R6 01 00003 99 02 RTU Id Radio Id R1 R2 R3 R4 R...

Page 59: ...e COMLI protocol master address the radio ID connected to the control system and eventual repeater radio ID s Radio 99 Master Radio 01 Radio 02 Radio 03 Radio 04 Radio 05 RTU Id Radio Id R1 R2 R3 R4 R5 R6 01 00001 01 02 00002 02 03 00003 03 04 00004 04 03 05 00005 05 03 04 06 RTU Id Radio Id R1 R2 R3 R4 R5 R6 01 00000 99 02 RTU Id Radio Id R1 R2 R3 R4 R5 R6 01 00000 99 02 RTU Id Radio Id R1 R2 R3 ...

Page 60: ... rate should be below 10 100 bit errors Please contact RADIUS support to evaluate any test results A command is transmitted from the particular radio unit to the receiving radio unit which replies by transmitting back a random sequence bit stream A correctly received character is displayed on the screen as U and an incorrectly received character is displayed as Dot The function should be used with...

Page 61: ...UUUUUUUUUUUUUUUUUUUUUUUUUUUUUUUUUUUUUUUUUUUUUUUUUUU UUUUUUUUUUUUUUU UUUU UUUUUUU UUUUUUUUUUUUUUUUUUUU UUUUUUUUUUUUUUUUUUUUUUUUUUUUUUU UUUUUUUUUUUUUUUUU UUUUUUUU UUUUUUUUU UUUUUUUUUUUUUUUUUUUUUUUUUUUUUUU UUUUUUUUUUUUUUUUUUUU UUUUUU UUUUUUU UUUUUUUUUUUUUUU Radio ID 02 Number of corrupted bytes At attenuation level 0 0000 errors At attenuation level 1 0000 errors At attenuation level 2 0020 errors At...

Page 62: ... Five attempts are carried out per test If acknowledge is received from the opposite radio Passed is presented on the screen If no acknowledge is received Failed is presented See the menu example below Communication Test Radio Id 05 Attempt 1 Passed Attempt 2 Passed Attempt 3 Passed Attempt 4 Passed Attempt 5 Failed Press any key to continue Id 01 Id 05 Id 04 4 7 2 6 3 5 1 8 PC med ProgTerm Id 02 ...

Page 63: ...est Radio Id 01 Downlink Path 04 03 02 01 RSSI dBm 80 81 78 TxPwr dBm 30 20 30 Uplink Path 01 02 03 04 RSSI dBm 76 81 80 TxPwr dBm 30 30 20 Press any key to continue The example above shows a Radio Link Test carried out from radio 04 to radio 01 The arrows indicate the direction of the radio message The transmitter power at Radio 04 is 30dBm 1W and the RSSI level at Radio 03 is 80dBm The transmitt...

Page 64: ...anding Wave Ratio correct Communication Can the PDR perform a Communication Test or a Radio Link Test How is the RSSI value compared to earlier Try to adjust the antenna direction to achieve a better RSSI value How is the result from the Bit Error Rate Test Has the PDR been moved from its original place External circumstance e g has new houses or the like been built That the radio units are correc...

Page 65: ...training classes if you want to let people in your organization to get a broad knowledge about your RADIUS system in general or if you want your technicians to become gurus when it comes to crimping antenna connectors trouble shooting and to create smart solutions with RADIUS system 16 2 User feedback Receiving user feedback is very important Since many years Radius has a user group NetMan Visiona...

Page 66: ...RADIUS Product Description PDR 121 iom_pdr121_04_r02 doc Rev 02 Page 66 67 AppendixA PDR 121 Layout Drawing ...

Page 67: ...ADIUS Product Description PDR 121 iom_pdr121_04_r02 doc Rev 02 Page 67 67 References Reference Document Description 1 ANTENNAS Antenna equipment installation description 2 MAINTMAN Maintenance Manual 3 4 ...

Reviews: