


8/17/2015
Easier to Read Pro97/2055 Scanner Manual
http://marksscanners.com/97/97.shtml#open_closed
7/16
To program a channel for CTCSS or DCS search:
1. In Manual mode, select the channel
by entering the bank number and channel number then
press MAN to advance to the channel.
Note: You may also change banks by pressing FUNC then
or
(each time) and then change channels by pressing
or
.
2. Press MODE
until you set the channel to CT Code Search or DC Code Search in the bottom of the display. Usually, but not always, VHF channels
will use CTCSS and UHF channels will use DCS. If you leave the channel at this 'Search' setting, the scanner will display the first code (if) found
when you do not program a code.
To program a CTCSS or DCS tone for a channel:
1. In Manual mode, select the channel
by entering the bank number and channel number then
press MAN to advance to the channel.
Note: You may also change banks by pressing FUNC then
or
(each time) and then change channels by pressing
or
.
2. Press MODE
until you set the channel to CT Code Search or DC Code Search in the bottom of the display.
3. Press PGM
to put the scanner in program mode.
4. Press FUNC then MODE
and you will see Set CTCSS Code or Set DCS Code in the top of the display. Use
or
to select the code then press
ENT to store. The scanner will then only receive transmissions on that channel that use the programmed tone or code in scan mode.
Press MAN to exit programming.
In Scan Mode
you can store the tone code of the frequency by pressing ENT while viewing the channel . Code Stored briefly appears in the display.
Note: When stopped on an active conventional channel while scanning, you can press MODE to cycle through the valid modes for that
channel, including CTCSS and DCS. This will reset any stored CT or DC code to the search code mode, allowing you to easily check for
other CT or DC codes that may be present on the frequency.
FM
173.20375173.2225
6.25
FM
173.225173.3875
6.25
FM
173.390173.40875
6.25
FM
173.4125174
12.5
FM
216.0025221.9975
5
FM
222225
5
AM
225406
25
FM
406512
6.25
FM
806823.9875
6.25
FM
849868.9875
6.25
FM
894960
6.25
FM
12401300
6.25
Programming Trunking Systems
Contents
You can program trunking frequencies and conventional frequencies into the same bank to utilize channel space better. That way, you don’t have to waste a whole bank on a trunking system
that has only 5 channels. I typically put my trunking frequencies in (1 trunking system per bank) starting at the beginning of the banks because you probably won't have more than 25 of those,
and then fill up the banks with conventional frequencies.
Channels start at 000 for bank 0, 100 for bank 1, 200 for bank 2 etc.
See also
Programming Conventional Frequencies
.
Motorola frequencies can be programmed in any order. See also
Determining Base/Step/Offset for VHF/UHF Motorola Systems
.
EDACS frequencies have to start at 001, 101, 201, etc. and have to be programmed in LCN (Logical Channel Number) order. You can still use 000, 100, etc. for a conventional frequency.
LTR frequencies also have to be programmed in LCN (Logical Channel Number) order to properly track the system. See also
Repeater Finder Tool
.
Valid Trunking Frequencies:
Note: These scanners will not trunktrack VHF systems.
Motorola Type IIIIi Systems:
Motorola Type I Systems:
Ericsson EDACS Systems:
LTR Systems:
406512 MHz
806900 MHz (except cell freqs)
406512 MHz
406512 MHz
851869 MHz (except cell freqs)
806900 MHz (except cell freqs)
806900 MHz (except cell freqs)
935940 MHz
900956 MHz
900956 MHz
1. In Manual mode select the channel
by entering the bank number and channel number (Ex: 001) then press MAN to advance to the
channel.
Note: You may also change banks by pressing FUNC then
or
(each time) and then change channels by pressing
or
.
Note for EDACS programming: EDACS frequencies have to start in the second channel of the bank (channels 001,101, 201,
etc.), and have to be programmed in LCN (Logical Channel Number) order.
See
Finding EDACS LCN Order
. You can still use
000, 100, etc. for a conventional frequency.
Note for LTR programming: LTR frequencies have to be programmed in LCN (Logical Channel Number) order also.
See also using the
Repeater Finder Tool
.
2. Press PGM then TRUNK
to put the scanner in program and trunk modes.
3. Press MODE until the desired mode,
MOT: none (for Motorola systems), ED: none (for EDACS systems) or LTR:none (for LTR systems)
appears in the display. This sets the talk group ID decoding method for the bank.
4. (Motorola 800 systems only)
Press FUNC then 3
to select the base frequency. Press
or
to select NORMAL or SPLINTER
then
press ENT to save
and return.
Note: Apparently, the default setting of 'Normal' works for most systems. 'SPLINTER' is for systems with splinter channels
(analog 800Mhz systems with frequencies between 866869 MHz [or rebanded 851854 MHz] ending with 0 instead of 5 e.g.
852.1250, not 852.1375). If, after programming, the system won't receive properly, try changing the setting (steps 14).
5. Press PGM
. You should see the channel number in the top of the display and a P before the channel number to show program mode.
6. Use the number keys and decimal point key to enter the frequency
you want to store. If you make a mistake press CL to delete the last digit or press and hold CL to clear all the digits.
Press
ENT
to store the frequency.
Notes: If you entered an invalid frequency (not in the receiver's range), Invalid Freq appears and the scanner beeps. The scanner automatically rounds (down) the entered number to
the nearest valid frequency. For example, if you key in 154.5175 (MHz), your scanner displays 154.515 when you press enter. If you enter a duplicate frequency, Dupl. f and the
channel number of the previous frequency appear and the scanner beeps three times. Press CL to clear or ENT to accept.
7. Press MODE until the desired mode,
MOT: none (for Motorola systems), ED: none (for EDACS systems) or LTR:none (for LTR systems) appears in the display. This sets the talk group ID
decoding method for the channel. This will also stay as default while you are programming the rest of the trunking frequencies.
To set the Attenuation for the channel,
press ATT to toggle the attenuator on or off.
To Program Text for the Bank,
see
Text Tagging a Bank
.
To Program Text for the Channel,
see
Text Tagging a Channel
.
8. Press PGM to advance to the next channel.
Use the number keys and decimal point key to enter the next frequency and press ENT to store. Enter the remaining frequencies the same way.
Press MAN exit programming
.
To Program IDs into the scan lists
see
Programming Talk Group IDs
.
If you Programmed a Motorola Type I or Type IIi system
see
Programming a Fleet Map
.
If you Programmed a Motorola UHF system
see
Programming Offset and Base Frequency
.
Programming a Fleet Map
Contents
Motorola Type I or Type IIi systems require you to program a fleet map. This allows you to receive the talkgroup IDs correctly. If
you don’t know which fleet map to use, you can try a method I found
at
Radio Reference.com
.
.
Since it is rather lengthy, I will just give you the link.
Determining Type I Motorola Fleet Maps
by Dave Goodson. If you know the fleet map by name, E1P1, E1P2, etc., I
have listed 16 preset
fleet maps
so you can see the size codes.
1. In Manual mode select any channel
in the bank
you want to program the fleet map in (Ex: 001) then press MAN to advance to the channel.
2. Press PGM then TRUNK
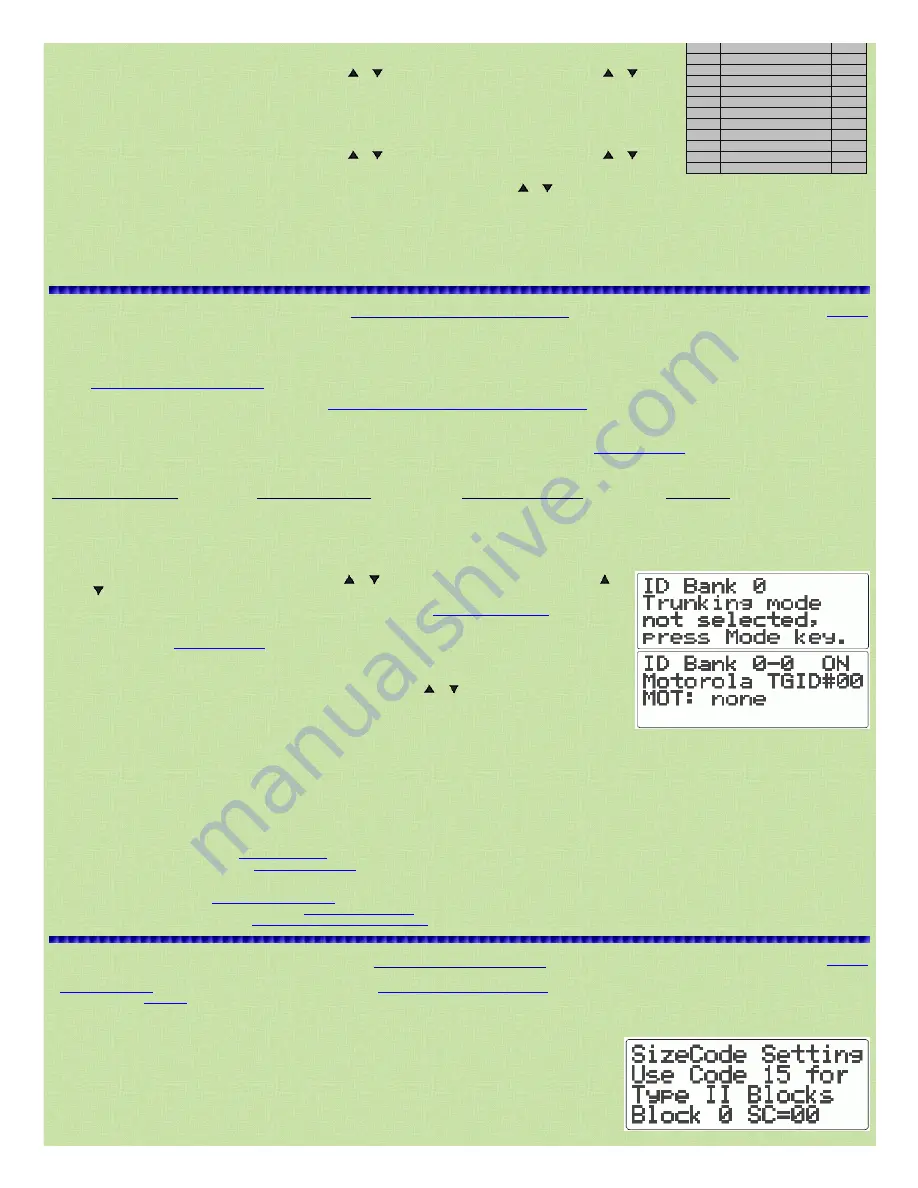
to put the scanner in program and trunk modes. You will see the ID list and MOT: none.
3. Press FUNC then 8.
SizeCode Setting Use Code 15 for Type II Blocks Block 0 SC=00 will appear.
4. Enter the size code
for block 0 (ex:8 for S8). If you make a mistake, press CL to clear the entry.
5. Press ENT
to store the size code for the first block and move to the next block. Program the rest of the block codes the same way. The
ID list will reappear after you program the last block.
Note: If you select size code S12, S13, or S14, these restrictions apply:


