4
Preparation
1.
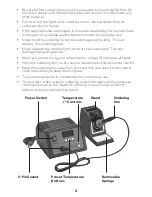
Insert the soldering iron's plug into the 5-pin socket on the
soldering station. The plug only fits one way.
2.
Insert the soldering iron into the support in the soldering stand
and wet the sponge in the tray with water.
3.
Plug the station's power cord into a power source. Switch
POWER
I/O
to
I
to turn the station on. The display shows the current
temperature. The temperature begins to rise until it reaches the
assigned temperature.
Change Temperature Unit
The default temperature unit is Fahrenheit. To change temperature uni
t:
1.
Switch
POWER I/O
to
O
to turn off the station.
2.
Press and hold
PRESET 2
. While pressing, switch
POWER I/O
to
I
to turn the station on. The display will show the temperature
setting changes from °F to °C and vice versa.
3.
Restart the station to start operating it.
Setting the Temperature
The digital soldering station allows you to modify and adjust the
temperature between 302°F (150°C) and 842°F (450°C).
Press
e
or
d
repeatedly to increase or decrease temperature. Press
and hold to increase or decrease rapidly.
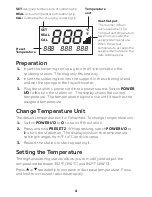
SET
REAL
CAL
888
888
888
888
°C
°F
SET
: Assigned temperature of soldering tip
REAL
: Actual temperature of soldering tip
CAL:
Calibrate after changing soldering tip
Temperature
unit
Heat Output
The number of bars
decreases when the
rising actual temperature
becomes close to the
assigned temperature.
When the actual
temperature exceeds the
assigned temerature, the
bars will disappear.
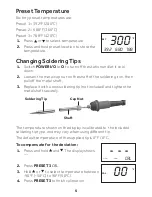
Preset
Temperature


