background image

6

Caution: You must use a Class 2 power source
that supplies 3 volts DC and delivers at least
200 mA. Its center tip must be set to positive

and its plug must fit the clock's 

DC 3V 

jack. The supplied

adapter meets these specifications. Using an adapter
that does not meet these specifications could damage
the clock or the adapter. 

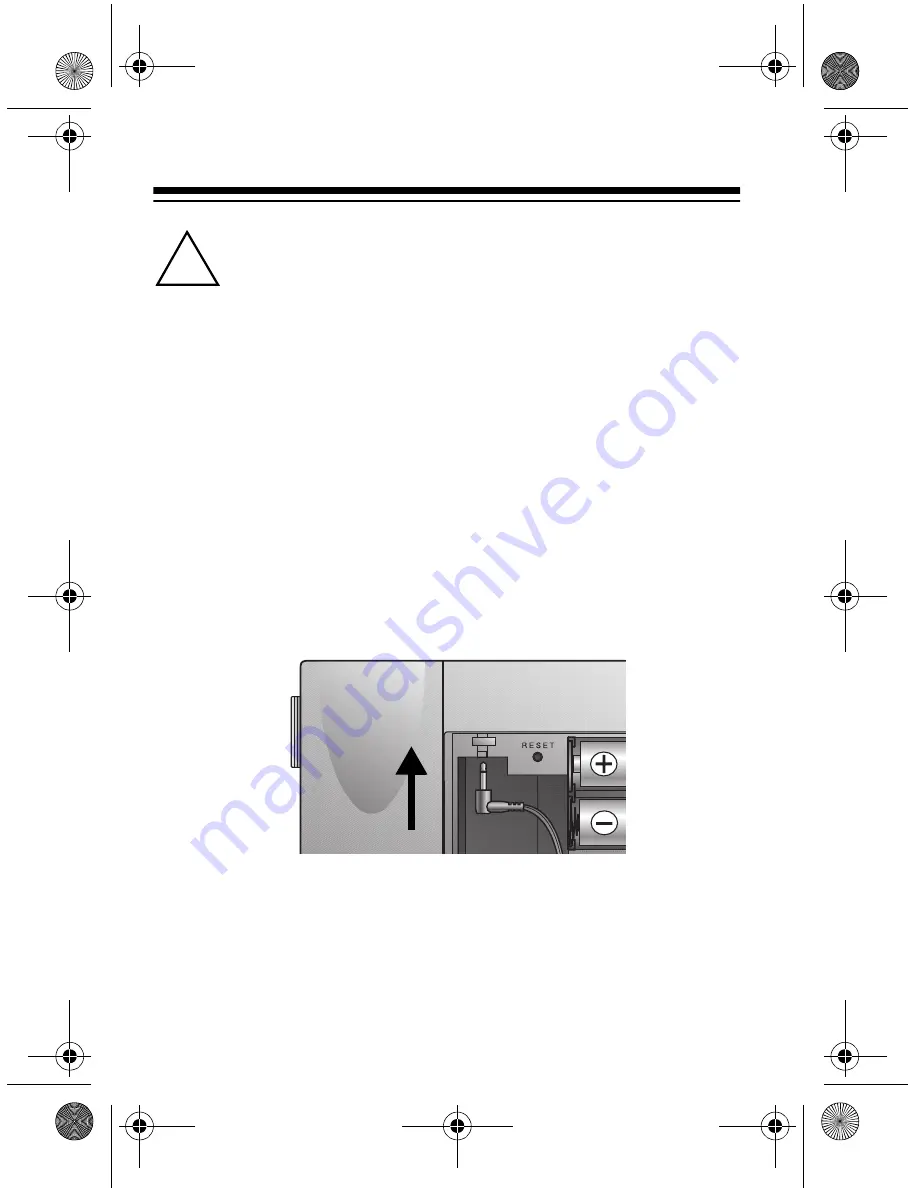
Follow these steps to connect the AC adapter to the
clock.

1. Slide the battery compartment cover in the direction

of the arrow to remove it.

2. Plug the AC adapter’s tip into the jack inside the bat-

tery compartment.

3. Route the adapter’s cord through the slot marked 

DC

3V

 on the back of the clock.

4. Replace the cover.

5. Plug the AC adapter’s other end into a standard AC

outlet.

!

63-969.fm  Page 6  Monday, September 27, 1999  9:19 AM

Summary of Contents for 63-969

Page 1: ...Cat No 63 969 OWNER S MANUAL Please read before using this equipment Projection Clock 63 969 fm Page 1 Monday September 27 1999 9 19 AM ...

Page 2: ... you are in and the date and day of the week appear on the display Crescendo Alarm the alarm sounds a series of beeps that gradually increase in volume Snooze Control temporarily silences the alarm for about 8 minutes so you can sleep a little longer Display Backlight lets you see all information on the display even when it is dark Supplied AC Adapter lets you power the clock s pro jection light t...

Page 3: ...ISK OF ELECTRIC SHOCK DO NOT REMOVE COVER OR BACK NO USER SERVICE ABLE PARTS INSIDE REFER SERVICING TO QUALIFIED PER SONNEL This symbol is intended to alert you to the pres ence of uninsulated dangerous voltage within the product s enclosure that might be of sufficient magnitude to constitute a risk of electric shock Do not open the product s case This symbol is intended to inform you that impor t...

Page 4: ...e and rec ommended type Do not mix old and new batteries different types of batteries standard alkaline or rechargeable or rechargeable batteries of different capacities Follow these steps to install batteries 1 Slide the battery compartment cover in the direction of the arrow to remove it 2 Place the batteries in the compartment as indicated by the polarity symbols and marked inside 63 969 fm Pag...

Page 5: ...language see Setting the Clock on Page 7 3 Replace the cover When BATT appears or the clock stops operating proper ly replace the batteries Warning Dispose of old batteries promptly and properly Do not burn or bury them Caution If you do not plan to use the clock for a month or more remove the batteries Batteries can leak chemi cals that can destroy electronic parts CONNECTING TO AC POWER Your clo...

Page 6: ...pecifications could damage the clock or the adapter Follow these steps to connect the AC adapter to the clock 1 Slide the battery compartment cover in the direction of the arrow to remove it 2 Plug the AC adapter s tip into the jack inside the bat tery compartment 3 Route the adapter s cord through the slot marked DC 3V on the back of the clock 4 Replace the cover 5 Plug the AC adapter s other end...

Page 7: ...advances by 1 with each press Hold down to rapidly advance the hour Note AM appears for AM hours and PM appears for PM hours 4 Press MODE SET The minute digits flash 5 Hold down or repeatedly press to set the minute 6 Press MODE SET The year digits flash 7 Repeatedly press to set the year 8 Press MODE SET The current hour minute and day of the week appear and the month digit flashes 9 Hold down or...

Page 8: ...guage used for the day of the week E for English F for French or S for Spanish appears 13 Repeatedly press to select the desired language 14 Press MODE SET The time time zone and date set tings appear 63 969 fm Page 8 Monday September 27 1999 9 19 AM ...

Page 9: ... the display for about 5 seconds press SNOOZE LIGHT USING THE PROJECTION LIGHT You can use the clock s projection light to project the time on a wall or ceiling To project the time place the clock at least 18 inches from the surface you are projecting onto adjust the pro jection arm to project light onto the surface where you want to see the time then slide PROJECTION LIGHT ON on the back of the c...

Page 10: ...ime by pressing SNOOZE LIGHT The projector lights for about 5 seconds then automatically turns off USING THE ALARM Setting the Alarm Time Note If you do not press a button within about 90 sec onds after you pressed the previous button the clock ex its its alarm setup mode Start over at Step 1 1 Hold down ALARM STOP ALARM SET until the alarm time and appear The hour digit flashes 2 Hold down or rep...

Page 11: ... alarm sounds whether the alarm time is dis played or not Turning the Alarm On Off The alarm automatically turns on when you set an alarm time To manually turn on the alarm press ALARM ON OFF appears At the set alarm time the display lights for about 14 sec onds flashes and the alarm sounds one soft beep every 2 seconds After 20 seconds 2 quick beeps sound every 2 seconds and the volume increases ...

Page 12: ...appens the snooze feature activates and continues to flash In about 8 minutes the alarm sounds again If the alarm turns off automatically a second time remains on the display and the alarm will not sound again until the set alarm time the next day Note When the alarm sounds the projection light and backlight turn on for about 14 seconds To turn off the alarm so it does not sound the next day press...

Page 13: ...k only in normal temper ature environments Temperature extremes can shorten the life of electronic devices dam age batteries and distort or melt plastic parts Keep the clock away from dust and dirt which can cause premature wear of parts Handle the clock gently and carefully Dropping it can damage circuit boards and cases and can cause the clock to work improperly Use only fresh batteries of the r...

Page 14: ...its warranty If your clock is not performing as it should take it to your local RadioShack store for assistance RESETTING THE CLOCK If the clock does not work properly or locks up you can reset it Open the battery compartment and use a pointed object such as a straightened paper clip to press RESET All display segments briefly appear Follow the steps list ed in Setting the Clock on Page 7 to set t...

Page 15: ...bout 8 Minutes Accuracy 0 5 Second Day Dimensions HWD 4 59 16 15 8 Inches 101 6 141 3 41 3 mm Weight Without Batteries 8 5 oz 241 g Without AC Adapter Included Accessory AC Adapter Specifications are typical individual units might vary Specifications are subject to change and improvement without notice 63 969 fm Page 15 Monday September 27 1999 9 19 AM ...

Page 16: ...t and the RadioShack sales receipt as proof of purchase date to any RadioShack store Ra dioShack will at its option unless otherwise provided by law a correct the defect by product repair without charge for parts and labor b replace the product with one of the same or similar design or c refund the purchase price All replaced parts and products and products on which a refund is made become the pro...

Reviews: