background image

Changing the bottom filters

1. Switch off the device and remove the AC plug from the wall socket.

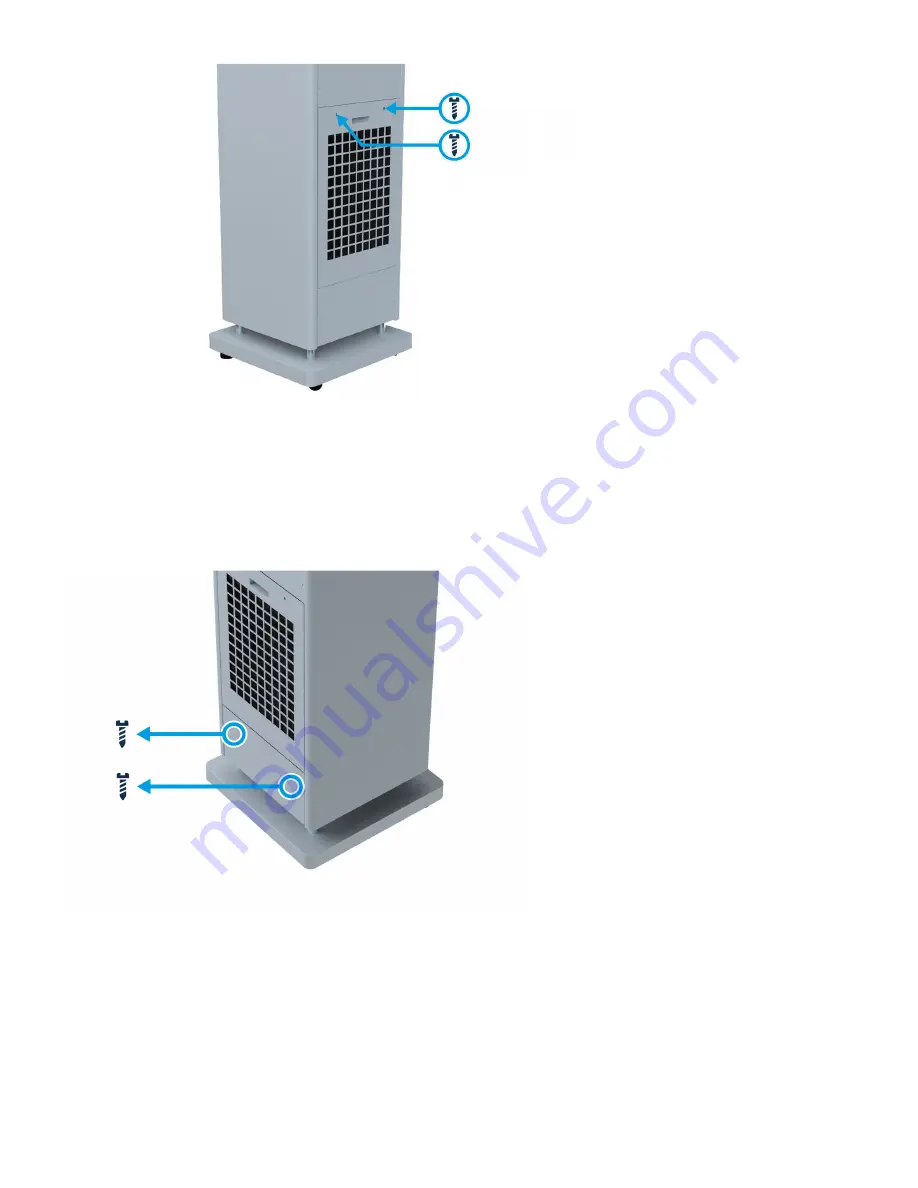
2. Remove the two screws from the bottom filter tray:

3. Grip the filter tray and pull it down towards the floor, then pull it outwards:

Radic8

VK Pro - 1_en

Copyright © 2022 Radic8

Page 33 of 45

Summary of Contents for VK Pro

Page 1: ......

Page 2: ...11 4 1 Package Contents 12 4 2 VK Pro 13 4 3 Control Panel 14 4 4 Remote Control 16 5 Installation 17 6 Operation 21 7 Maintenance 25 7 1 VK Pro Filters 26 7 2 Changing the Filters 28 7 3 Replacing t...

Page 3: ...1 VK Pro User Manual Version 1 0 Document Number VKP 4 10 3 For the latest version of this manual go to radic8 com support Radic8 VK Pro 1_en Copyright 2022 Radic8 Page 3 of 45...

Page 4: ...be responsible for any injury or loss resulting from the user s failure to operate this device in accordance with its user manual as updated from time to time available on www radic8 com Radic8 VK Pro...

Page 5: ...upply mains Wear personal protective equipment PPE such as a disposable face mask and gloves when handling serviceable parts Do not obstruct the device s airflow intakes or outlets Remove batteries fr...

Page 6: ...ith reduced physical sensory or mental capabilities or lack of experience and knowledge provided they have been given supervision or instruction concerning use of the appliance in a safe way and under...

Page 7: ...nly Principle method Mechanical air filtration and UV sterilization This device is equipped with a UV lamp and does not employ ionizers or other ozone generating components Labelling Symbols Follow in...

Page 8: ...iation and is employed on electronic products manufactured or sold in the United States This indicates that the electromagnetic radiation from the device is below the limits specified by the Federal C...

Page 9: ...r in a particular installation If this equipment does cause harmful interference to radio or television reception which can be determined by turning the equipment off and on the user is encouraged to...

Page 10: ...nd or any other electrical power supply reason water or moisture damage abnormal storage abnormal working conditions and any damage caused by consumables and parts not supplied by Radic8 Only Radic8 p...

Page 11: ...is designed for uncompromising clean air performance in busy environments of all kinds It is intended to be used for clean air delivery in large communal or open plan spaces Radic8 VK Pro 1_en Copyri...

Page 12: ...4 1 Package Contents VK Pro User manual IEC power cable plug type based on region Remote control batteries not included Radic8 VK Pro 1_en Copyright 2022 Radic8 Page 12 of 45...

Page 13: ...or Air Quality IAQ sensor Detects VOC and PM levels in Auto mode AC input Power input from the included C13 mains plug Back filter tray Houses back pre filter carbon filter and HEPA filter Bottom filt...

Page 14: ...indicator Indicates when the Reactor Chamber must be replaced by a Radic8 approved technician IR sensor Accepts input from the included remote control LCD display Displays operational and device info...

Page 15: ...Down button Decreases the fan speed Power button Switches the device on or off Radic8 VK Pro 1_en Copyright 2022 Radic8 Page 15 of 45...

Page 16: ...on on the LCD display Up button Increases the fan speed Down button Decreases the fan speed Timer button Cycles down through timer modes of 3 6 or 9 hours Timer button Cycles up through timer modes of...

Page 17: ...ssing the release latch on the back of the remote control remove the battery compartment cover B Insert two AAA batteries not included into the battery compartment Ensure the negative terminals marked...

Page 18: ...le from the bottom of the device 4 Ensure the power plug is securely seated in the AC input Remove batteries from the remote control if not in use for an extended period Radic8 VK Pro 1_en Copyright 2...

Page 19: ...5 Insert power plug into wall socket ensuring correct mains voltage 6 The device will automatically power on in Auto mode Radic8 VK Pro 1_en Copyright 2022 Radic8 Page 19 of 45...

Page 20: ...Radic8 VK Pro 1_en Copyright 2022 Radic8 Page 20 of 45...

Page 21: ...mode Description AUTO Auto The device is in Auto mode FAN 1 Manual Low fan speed FAN 2 Manual Medium fan speed FAN 3 Manual High fan speed FAN 4 Manual Highest fan speed 001 Reactor Chamber replaceme...

Page 22: ...Cs are detected the PM or VOC lights on the control panel will turn yellow The fan speed will automatically increase for greater airflow and rapid filtration When high levels of PM or VOCs are detecte...

Page 23: ...ive However the remote control can still be used to change the device settings To unlock the buttons hold the Power button on the control panel for another five seconds Set the timer The VK Pro has a...

Page 24: ...l panel to turn the Reactor Chamber on or off The UV C text below the UV C button will go dark to indicate the Reactor Chamber is off and illuminate when the Reactor Chamber is switched on When the Re...

Page 25: ...onnected from the mains before conducting any maintenance Always wear personal protective equipment PPE such as a disposable face mask and gloves when replacing the filter s on your device Before hand...

Page 26: ...PA filter Disposable Replace when the filter replacement indicator illuminates The filters should always be arranged in the filter trays with the pre filter closest to the outside of the device the ca...

Page 27: ...Internal External Radic8 VK Pro 1_en Copyright 2022 Radic8 Page 27 of 45...

Page 28: ...ead FILT Please contact your local Radic8 distributor to purchase replacement HEPA and carbon filters Changing the back filters 1 Switch off the device and remove the AC plug from the wall socket 2 Re...

Page 29: ...o the four filter grid screws and slide out the filter grid 5 Remove the HEPA filter and carbon filter from the filter tray and safely dispose of them Radic8 VK Pro 1_en Copyright 2022 Radic8 Page 29...

Page 30: ...damp dust cloth 7 Ensure the pre filter is completely dry and reinsert it into the filter tray towards the external side of the tray Insert a new carbon filter in the middle of the filter tray Radic8...

Page 31: ...towards the internal side of the tray Ensure the arrow on the HEPA filter label points towards the inside of the device 9 Reinsert the filter grid and secure with the four filter grid screws Radic8 V...

Page 32: ...10 Reinsert the back filter tray into the device and push it back into place 11 Secure the back filter tray with the two screws Radic8 VK Pro 1_en Copyright 2022 Radic8 Page 32 of 45...

Page 33: ...the device and remove the AC plug from the wall socket 2 Remove the two screws from the bottom filter tray 3 Grip the filter tray and pull it down towards the floor then pull it outwards Radic8 VK Pro...

Page 34: ...o the four filter grid screws and slide out the filter grid 5 Remove the HEPA filter and carbon filter from the filter tray and safely dispose of them Radic8 VK Pro 1_en Copyright 2022 Radic8 Page 34...

Page 35: ...n it with a damp dust cloth 7 Ensure the pre filter is completely dry and reinsert it into the bottom of the filter tray Insert a new carbon filter in the middle of the filter tray Radic8 VK Pro 1_en...

Page 36: ...op of the filter tray Ensure the arrow on the HEPA filter label points towards the inside of the device upwards 9 Reinsert the filter grid and secure with the four filter grid screws Radic8 VK Pro 1_e...

Page 37: ...10 Slide the filter tray back into the device 11 Secure the back filter tray with the two screws Radic8 VK Pro 1_en Copyright 2022 Radic8 Page 37 of 45...

Page 38: ...old the Up button on the control panel for five seconds to reset the filter timer Cleaning the pre filter The pre filters in the back and bottom filter trays can be cleaned and reused Radic8 recommend...

Page 39: ...laced Please contact your local Radic8 distributor or a Radic8 approved technician to have the Reactor Chamber replaced Radic8 will provide the necessary servicing information and guidance as requeste...

Page 40: ...of the device to remove excess dust If using a cleaning product spray the product directly onto the cloth before wiping the device Radic8 recommends using an 85 alcohol based sanitizer for cleaning th...

Page 41: ...irflow The pre filter may need to be cleaned and the HEPA filter replaced Ensure the device s airflow intake or outlet are not obstructed Consider increasing the fan speed The timer preset does not wo...

Page 42: ...device will power off Er 3 Micro switch error The device will power off Er 4 Input PCB error The device will not power on Er 5 Device memory error The device will not power on In the event of any of t...

Page 43: ...ations Model VK Pro Description Air Purifier Mode of operation Continuous Weight 34 8kg 76 72lbs Dimensions mm 1570 H x 370 W x 370 D Dimensions in 61 8 H x 14 6 W x 14 6 D Coverage 1 ACH 280m2 Covera...

Page 44: ...ation Freestanding Air changes per hour based on 2 4m 7 8ft ceiling height Sound pressure level calculated from sound power level as tested against ISO 3744 Measured at highest fan speed The built in...

Page 45: ...adic8 distributor or a Radic8 approved technician Radic8 PTE Ltd 9 Raffles Place 27 00 Republic Plaza Singapore 048619 info radic8 com The model and serial number can be found on the label on the devi...

Reviews: