background image

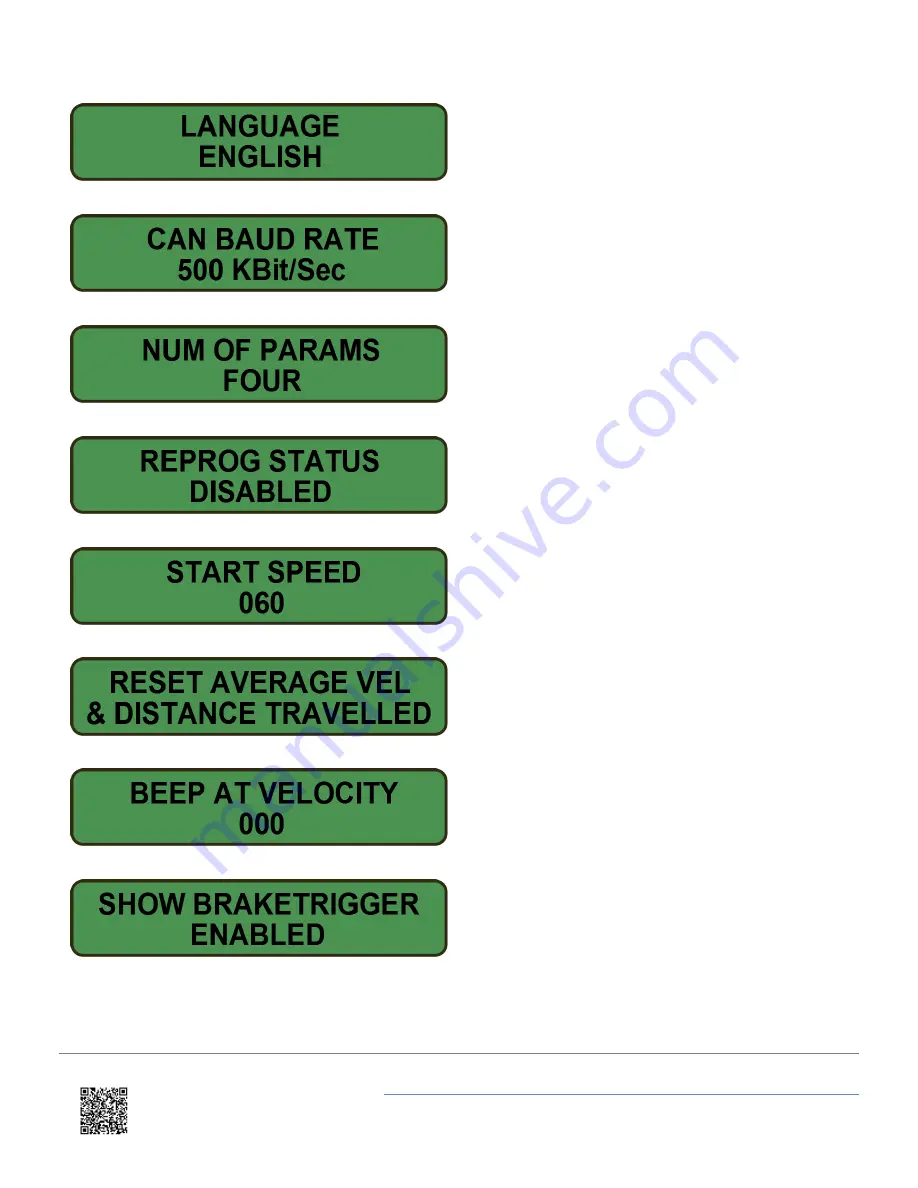
Change the display menu language. Select using arrow
keys and press OK to set.

Select the CAN BAUD RATE. Options available are
125Kbs, 250Kb/s, 500Kbps and 1Mbps. Note 500Kbps
is the default VBOX baud rate.

Change the number of parameters shown in the main
screens. Use the arrow keys to select either two or four.

Press OK to enable/disable for firmware upgrades. After
upgrade is complete, status must be manually disabled.
If using a thermal printer, this must be disconnected
before firmware upgrade status is enabled.

Select accel or decel test and set start & end speeds for
each test. Arrow keys increase/decrease the value, OK
key moves to next digit. Target distance can also be
defined here.

OK will reset Average Velocity and the Distance
Travelled. Note, Average Velocity is calculated from
VBOX turn on and not from first movement.

Define a velocity at which the MFD will momentarily
beep.

Enable/disable on screen Brake Trigger message when
the Brake Trigger is pressed.

https://racelogic.support/01VBOX_Automotive/06Displays/Multi-Function_Display_(MFD)/

12

Summary of Contents for RLVBDSP03-24

Page 1: ...eens 03 MFD Data Display Options 04 MFD Menu Options 05 MFD Setup VBOX Tools 06 MFD Display Parameter Tables 07 MFD Thermal Printer 08 MFD Firmware Upgrade 09 MFD CAN Output 10 MFD PIN OUTS 11 MFD Tec...

Page 2: ...d are used for connection to the VBOX CAN bus and to supply power to the display The bottom left and bottom right connectors are serial connections The function of these connectors is to allow firmwar...

Page 3: ...ay The left and right arrow keys are used for selecting a menu item or cycling through the display screens When power is applied the display will revert to the data display mode https racelogic suppor...

Page 4: ...uccessful 6 Press the left arrow button until the display shows BACK Press OK Repeat this step once more to return to the main screen Mounting The MF display is supplied with a windscreen suction moun...

Page 5: ...oll to a new test the test name and start and end conditions are momentarily displayed then the screen shows three parameters Velocity Time and Distance Pre test setup From any one of the eight Pre se...

Page 6: ...e the left and right arrow keys to scroll through an alphanumeric list then press OK to confirm and proceed to the next character up to 10 characters Press OK choose between ENABLED and DISABLED With...

Page 7: ...in this mode will cycle through the 13 screen layouts Some screens will display a title page which will timeout after approximately one second if no buttons are pressed The title pages are to inform t...

Page 8: ...is shown next to each section of channel data A list of all the parameter codes used by the MF Display can be found on page 06 MFD Display parameter tables If only two parameters are displayed then t...

Page 9: ...are commonly used in brake testing the majority of which require the use of a brake trigger switch with the VBOX Accel parameters are used in acceleration tests and CAN parameters are from external mo...

Page 10: ...Pressing OK when this is highlighted will exit the currently selected sub menu Main Menu Define the displayed parameters in both main screens Settings such as Contrast Backlight brightness and units...

Page 11: ...next parameter on the display The 2 indicates that the field being edited is on main screen 2 Press OK to return to the main menu Config Display Menu Adjust brightness of the backlight Adjust the bri...

Page 12: ...a thermal printer this must be disconnected before firmware upgrade status is enabled Select accel or decel test and set start end speeds for each test Arrow keys increase decrease the value OK key m...

Page 13: ...efine up to four distances for drive by noise testing When these are crossed the display will beep Version Menu Hardware Version Firmware version Unit serial number Press OK to return to the main menu...

Page 14: ...minimum The target value will be at 50 of the full scale I e if a minimum value of 0 is entered and a target value of 20 the maximum value will auto set to 40 Lap Timing Menu The setup method is the...

Page 15: ...mes to be viewed after the event Press OK to clear all start finish and split lines stored in memory Change whether split time is time from start finish line ON or time from previous split point OFF C...

Page 16: ...on the image of the MFD logo in the tab in Multifunction Display tab will bring up a set up window From within this window all of the functions and display parameters of the MFD can be set To change a...

Page 17: ...screen for Lap Timing functions of the MFD Note that from the Lap Timing setup page Lap and Split positions can be downloaded from or uploaded to the VBOX https racelogic support 01VBOX_Automotive 06D...

Page 18: ...the start and end criteria for the Accel and Decel tests can be set These Accel and Decel tests run concurrently when either of the Main Screens are displayed https racelogic support 01VBOX_Automotiv...

Page 19: ...ty km h or mph AG Lateral Acceleration g GA Max Lateral Acceleration g OG Longitudinal Acceleration g AV Average Velocity km h or mph D0 Distance Travelled m or ft V0 Vertical Velocity 2 m s or ft s V...

Page 20: ...Peak deceleration g AD Average deceleration click for description m s DO Average deceleration 2 click for description g DD MFDD MFDD OD Corrected distance m or ft ST Deceleration time s DS Decelerati...

Page 21: ...o enter this submenu Note To allow the MFD to read the available CAN channels it must be connected up to a VBOX and VBOX Setup entered Failure to do so will result in this list being blank or incomple...

Page 22: ...me s LL Last lap time s LS Last Split Time s SV Vel Last Split km h or mph LD Lap Count NA AL Average Lap Time s VL Velocity km h or mph LT Lap Time s V0 Velocity at start finish line km h or mph S1 S...

Page 23: ...By Noise Parameters Code Name Units TV Velocity at microphone km h or mph SV Velocity at start line km h or mph LV Velocity at finish line km h or mph AA Acceleration between mid point and finish line...

Page 24: ...ion PRINT LAP TIMES press OK to print On completion of an acceleration deceleration test the time taken and start end speeds will be printed automatically After travelling the set distance as set in t...

Page 25: ...t in up to a 4 phase pattern to provide status information Generally if the LED is flashing on and off it indicates that the printer is running from a battery pack steady illumination means that the b...

Page 26: ...e serial ports on the MFD When the display is connected and setup double click on the firmware file to start the upgrade Racelogic Upgrader software should be launched simply select the correct COM po...

Page 27: ...Travelled Unused 0x505 Unused 14 Start_Speed 15 Test_Time Unused 0x506 Unused 16 End_Speed 17 Distance_Travelled Unused 0x507 Unused 18 Target_Distance 19 Velocity_atTarget_Dis Unused 0x508 Unused 20...

Page 28: ...est 1 km h mph per bit 15 Time taken to go from start speed to end speed for decel tests 0 01 seconds per bit 16 End speed for decel test 1 km h mph per bit 17 Distance travelled during decel test 0 0...

Page 29: ...Test Number 1 8 i e Test 1 ID 0x511 Test 2 ID 0x512 Test 3 ID 0x513 Test 4 ID 0x514 Test 5 ID 0x515 Test 6 ID 0x516 Test 7 ID 0x517 Test 8 ID 0x518 All of the data below is sent twice at the end of a...

Page 30: ...Top Left and Top Right Lemo 5 PIN PIN I O Function 1 O RxD Serial Data Transmit COM2 2 3 I O CAN High 4 I O CAN Low 5 O 12 V Power Chassis Ground https racelogic support 01VBOX_Automotive 06Displays...

Page 31: ...TxD Serial Data Transmit COM1 Firmware Upgrade 2 I RxD Serial Data Receive COM1 Firmware Upgrade 3 O Digital Output 1 Lap pulse toggle 4 O Digital Output 2 Unused 5 O 12 V Power Chassis Ground https...

Page 32: ...r Input Voltage Range 12 24 V DC 10 Mounting Either Velcro mounting suction cups or 1 4 20 screw mounting Weight approximate 400 g 14 1 oz Display 20 x 2 Line LCD with contrast control and adjustable...

Page 33: ...Data Operating Temp 0 60 C Storage Temp 40 to 85 C https racelogic support 01VBOX_Automotive 06Displays Multi Function_Display_ MFD 33...

Page 34: ...24 VBOX Connection cable 1 RLCAB005 Suction Mount 1 RLVBACS041 Optional Accessories Description Product Code Serial cable for firmware upgrade RLCAB001 Unterminated 5W Lemo cable RLCAB015 MF Display...

Page 35: ...is out of range click for details Callstack at Template Custom Views PDFPageFooter content body pre line 11 column 13 at template at VBOX Automotive https racelogic support 01VBOX_Automotive 06Display...

Page 36: ...VBOX Motorsport LabSat GNSS Simulators VBOX Mining https racelogic support 01VBOX_Automotive 06Displays Multi Function_Display_ MFD 36...

Reviews: