background image

QUIETCOOLSYSTEMS.COM

7

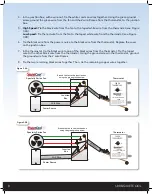
5.  Tie the black wire from the power source to the remaining black wire from the thermostat.

6.  Using the ground screw in the thermostat, ground your power source and the green wire from the    

 fan.

7.  Mount the thermostat to one of the joists near the attic fan.

WELCOME

INST

ALLA

TION

WIRING

OPERA

TION

W

ARRANTY

Ground the fan and power to the thermostat 

using the green ground screw

Specialty Series Fan

Power Source

14-2 Wire

14-2 Wire

60°

Thermostat

FAN ON

TEMPERATURE

90°

120°

®

ADJUSTABLE

TEMPERATURE THERMOSTAT

CAUTION

Automatically started device - to reduce the

risk of injury disconnect from power supply

before servicing.  For residential use only.  See

instructions for wiring diagram.

60°

ADVANCED ATTIC GABLE FANS

®

Low Speed

High Speed

Figure 3.1A

Ground the fan and power to the thermostat 

using the green ground screw

Specialty Series Fan

Power Source

14-2 Wire

14-2 Wire

60°

Thermostat

FAN ON

TEMPERATURE

90°

120°

®

ADJUSTABLE

TEMPERATURE THERMOSTAT

CAUTION

Automatically started device - to reduce the

risk of injury disconnect from power supply

before servicing.  For residential use only.  See

instructions for wiring diagram.

60°

ADVANCED ATTIC GABLE FANS

®

Low Speed

High Speed

Figure 3.2B

3.2    REMOTE THERMOSTAT WIRING

1.  For this installation, you will need a 2 wire Romex, junction box, and a thermostat. 

2.  Open up the thermostat that is connected to the fan. Remove the power cord. Remove the bracket    

  mounting the thermostat to the flex tubing and remove the thermostat. Mount a junction box to  


  the flex tubing with the included bracket and mount the junction box. Bring your 2 wire romex from    

  the power source into the junction box. 

3.  Mount the thermostat in the best location for thermostat readings. Run a 2 wire Romex from the  


  junction box to the thermostat. Tape the white wire on each side of the 2 wire Romex to indicate that  

  it is a switch leg.

Summary of Contents for AFG PRO-2.0

Page 1: ...DO NOT THROW AWAY SERIAL NUMBER FOR FAN IS LOCATED ON THE BACK COVER OF THE OWNER S GUIDE LEAVE WITH HOMEOWNER OWNER S GUIDE PRO ATTIC GABLE FAN AFG PRO 2 0...

Page 2: ...STEMS COM WARNINGS CAUTION This unit has an unguarded impeller Do not use in locations readily accessible to people or animals CAUTION Do not operate any fan with a damaged cord or plug Discard fan or...

Page 3: ...standard thermostat this attic fan will transform your attic into a cool oasis QuietCool Attic Fans work almost everywhere anytime During the summer an attic can be 40 50 degrees hotter than the outsi...

Page 4: ...or effectively as it could with 1 750 attic venting But don t worry the system will still operate if there is not enough venting Insufficient venting is a very simple problem to fix Roofing contractor...

Page 5: ...Mount The AFG can be mounted on a wide louver but additional mounting steps must be taken in order for the fan to work properly As shown in Figure 2 1B two additional boards must be fastened to the bo...

Page 6: ...ced electrician NOTE Your fan came with the Adjustable Thermostat pre wired on High Speed to a power cord for testing purposes before installation If you would like to hard wire the fan or it is requi...

Page 7: ...d screw Specialty Series Fan Power Source 14 2 Wire 14 2 Wire 60 Thermostat FAN ON TEMPERATURE 90 120 ADJUSTABLE TEMPERATURE THERMOSTAT CAUTION Automatically started device to reduce the risk of injur...

Page 8: ...2 wire Romex 8 Tie the two remaining black wires together Then tie the remaining copper wires together Ground the fan to the junction box using the green ground screw Specialty Series Fan Junction Box...

Page 9: ...rature is at or above the set temperature To change the setting of the thermostat simply take a screwdriver and twist the dial The thermostat also includes a Fire Fuse that will turn off the attic fan...

Page 10: ...armer months of the year With an attic fan running during the summer we have seen attic temperature maintain as low as a 5 F difference between the outside temperature and the attic temperature WINTER...

Page 11: ...from the operation of our equipment or any malfunction thereof 2 Cost of service calls to diagnose the cause of problems or the labor charge to un install any components 3 Product failure or damage d...

Page 12: ...FAN SERIAL NUMBER INFORMATION RETAIN FOR YOUR RECORDS SERIAL NUMBER IS REQUIRED FOR WARRANTY PURPOSES 1 888 QUIETCOOL WWW QUIETCOOLSYSTEMS COM Rev 4 16 20...

Reviews: