


language selection will be prompted automatically when starting this product for the first
time.
Volume Control — uses can define the rotating direction of the volume knob for volume
up or down. (Available for software version 1.0.5 and higher.)
Volume Lock — when the Volume Lock is “ON”, volume can’t be adjusted; when the
Volume Lock is “OFF”, volume can be adjusted. (Available for software version 1.0.5
and higher.)
Fixed volume setting (Startup volume) — "last setting" (remains the same volume as
before shutdown), "fixed" (predetermined startup volume. See "Power on volume" )
Press the "OK" key to enter edit mode, then use the "Helm" or the "Left" and "Right"
keys to change selection, then press the "OK" key to select. Press the "Main menu" or
“Back Menu” to return to the "Main" menu.
Power-on volume — 1~60 (See "Startup volume" if it is set to "Memory", this parameter
can not be adjusted). Press the "OK" key to enter edit mode, then use the "Helm" or the
"Left" and "Right" keys to change selection, then press the "OK" key to select. Press the
"Main menu" or “Back Menu” to return to the "Main" menu.
Line out volume — "Maximum" or "Adjustable". Press the "OK" key to enter edit mode,
then use the "Helm" or the "Left" and "Right" keys to change selection, then press the
"OK" key to select. Press the "Main menu" or “Back Menu” to return to the "Main" menu.
Gain-"H",”M” or "L" (High, Medium or Low
)
. Press the "OK" key to enter edit mode,
then use the "Helm" or the "Left" and "Right" keys to change selection, then press the
"OK" key to select. Press the "Main Menu" or "Back Menu" key to return to the "Main"
menu.
EQ Setting-“OFF”, “EQ 1” or “EQ 2”. (Toggles between bypass, EQ 1 and EQ 2. Note:
There will be a 6 db drop in volume when EQ1 or EQ2 are engaged) Press the "OK" key
time (See "Sleep timer"). Press the "OK" key to change selection. Press the "Main
menu" to return to "Main" menu.
EQ 1- (Equalizer settings) Press the "OK" key to enter edit mode, then use the "Left"
and "Right" keys to select band, then use the "Helm" to raise or lower setting. Press the
"Main Menu" or "Back Menu" key to exit or return to the "Main" menu.
EQ 2- (Equalizer settings) Press the "OK" key to enter edit mode, then use the "Left"
and "Right" keys to select band, then use the "Helm" to raise or lower setting. Press the
"Main Menu" or "Back Menu" key to exit or return to the "Main" menu.
Update media lib — "Manual" or "Auto". Updates the media library after inserting a
Micro SD card or the player is connected to a computer. To update manually press the
"OK" key to enter edit mode, then use the "Helm" or the "Left" and "Right" keys to select
"Manual", then press the "OK" key to begin update. Under automatic mode the media
library is automatically updated when the unit is disconnected from a computer. To
update automatically press the "OK" key to enter edit mode, then use the "Helm" or the
"Left" and "Right" keys to select "Auto", then press the "OK" key to select. Never
reconnect the computer during the upgrading process. Press the "Main menu" or "Back
Menu" to return to the "Main" menu.
Flip Function — "on" or "off". When "on", the "Next song" and "Previous song" keys
become page advance keys for navigating long song lists. Press the "OK" key to
change selection. Press the "Main menu" or "Back Menu" to return to the "Main" menu.
OK key to wake up — "on" or "off". When "on", pressing the "OK" key will activate the
display backlight if off. Press the "OK" key to change selection. Press the "Main menu"
or "Back Menu" to return to the "Main" menu.
Screen shutdown — "On" or "Off". When set to "On" the backlight for the display will
shut off automatically (see “Screen shutdown time”). When set to "Off" the display
backlight will remain on unless turned off manually by pressing the "Power" key. Press
the "OK" key to change selection. Press the "Main menu" to return to the "Main" menu.
Note: When the backlight is off, the player is in "Lock screen" mode, and all function
keys are disabled. To exit "Lock screen" mode press the "Power" key.
Screen shutdown time — "10s", "20s", "30s", "60s", "120s" (measured in seconds). (If
“Screen shutdown” is set as “Off”, this parameter can not be adjusted). Press the "OK"
key to enter edit mode, then use the "Helm" or the "Left" and "Right" keys to change
selection, then press the "OK" key to select. Press the "Main menu" or "Back Menu" to
return to "Main" menu.
Brightness — 1~10. Adjusts display backlight brightness. Press the "OK" key to enter
edit mode, then use the "Helm" or the "Left" and "Right" keys to change selection, then
press the "OK" key to select. Press the "Main menu" or "Back Menu" to return to "Main"
menu.
Home Screen Mode — 1~4. Select different default display backgrounds. Shows when
songs without cover art play. Press the "OK" key to enter edit mode, then use the
"Helm" or the "Left" and "Right" keys to change selection, then press the "OK" key to
select. Press the "Main menu" to return to "Main" menu.
Vibrate — "On" or "Off". When set to "On", the four touch keys will give a vibration
prompt when activated. Press the "OK" key to change selection. Press the "Main
menu" to return to "Main" menu.
Idle poweroff — "On" or "Off". When set to “On”, the system will shut down automatical-
ly when the earphone output, line output or optical fiber output are not connected and
no operation is made for 10 minutes in order to save power. Press the "OK" key to
change selection. Press the "Main menu" to return to "Main" menu.
Sleep—"On" or "Off". When set to "On", unit will shut down automatically after a preset
time (See "Sleep timer"). Press the "OK" key to change selection. Press the "Main
Menu" or "Back Menu" key to return to "Main" menu.
Sleep timer — 10, 20, 30, 60, 120 minutes. Press the "OK" key to enter edit mode, then
use the "Helm" or the "Left" and "Right" keys to change selection, then press the "OK"
key to select. Press the "Main Menu" or "Back Menu" key to return to "Main" menu.
About QP1R — information about firmware version, storage information and
instructions for firmware upgrading via Micro SD card. Press the "OK" key to view.
Press the "Main Menu" or "Back Menu" key to return to "Main" menu.
Storage formatting — format the internal memory and external Micro SD cards. Press
the "OK" key to enter edit mode, then use the "Helm" or the "Left" and "Right" keys to
select "Internal Storage", "TF Card1" or "TF Card 2" to be formatted, then press the
"OK" key, then use the "Helm" or the "Left" and "Right" keys to select “Yes” (will
highlight in blue) and then press the "OK" key to begin format (the process may take
several minutes). Warning: formatting will erase all files permanently, there is no
"undo". Press the "Main Menu" or "Back Menu" key to return to "Main" menu.
Factory restore-Reset to factory defaults. Press the "OK" key, then use the "Helm" or
the "Left" and "Right" keys to select “Yes” (will highlight in blue) and then press the "OK"
key.
Upgrade —To upgrade firmware; Shut down the player by pressing the "Power" key
until the "Questyle" logo appears and begins to fade out. Copy the q1.fw (do not
rename file) document to a blank Micro SD card and then insert it into the TF card 1 slot
of the player. Start the player by pressing the "power" key until you feel a slight
vibration. Use the "Helm" or the "Left" and "Right" keys to select “System settings” and
press the "OK" key, then use the "Helm" or the "Left" and "Right" keys to select
“Upgrade” and press the "OK" key, then use the "Helm" or the "Left" and "Right" keys
to select “Yes” (will highlight in blue) and then press the "OK" key, wait until the firmware
upgrade is finished (a progress bar will appear, do not power off during upgrade
process, the player will automatically reboot, may take several minutes). Press the
"Main Menu" or "Back Menu" key to return to "Main" menu.
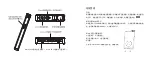
Playing control and shortcut menu
Press the “Back Menu” key while in the "Now Playing" interface, to enter the list of
songs to be played.
Press the “Menu” key under the "Now Playing" interface and it will return to the "Main"
menu interface. If a song is playing, press the “Back Menu” key and it will return to the
"Main" menu interface and then press the “Back Menu” key and it will return to the "Now
Playing" interface.
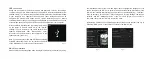
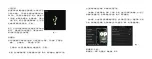
While in the "Now Playing" interface, press and hold the “Menu” key and the "Shortcut
menu" will pop up showing the “Favorites”, “Add to playlist” and “Delete song” icons.
Select the "Favorites" icon using the "Helm" or the "Left" and "Right" keys, then press
the "OK" key to add the song to the "Favorites" menu. Select the "Add to playlist" icon
using the "Helm" or the "Left" and "Right" keys, then press the "OK" key to add the song
to a "Playlist". Select the "Delete song" icon using the "Helm" or the "Left" and "Right"
keys, then press the "OK" key to permanently delete the song from the internal memory
or Micro SD card. Press the "Menu" key to exit the "Shortcut menu".
If a song is being played, keep pressing the “Back Menu” key and it will return to the
"Now Playing" interface.
Cautions and reset
Attention
This product does not resist water and dust, never use in extremely hot or extremely
cold environments. The safe environmental temperature for this product is between 0
℃
~40
℃
. To avoid damage, do not drop this product. Charge this product at least once a
month, to maintain battery life.
This product will shut down automatically if the charge drops below 2% on the battery
indicator (if the charge drops below 10%
,
the battery icon will turn red). Please charge
it immediately.
Reset
In case of system crash, (or if the function keys do not work after pressing), please
press and hold the “Power” key for more than 10 seconds to reset the system. After
reset, restart the player by pressing the "Power" key until the unit vibrates. If no songs
appear on song lists, power off the unit, remove the Micro SD cards, then power the unit
back on. Once normal function is restored, power off the unit, reinstall the Micro SD
cards, power on the unit, then manually upgrade the media library.


