background image

Time Stamp

- When a blank SD-card is inserted, the camera will create a  ‘txt ’ file (TIMEREST.txt) to give you the opportunity to display the
  time/date data on your video/photo. The format is 

20181031152035 Y

 (for display) and 

  Open the TIMEREST.txt in a text editor and set the correct date and time as well as ‘Y’ or ‘N’ at the end to dispay or not the
  time stamp in your video/photo. Directly after saving the file, insert the card in the camera and power the camera to update the
  internal clock.

20181031152035 N

 (for no display).

Press and hold

  again the ‘Mode’ button. During this maneuver a red LED, a blue/red LED and a blue LED are flashing several times. After that,
  all the LEDs are going off. The camera is now in 1080p motion detection. The camera will now record a sequence of a minimum
  of 1 minute. As long as a movement is detected the camera will continuously record (up to 5 minutes sequence maximum). After
  saving this sequence, the camera will stop recording. The Led is still off, but the motion detection mode remains activated. Once
  a new movement is detected, the camera begins again to record as long as a movement is detected (5 minutes sequence max).
  A new movement detection is reported by a short blue/red flashing LED. Stop the detection mode by pressing the on/off button.
  To power off the camera, (in standby or motion detection mode), push and hold the on/off button until a fast blinking blue LED is
  visible. After that the LED goes off and the camera is turned off

Power the camera and wait until the blue LED is lighting. Press the ‘Mode’ button one time to change to 1080p. 

5/7

Resetting the camera

- As indicated in the manual, you should be able to reset the camera by inserting a small object in the reset hole. Unfortunately,
  there exists no reset hole. If I find a solution, I will indicate it in a next update.

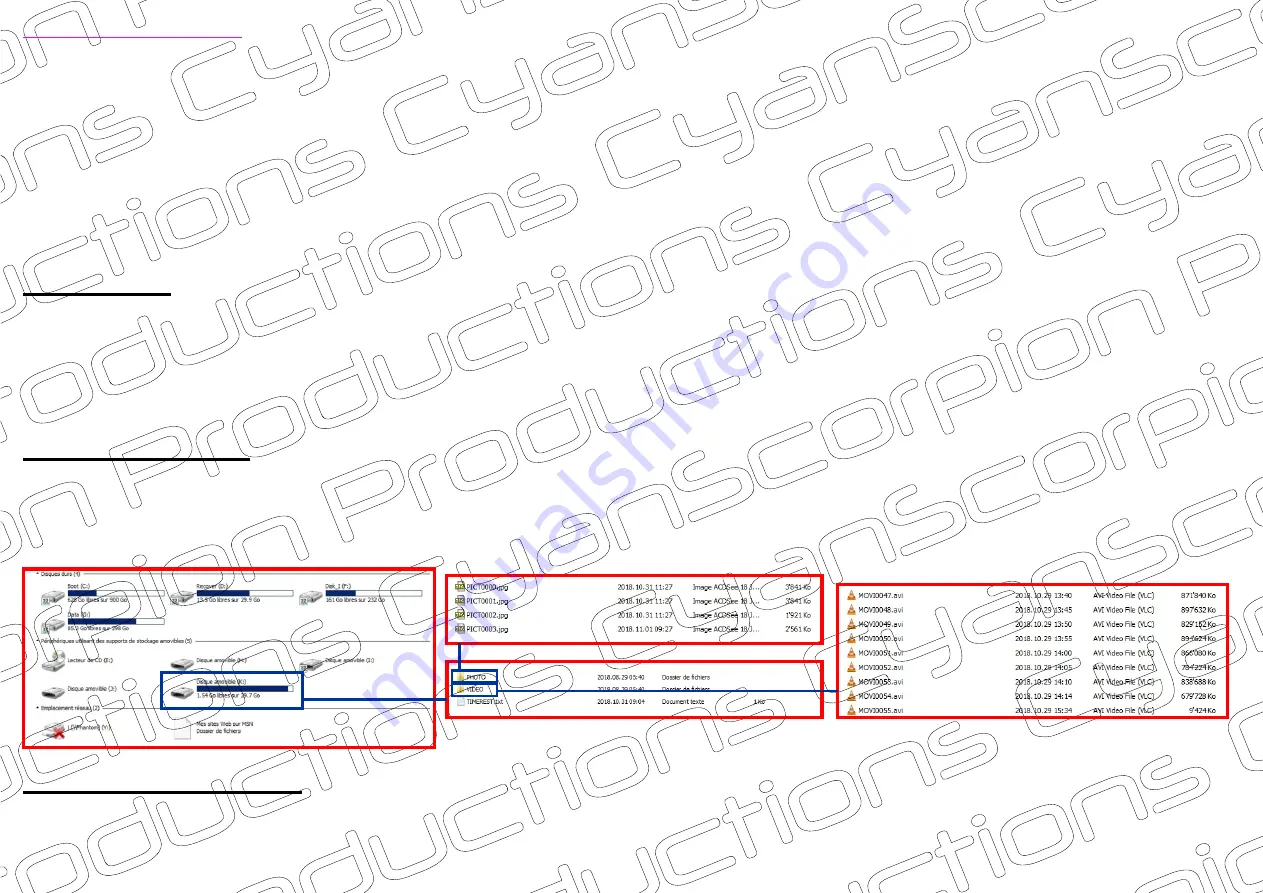
SD-card directory

Computer drive letter

SD-card directory

Photo folder

Photo folder

- When you connect the camera to your computer, the mass storage device becomes visible and is indicated by a drive letter. You
  can also take out the card and use it with a card reader. The SD card directory consists of a photo folder, a video folder, and the
  file for the timestamp.

1080p motion detection

Summary of Contents for A3s mini

Page 1: ...ver 1 0 November 01 2018 Index 1 Main page 2 Properties Video and photo info 3 Operations Charging Video recording 4 Dashcam use Photo shooting Motion detection 5 Time stamp SD card directory Resetting the camera 6 Webcam use 7 TV connection ...

Page 2: ...Properties Info video data Info photo data 2 7 ...

Page 3: ... button the LED is turning from blue to blue red Push one time the on off button to begin recording The LED is flashing three times blue red and the recording in begins During recording no LED are lit Push again the on off button and the recording stops The state of the LED returns to blue red To enter again the mode push two times the Mode button The LED is showing again a solid blue To power off...

Page 4: ...y is nearly empty the camera will automatically save the last sequence and power the device off Photo shooting In standby mode blue LED is lighting change to by using the Mode button Push two times the Mode button the LED is turning from blue to blue red and than to red Take a by pressing the on off button The red LED is briefly going off than returns to solid red A photo was taken To return to vi...

Page 5: ...on mode remains activated Once a new movement is detected the camera begins again to record as long as a movement is detected 5 minutes sequence max A new movement detection is reported by a short blue red flashing LED Stop the detection mode by pressing the on off button To power off the camera in standby or motion detection mode push and hold the on off button until a fast blinking blue LED is v...

Page 6: ...mpletely installed Now push the on off button Supplemental video and audio drivers will be installed During all these operations the red LED flashes no matter if your are in video mode or in charging access mode note you do not need to remove the SD card Next time you connect the camera to the computer the camera will directly start in charging access mode You need to push the on off button to swi...

Page 7: ...ra directly to your TV s AV input using the provided cable On the TV select AV as your input Now turn on your camera and an image in 720p is displayed Note you can only display a live image A B C It is not possible to playback recorded files on TV A B C If you want to use your camera as a surveillance camera I also recommend connecting an external power source 7 7 ...

Reviews: