background image


GNSS  Module  Series 

                                                                L26-DR  EVB User Guide 

L26-DR_EVB_User_Guide                                                                 12 / 28 


3.4. Switches and Buttons 

 
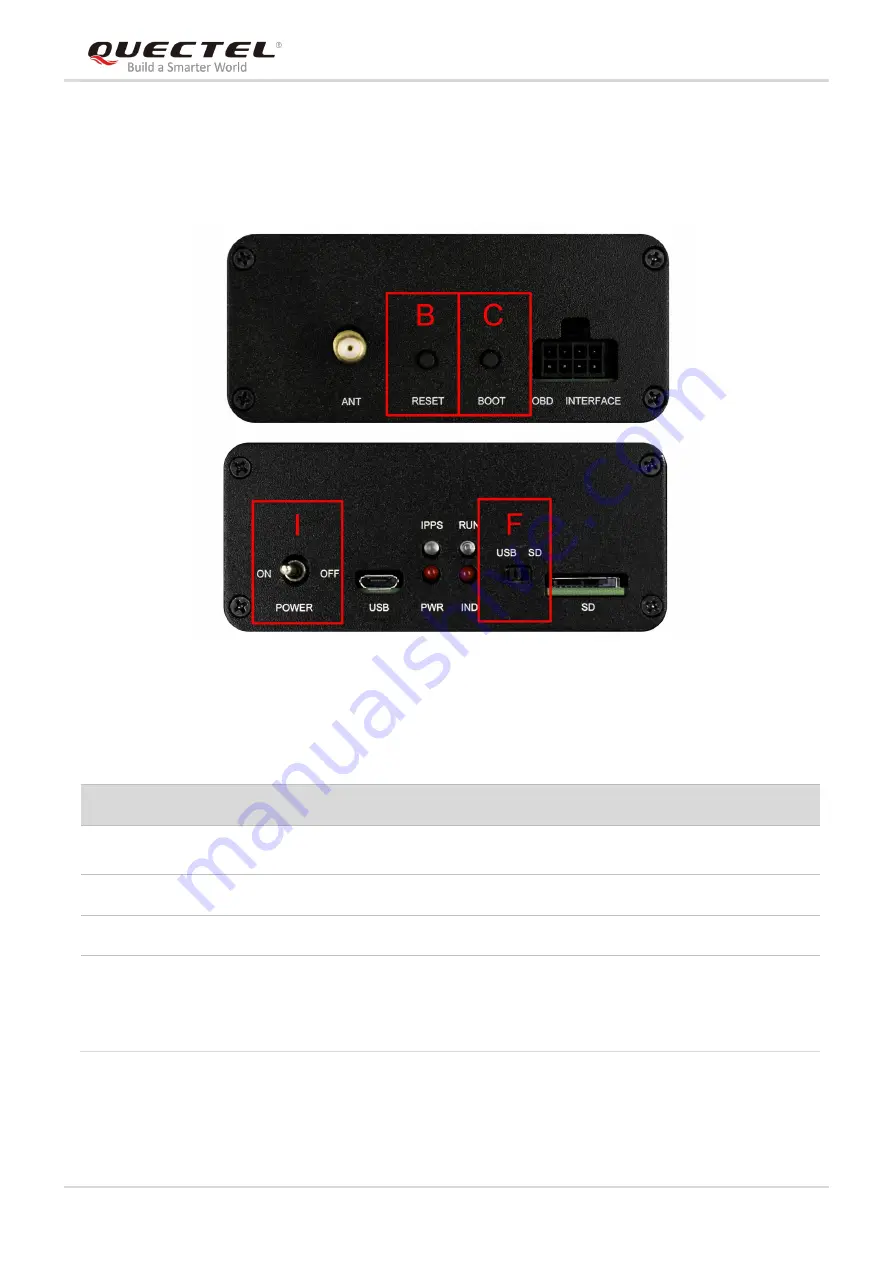
The following figure illustrates the switches and buttons of the EVB. 


Figure 7: Switches and Buttons 


Table 3: Switches and Buttons   


Part No. 

Name 

I/O 

Description 

RESET   

DI 

The module will be  reset through pressing and then 
releasing the button. 

BOOT 

DI 

Please refer to 

Chapter 4.2.2


for details. 

POWER 

PI


Power switch


USB/SD   

IO 

USB/SD switch 
L26-DR EVB supports data output via both Micro-USB 
and SD card interfaces,  which  is  switched by the 
USB/SD switch. 

Summary of Contents for L26-DR EVB

Page 1: ...L26 DR EVB User Guide GNSS Module Series Rev L26 DR_EVB_User_Guide_V1 2 Date 2019 12 25 Status Released www quectel com ...

Page 2: ...HE INFORMATION PROVIDED IS BASED UPON CUSTOMERS REQUIREMENTS QUECTEL MAKES EVERY EFFORT TO ENSURE THE QUALITY OF THE INFORMATION IT MAKES AVAILABLE QUECTEL DOES NOT MAKE ANY WARRANTY AS TO THE INFORMATION CONTAINED HEREIN AND DOES NOT ACCEPT ANY LIABILITY FOR ANY INJURY LOSS OR DAMAGE OF ANY KIND INCURRED BY USE OF OR RELIANCE UPON THE INFORMATION ALL INFORMATION SUPPLIED HEREIN IS SUBJECT TO CHAN...

Page 3: ...2019 11 09 Brooke WANG 1 Updated Figure 2 9 and 15 2 Updated the description in Chapter 5 2 3 Updated the calibration procedure in Chapter 7 4 Updated accessory information in Table 2 1 2 2019 12 25 Shua SHI Brooke WANG 1 Updated the description about calibration result monitoring in Chapter 6 2 2 2 Moved description about EVB and accessories assembly into Chapter 2 ...

Page 4: ...EDs 13 3 6 OBD Interface 14 4 EVB Operation Procedures 15 4 1 Communication via Micro USB Interface 15 4 2 Download Firmware 16 4 2 1 Firmware Upgrade 16 4 2 2 Boot Download 16 5 Usage of Teseo Suite Pro 18 5 1 View GNSS Receiver Status 18 5 1 1 COM Port and Baud Rate Setting 18 5 1 2 Explanations of Views and Windows 20 5 2 Send PSTM Commands 21 6 Calibration Procedure 22 6 1 Calibration for L26 ...

Page 5: ...r_Guide 4 28 Table Index TABLE 1 INTERFACES OF L26 DR EVB 7 TABLE 2 LIST OF ACCESSORIES 8 TABLE 3 SWITCHES AND BUTTONS 12 TABLE 4 OPERATION STATUS INDICATION LEDS 13 TABLE 5 PIN DESCRIPTION 14 TABLE 6 RELATED DOCUMENTS 27 TABLE 7 TERMS AND ABBREVIATIONS 27 ...

Page 6: ...ATUS INDICATION LEDS 13 FIGURE 9 OBD INTERFACE 14 FIGURE 10 USB PORTS 15 FIGURE 11 COM PORT SETTING OF QCOM 15 FIGURE 12 STA808X 9X FIRMWARE UPGRADE TOOL CONFIGURATIONS 16 FIGURE 13 TESEOIII XLOADER TOOL CONFIGURATIONS 17 FIGURE 14 TESEO SUITE PRO INTERFACE 18 FIGURE 15 MANUAL CONFIGURATION FOR THE COM PORT 19 FIGURE 16 SIGNAL LEVEL 20 FIGURE 17 SKY VIEW 20 FIGURE 18 MODULE POSITIONING FORM 21 FIG...

Page 7: ...into all manuals supplied with the product If not so Quectel assumes no liability for any failure to comply with these precautions Be assure the use of the product conforms to the national safety and environmental regulations and is allowed in the country and in the environment required Keep away from explosive and flammable materials The use of electronic products in extreme power supply conditio...

Page 8: ...e Views of L26 DR EVB The following figure illustrates the top and side views of L26 DR EVB Figure 1 Top and Side Views of L26 DR EVB Table 1 Interfaces of L26 DR EVB SN Name Description A ANT Antenna Interface B RESET Reset Button C BOOT Boot Button D OBD INTERFACE OBD Interface E SD SD card Interface ...

Page 9: ...S Antenna EVB USB Flash Drive OBD Cable Figure 2 L26 DR EVB Accessories Table 2 List of Accessories F USB SD USB SD Switch G 1PPS RUN PWR IND Indication LEDs H USB Micro USB Interface I POWER Power Switch Items Description Quantity EVB The evaluation board of L26 DR 1 USB Cable USB Cable 1 OBD Cable 1 OBD Cable 1 ...

Page 10: ...bly The following figure shows the assembly of L26 DR EVB and its accessories Figure 3 L26 DR EVB and Accessories Assembly Antenna GNSS Antenna Active 1 USB Flash Drive USB Flash Drive including L26 DR related documents tools drivers etc 1 Instruction One sheet instruction giving instructions for EVB connection details of EVB accessories etc 1 NOTE ...

Page 11: ... 28 3 Interface Applications 3 1 Micro USB Interface Main power is supplied via the Micro USB interface Data can be transmitted via both Micro USB and SD card interfaces which is switched between the two interfaces with the USB SD switch Figure 4 Micro USB Interface ...

Page 12: ...rface The SD interface supports to save the output data of L26 DR module in SD card The storage capacity of supported SD card should be no more than 32GB Figure 5 SD Card Interface 3 3 Antenna Interface The antenna interface is used to connect the GNSS antenna Figure 6 Antenna Interface ...

Page 13: ...witches and Buttons Table 3 Switches and Buttons Part No Name I O Description B RESET DI The module will be reset through pressing and then releasing the button C BOOT DI Please refer to Chapter 4 2 2 for details I POWER PI Power switch F USB SD IO USB SD switch L26 DR EVB supports data output via both Micro USB and SD card interfaces which is switched by the USB SD switch ...

Page 14: ... Status Indication LEDs Table 4 Operation Status Indication LEDs Name I O Description 1PPS DO Flash 1PPS signal indicator The frequency is 1Hz configurable RUN DO Flash SD card function is supported PWR DO Power indicator IND DO Flash Data is output through SD card interface Extinct Data is output through USB card interface ...

Page 15: ...gure 9 OBD Interface Table 5 Pin Description L26 DR UDR EVB does not support WHEELTICK FWD CAN features Pin No Signal I O Description 1 GND Ground 2 CAN_L IO Low level CAN bus line 3 CAN_H IO High level CAN bus line 4 SGND Signal ground 5 Reserved 6 WHEELTICK DI Odometer wheel tick input 7 FWD DI Forward backward status signal input 8 GND Ground NOTE ...

Page 16: ... drive on PC to install the USB driver The USB port numbers will be viewed in Device Manager of the PC after the USB driver is installed as shown below Figure 10 USB Ports Step 3 Install and then use the QCOM tool provided by Quectel to realize the communication between L26 DR module and the PC The following figure shows the COM Port Setting of QCOM select the correct COM Port USB Port shown in th...

Page 17: ...A808x 9x Firmware Upgrade and configure the tool as shown below Figure 12 STA808x 9x Firmware Upgrade Tool Configurations Step 4 Click button and then reset the module to upgrade the firmware 4 2 2 Boot Download Boot download should be performed as the following steps Step 1 Connect the EVB to a PC through the USB cable Step 2 Long press BOOT button the BOOT pin of L26 DR will be pulled up to VCC ...

Page 18: ...Guide 17 28 Step 3 Release BOOT button to make BOOT pin of L26 DR return to normal floating Step 4 Run the tool TeseoIII XLoader and configure the tool as shown below Figure 13 TeseoIII XLoader Tool Configurations Step 5 Click button to download the firmware ...

Page 19: ...uite Pro The tool helps users to view the status of GNSS receiver The following chapters only briefly describes the use of Teseo Suite Pro For more details about the tool please click Help and select User Manual in the tool 5 1 View GNSS Receiver Status 5 1 1 COM Port and Baud Rate Setting After the tool is opened the following interface will be shown Figure 14 Teseo Suite Pro Interface ...

Page 20: ...uite Pro when the it is opened If not the steps from a to d illustrated in the following figure should be performed Please click the corresponding buttons After button is clicked the Rover Configuration box will be popped up then please check the Add Control Port box a b c d Figure 15 Manual Configuration for the COM Port ...

Page 21: ... Below are displayed information such as the PRN the frequency band used by the satellite BAND the azimuth AZI and the elevation of the satellite ELE Clear flag means the navigation data of this satellite are in use while faded flag means not used Figure 16 Signal Level After button is clicked Sky View will be opened which shows the current azimuth and elevation of satellites used for the fix Figu...

Page 22: ...that shows information about GPS positioning of devices will be opened Figure 18 Module Positioning Form 5 2 Send PSTM Commands PSTM Commands can be sent by Teseo Suite Pro Through clicking button the command input box will be popped up which is shown in the figure below Figure 19 Command Sending via Teseo Suite Pro ...

Page 23: ...s 7 steps as describe in the following chapters 1 This calibration process in this chapter is based on the precondition that users have fixed the EVB And no displacement or rotation of the EVB should happen after the calibration 2 The calibration process needs to be repeated only when The EVB has been moved and reinstalled During a DR cold start and when the NVM is blank or invalid 3 Please follow...

Page 24: ...roundabouts tight turns and road curves with direction changed in 90 degrees or more Large turns e g smooth turns on highway lane changes etc will not work Please note that the success of this operation does not depend on its duration but the number of valid turns In order to have a fine tuned yaw rate gain it is suggested that the first boot calibration route should include at least 10 tight turn...

Page 25: ... Pro tool After the tool is started please click DR in the menu The Dead Reckoning window will be popped up as shown by the figure below If the DR Calibration Status shown below turns green the calibration is successful After that the test can be started If the DR Calibration Status turns red please repeat the calibration procedure Figure 20 ADR Calibration Status ...

Page 26: ... limit to the placement direction on the plane formed by the other two axes For instance if axis Z is perpendicular to the horizontal plane there is no limit to the mounting direction of the EVB on the plane formed by axes X and Y Y X Z Figure 21 Axis of L26 DR UDR EVB 6 2 1 Calibration Procedure Step 1 Install the EVB on a vehicle and connect the antenna Step 2 Power on the EVB Step 3 Keep the ve...

Page 27: ... 6 2 2 Calibration Result Monitoring The calibration result will be reported in an NMEA PQSOL message For more details about this message please refer to document 2 A method to check the UDR state message is shown by the following figure Figure 22 UDR Calibration Status ...

Page 28: ...ocol_Specification L26 DR GNSS Protocol Specification 3 Quectel_L26 DR_Reference Design L26 DR Reference Design 4 Quectel_QCOM_User_Guide QCOM User Guide Abbreviation Description API Application Programming Interface CAN Controller Area Network CNR Carrier to Noise Ratio DI Digital Input DO Digital Output EVB Evaluation Board GNSS Global Navigation Satellite System IO Bidirectional LED Light Emitt...

Page 29: ...eries L26 DR EVB User Guide L26 DR_EVB_User_Guide 28 28 PI Power Input PPS Pulse Per Second PRN Pseudorandom Noise SV Satellite Vehicle UART Universal Asynchronous Receiver Transmitter UTC Coordinated Universal Time ...

Reviews: