QUATRO
Air Technologies Inc.
----------------------------------------------------------------
Engineers Of Clean Air
----------------------------------------------------------------
30 Hymus Boulevard, Montreal, Quebec, H9R 1C9 Tel.: (514) 630-4444 Fax: (514) 630-4454 website:
www.quatroair.com
Replacement Instructions
ALLOW MOTOR(S) TO COOL FOR 45 MINS BEFORE SERVICING
1- Unplug power cord and open motor access panel.
2- Disconnect wires, cut zip ties.
3- Remove the retaining nuts & lock washer holding the motor assemblies.
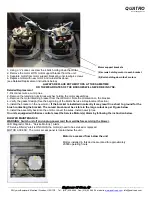
4- Remove the motor retaining bracket from the old motor. Note the orientation on the bracket.
5- Install the bracket on the new motor. See the installations pictures below.
THIS IS PARTICULARLY IMPORTANT. If the bracket is installed incorrectly it may
result in a short to ground for the brush contacting the bracket. The curved brush must be visible in the large
cutout as per Figure 2 above.
6- Install the assembly back into the unit & connect the wires. Install new zip ties.
7- Plug in power cord and
Reset “Service Motor(s) Alert.
This MUST be done
EVEN IF L2 IS NOT ILLUMINATED
or the
motor(s) replacement alert will not function correctly. Follow the instructions below.
1- Ensure filter access door is closed
2- Plug power back to the unit
3- Press & hold SPEED UP & DN simultaneously until unit BEEPS
4- Hold for 10+ seconds, when panel is beeping continuously, release buttons
5- You are now in RESET MENU, in this condition, “System ON” Led is FLASHING QUICKLY
6- Press SPEED DN (1 Time) until
“Service Motor(s)
” LED is FLASHING
7- Press & HOLD POWER button while
“Service Motor(s)
LED is FLASHING & unit is BEEPING continuously
8- Release, when LED stops FLASHING & stops BEEPING
Motor contains double shielded ball bearings with a special lubricant, assuring long life and quiet operation. No extra motor
maintenance is required.
RESETTING MICROPROCESSOR CONTROLLER AFTER REPLACING MOTORS
Resetting Microprocessor After Motor Replacement WHILE “Service Motor(s)” Led is SOLID
1-
Ensure motor access door is closed 2- Plug power back to the unit
3-
When you Press “POWER”, MOTOR WILL START, “Service Motor(s)” Led stays SOLID
4-
While motor is operating, press & hold SPEED UP & DN simultaneously until unit BEEPS
(hold for 10+ seconds, when beeping continuously, release)
5-
In this condition, “System ON” Led is FLASHING, “Service Motor(s)” led is SOLID
6-
Press SPEED DN (once) until “Service Motor(s)” Led is FLASHING and system is BEEPING continuously
7-
Press & HOLD POWER button while “Service Motor(s)” is FLASHING & BEEPING continuously
Release, when it stops BEEPING, and motor operates in LOW speed
8-
Operate unit at LOW SPEED for 10-15 minutes to break-in new brushes (to prolong brush life)
Resetting Microprocessor After Motor Replacement,
WHILE “Service Motor(s) Led is OFF
1-
Ensure motor access door is closed 2- Plug power back to the unit
3-
When you Press “POWER”, MOTOR WILL START
4-
While motor is operating, press & hold SPEED UP & DN simultaneously until unit BEEPS
(hold for 10+ seconds, when beeping continuously, release)
5-
In this condition, “System ON” Led is FLASHING
6-
Press SPEED DN (once) until “Service Motor(s)” Led is FLASHING
7-
Press & HOLD POWER button while “Service Motor(s)” is FLASHING
Release, when it stops BEEPING, and motor operates in LOW speed
8-
Operate unit at LOW SPEED for 10-15 minutes to break-in new brushes (to prolong brush life)
Unplug POWER cord from unit, Replace motor(s) as per instructions above, close motor access door.
MOTOR WILL DEFAULT TO LOWEST SPEED AFTER A RESET. YOU WILL PROLONG MOTOR BRUSH LIFE IF YOU BREAK THEM IN, SO IT IS ADVISED TO LET
MOTOR OPERATE AT LOWEST SPEED FOR 15 MINUTES
TROUBLESHOOTING, MECHANICAL GUIDE
Symptoms
Possible Cause
Suggested Solution
Unit will not start
Faulty power supply
Circuit breaker popped
Motor burnt
Brushes worn
Check breaker box
RESET circuit breaker on unit panel
Replace motor (PN: AB001)
Replace Brushes (PN: AB112)
Excessive noise
Turbine impeller contacting housing
Replace motor (PN: AB001)
Insufficient airflow
Obstruction in system
Clogged filter
Remove obstruction
Replace filter
Motor shuts off
Input amperage too high
Graphite crystal rods are consumed
Motor is burnt
Ensure filter is in place, reset circuit breaker
Replace rods (PN: AG112, 2/pkg)
Replace motor (PN: AB001)
Excessive airflow
Filter not in place
Install filter


