background image

5

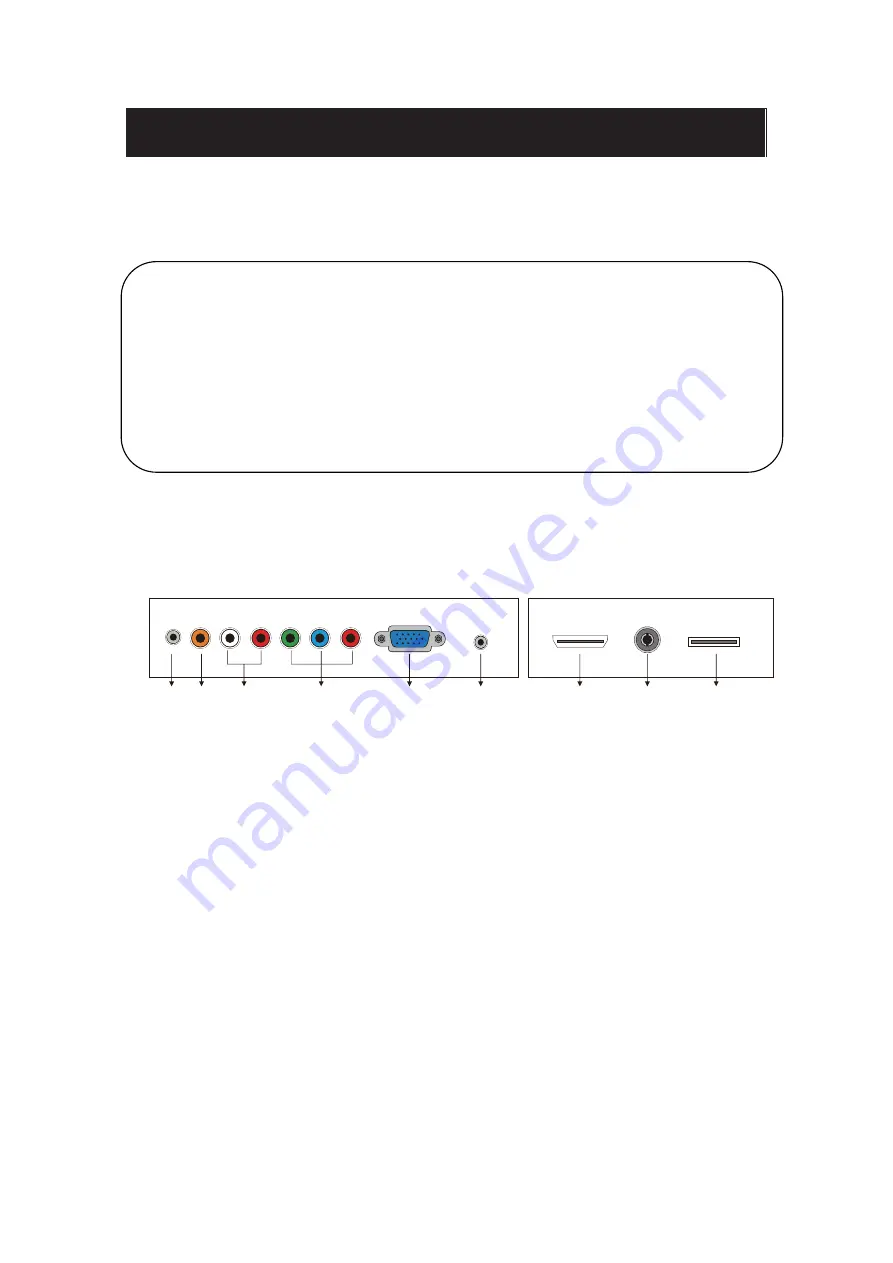
Main unit description 

Control Panel Button Function 

TV Terminal Connections 

VOL+ : Volume up. 
VOL- : Volume down. 
CH+

: TV channel up. 

CH-

: TV channel down. 

MENU : Press to select the main menu. 
SOURCE : Select the input sources.
POWER : Switching Power On/Standby. 

1

2

3

4

5

6

7

8

9

1. EARPHONE out terminal. 
2. Coaxial out terminal.
3. Audio input terminal for component video/composite video.

9. USB input terminal

˄

Playing JPEG files.

˅

7. HDMI input terminal.

5. VGA input terminal of simulation signal of PC. 

6. PC AUDIO input terminal. 

8. RF antenna.

4. Component video/composite video input terminal.

Summary of Contents for SQ240W

Page 1: ...t the factory so that you can receive the over the air broadcast signal If you want to receive the Cable TV signal through the antenna input terminal this menu option must be switch to the Cable Cable...

Page 2: ...Contents z Introduction z Warning z Caution z Main Unit Description z Remote Control z OSD Basic Adjustment z Specifications z Troubleshooting...

Page 3: ...premature component failure This TV can be connected to AC 100 240V 50 60HZ Do not install the TV in a location near heat sources such as radiators air ducts direct sunlight or in closed compartments...

Page 4: ...nstructions in the literature accompanying the equipment Class I structures of equipment should be connected to the grid power output with a protective earth connection on the socket Power plug as a b...

Page 5: ...drop or push objects into the television cabinet slots or openings Never spill any kind of liquid on the television receiver Caution Avoid exposing the main unit to direct sunlight and other sources...

Page 6: ...injury to an individual and damage to the television may result if it should fall Caution When the product is not used for an extended period of time it is advisable to disconnect the AC power from t...

Page 7: ...CE Select the input sources POWER Switching Power On Standby 1 2 3 4 5 6 7 8 9 1 EARPHONE out terminal 2 Coaxial out terminal 3 Audio input terminal for component video composite video 9 USB input ter...

Page 8: ...nd front between the current and previous channels AUTO Adjust the picture automatically in pc mode EPG Enter electronic program guide FAV Switch between custom set Favorite List RED GREEN YELLOW CYAN...

Page 9: ...Quasar Quasar Instruction for Wall Mount 100mm x 200mm 4...

Page 10: ...ct Brightness and press the e f button to enter brightness adjustment menu to adjust brightness 3 Press c d button to select Contrast and press the e f button to enter contrast adjustment menu to adju...

Page 11: ...ton to select Balance and press the button to adjust 5 Press button to select MTS and press the button to adjust Note This setting is only for ATV 6 Press button to select Audio Language and press the...

Page 12: ...o select OSD Timeout the button to adjust OSD timeout 4 Press button to select Closed Caption and press the ENTER button to enter sub menu a Press button to select CC Mode the button to adjust b Press...

Page 13: ...ected to your TV 6 Press button to select Other Settings and press the ENTER button to enter sub menu a Press button to select Blue Screen the button to select On or Off b Press button to select Audio...

Page 14: ...TER button to enter next step g Press button to select Air Cable and press the button to select Air or Cable h Press button to select Go to next step and press the ENTER button to start auto scan Note...

Page 15: ...then press ENTER button to enter sub menu a Press button to select TV and press the button to select Block or Unblock b Press button to select AV and press the button to select Block or Unblock d Pre...

Page 16: ...l Label and press the ENTER button to enter 5 Press button to select US button a Press button to select TV and press ENTER button to enter sub menu Press button to select and press ENTER to block or u...

Page 17: ...select H Pos and press the e f button to adjust 2 Press c d button to select V Pos and press the e f button to adjust 3 Press c d button to select Clock and press the e f button to adjust 4 Press c d...

Page 18: ...Media OPERATION SOURCE 16...

Page 19: ...Photo Menu 17...

Page 20: ...er THD 7 2 x 3W NTSC Cable 1 135 Air 2 69 ATV DTV 1 x 1 x t u p n I A G V B G R g o l a n A x t u p n I I M D H e c a f r e t n I a i d e m i t l u M n o i t i n i f e D h g i H e d i S 1 Audio Input...

Reviews: