background image

Locate the chassis serial number. You can find the number on the packing slip, in 
your confirmation email, or on the controller-drive tray after you unpack it.

WARNING:

 Install hardware from the bottom of the cabinet up 

to the top to prevent the equipment from toppling over.

Left and right rails
Left and right rear hold-down brackets for additional bracing, if needed

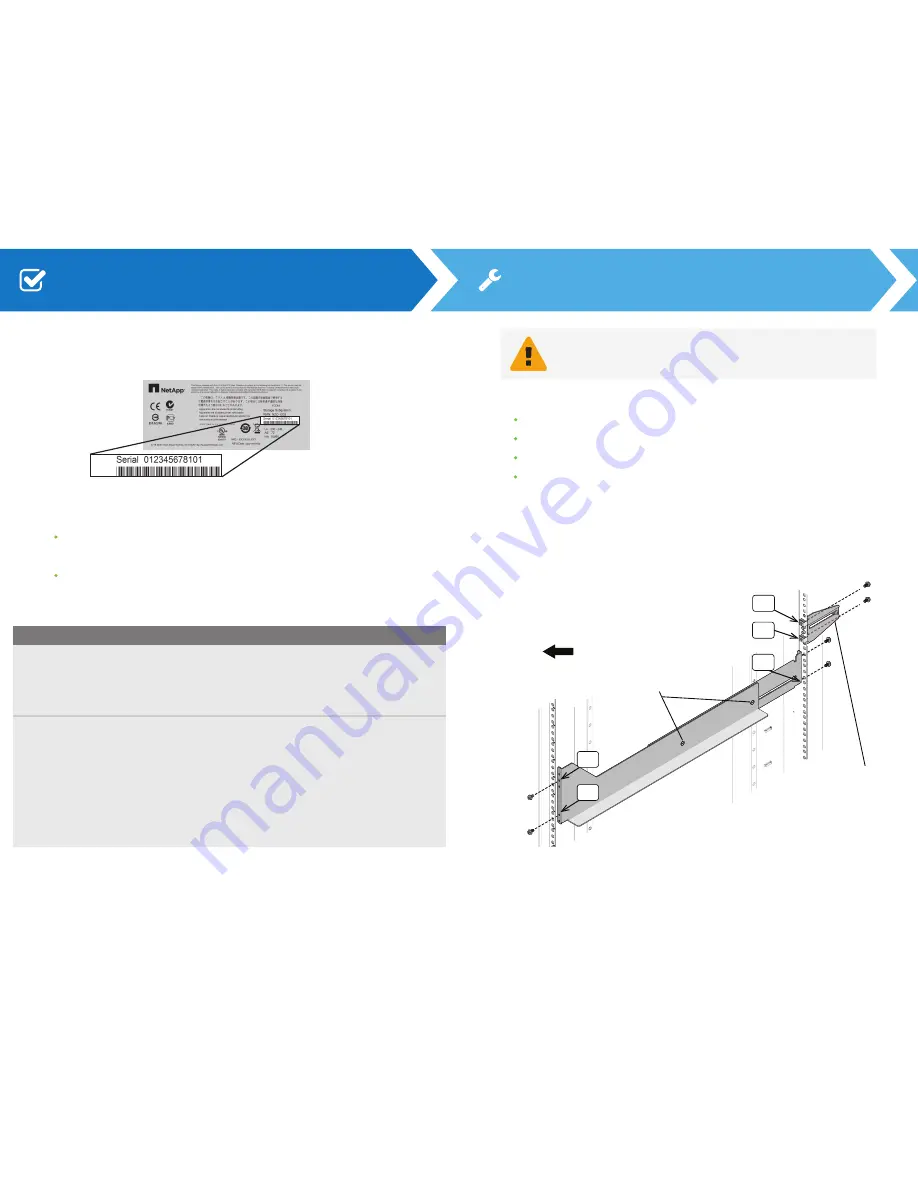
You need this hardware to install the rails (the kit also includes extra screws):

16 screws (8 for the rails, 4 for the brackets, 4 for securing the tray)
8 washers (used only for cabinets with square holes)

Extend the rail by loosening the two adjustment screws.
Starting at the lowest available position in the cabinet, align the holes on the 
ends of the rail with the holes on the cabinet. Confirm that the rail is level.

Secure the front of the rail to the cabinet by counting down from the top of the 
rail and inserting two screws into the 2

nd

 and 4

th 

rail

 holes. Use the washers if 

the cabinet has square holes.

Secure the rear of the rail to the cabinet with two screws (and washers if the 
cabinet has square holes). Use the same set of holes as in the front.
If you plan to ship an empty tray in the cabinet, secure the hold-down
brackets to the back of the cabinet by counting up from the bottom of the 
rail and inserting screws into the 8th and 11th cabinet holes. The tray must be 
empty when shipped.

4

5

2

Cabinet

Front

Go to the NetApp Support Site: 

http://mysupport.netapp.com

2

a

If you are a...

Follow these steps...

From the top menu, select 

Products > My Products.

Confirm that the new serial number is listed.
If it is, go to “Install the rails.” If it is not, follow the 
instructions below to register the hardware.

After your registration is approved, you can download 
SANtricity software. The approval process might take 
up to 24 hours.

NetApp customer who has 
registered hardware before

A reseller customer or a new 
NetApp customer

1

2
3

From the top menu, select 

Products > Register

Products

.

Enter the product serial number, and click 

Submit.

Enter the requested details, and click

 Submit.

2
3

Sign into the site:

If you do not already have a NetApp account, click 

Register Now

 to create 

an account.

If you already have a NetApp account, click 

Sign In,

 and enter your username 

and password.

Determine whether you need to register the hardware, as follows: 

2

nd

4

th

Adjustment Screws

Rear Hold-Down Bracket

11

th

8

th

1

st

Register the hardware

Install the rails

Summary of Contents for StorNext QD7000

Page 1: ...Installation and Setup Instructions StorNext QD7000 Firmware 8 40 xx xx 6 68666 01 Rev A...

Page 2: ...nishable violation of the law TRAEMARK STATEMENT Artico Be Certain and the Q brackets design DLT DXi DXi Accent DXi V1000 DXi V2000 DXi V4000 GoVault Lattus NDX the Q logo the Q Quantum logo Q Cloud Q...

Page 3: ...er only Refer to the NetApp to Quantum Naming Decoder section for additional information This section provides the following information Audience Prerequisites NetApp to Quantum Naming Decoder Product...

Page 4: ...t Quantum storage naming conventions Table 1 Product Nomenclature E Series NetApp Product Quantum Storage Description Controller Drive Tray Base System Quantum uses Base System when referring to a dri...

Page 5: ...00 RAID controllers Titan Quantum StorNext QD7000 E5560 DE6600 4U drive enclosure With E5500 RAID controllers Soyuz Quantum StorNext QD7000 E5460 DE6600 4U drive enclosure With E5400 RAID controllers...

Page 6: ...ay result in bodily injury damage to the equipment or interference with other equipment WARNING Before operating this product read all instructions and warnings in this document and in the system safe...

Page 7: ...Preface Installation and Setup Instructions vii...

Page 8: ...ssue resolution with these exclusive Quantum StorageCare services Service and Support Website Register products license software browse Quantum Learning courses check backup software and operating sys...

Page 9: ...http www quantum com customercenter For further assistance or if training is desired contact the Quantum Customer Support Center North America 1 800 284 5101 toll free 1 720 249 5700 EMEA 800 7826 888...

Page 10: ...and installing hardware Installation and Setup Instructions for E Series 60 Drive Trays E2760 and E5660 controller drive trays DE6600 expansion drive trays Task Document Preparing your site Site Prepa...

Page 11: ...ds for your country two for each tray I O cables and transceivers if ordered Ethernet cables if ordered as needed to connect to the management station Serial cables as needed for diagnostics or instal...

Page 12: ...s in the front If you plan to ship an empty tray in the cabinet secure the hold down brackets to the back of the cabinet by counting up from the bottom of the rail and inserting screws into the 8th an...

Page 13: ...down from the top on each side 1st 3rd Starting with the leftmost slot at the front align the two raised buttons on the drive with the notches on the drawer Then pressing gently on the top of the dri...

Page 14: ...ve tray 60 drive tray shown but you can connect to 12 drive or 24 drive trays Two expansion drive trays shown below the controller drive tray Controller Drive Tray Controller B Expansion Drive Tray Ex...

Page 15: ...pported host topologies Before connecting the host cables confirm that host bus adapters HBAs are installed in the data hosts If you are using AIX wait to connect the data hosts until after you have i...

Page 16: ...Data Hosts Controller Drive Tray SANtricity Storage Manager Client Management port 1 on each controller OS OS OS If you choose out of band management you can use one of these options to set IP addres...

Page 17: ...tions for DHCP and for installing and using SANtricity Storage Manager to configure your array 3 Select the SANtricity Power Guide for Advanced Users for your host operating system if you need instruc...

Reviews: