Quantum Scalar i500: Ethernet Expansion Blade Installation
6-68141-01 Rev A
April 2014
4
Installing the Ethernet Expansion Blade
Caution:
If the Ethernet Expansion blade or Ethernet connectivity fails and
the attached tape drives have FIPS mode enabled, all encryption
operations (encrypting, decrypting, key requests) on the attached
tape drives will fail. These operations will NOT automatically
continue over internal serial communication. If this happens,
contact Quantum Support for a replacement Ethernet Expansion
blade as soon as possible.
Installing the Ethernet Expansion Blade
The Ethernet Expansion blade must be installed in the bottom left vertical bay in
an expansion module. The empty bay to the right of the Ethernet Expansion
blade must be covered by a cover plate.
Equipment Required
• Ethernet Expansion blade
• Cover plate
• Ethernet cables (one for each tape drive that you will connect to the
Ethernet Expansion blade), plus an extra one per Ethernet Expansion
blade, to connect the LCB to the expansion module in which the
Ethernet Expansion blade is installed.
Tools Required
None
Instructions
1
Upgrade library firmware to version 600G or later.
2
Upgrade tape drive firmware on all HP LTO-5 FC or HP LTO-6 FC tape drives
that you plan to connect to the Ethernet Expansion blade to the latest
version qualified with the Scalar i500 library (see the
Scalar i500 Release
Notes
for qualified firmware levels).
3
Save the library configuration:
a
From the Web client, select
Tools > Save/Restore Configuration
.
b
Select
Save System Configuration
, and click
Apply
.
4
Shut down the library.
5
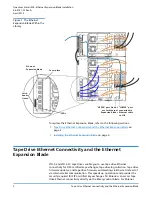
For every expansion module that contains an Ethernet Expansion blade,
make sure a standard Ethernet cable is connected from one of the four
internal Ethernet ports on the library control blade (LCB) to the Ethernet
port marked “LOWER” located on the bottom right of the expansion module
in which the Ethernet Expansion blade is installed. There are two ports,
marked “UPPER” and “LOWER.” Since the Ethernet Expansion blade must be
installed in the lower bay of the expansion module, you must use the port
marked “LOWER.” The “LOWER” port is on the right. See


