background image

13

To unlock the R-net:

1.  Press the on/off button and power on the R-net.

2.  Push the joystick to the full forward position until the R-net beeps.

3.  Pull the joystick to the full rearward position until the R-net beeps.

4.  Release the joystick. There should be a long beep.

5.  The R-net is now unlocked.

NOTE: If the above procedure fails to either lock or unlock the R-net, contact your Pride/Quantum 

Rehab Provider.

Actuator Adjustment

The R-net can control optional power accessories such as a power elevating seat or power elevating leg 

rests using the mode button and the joystick.

NOTE: Actuator adjustment may vary depending on the R-net program.

To select and adjust an actuator:

1.  Push the on/off button to power on the chair and the controller.

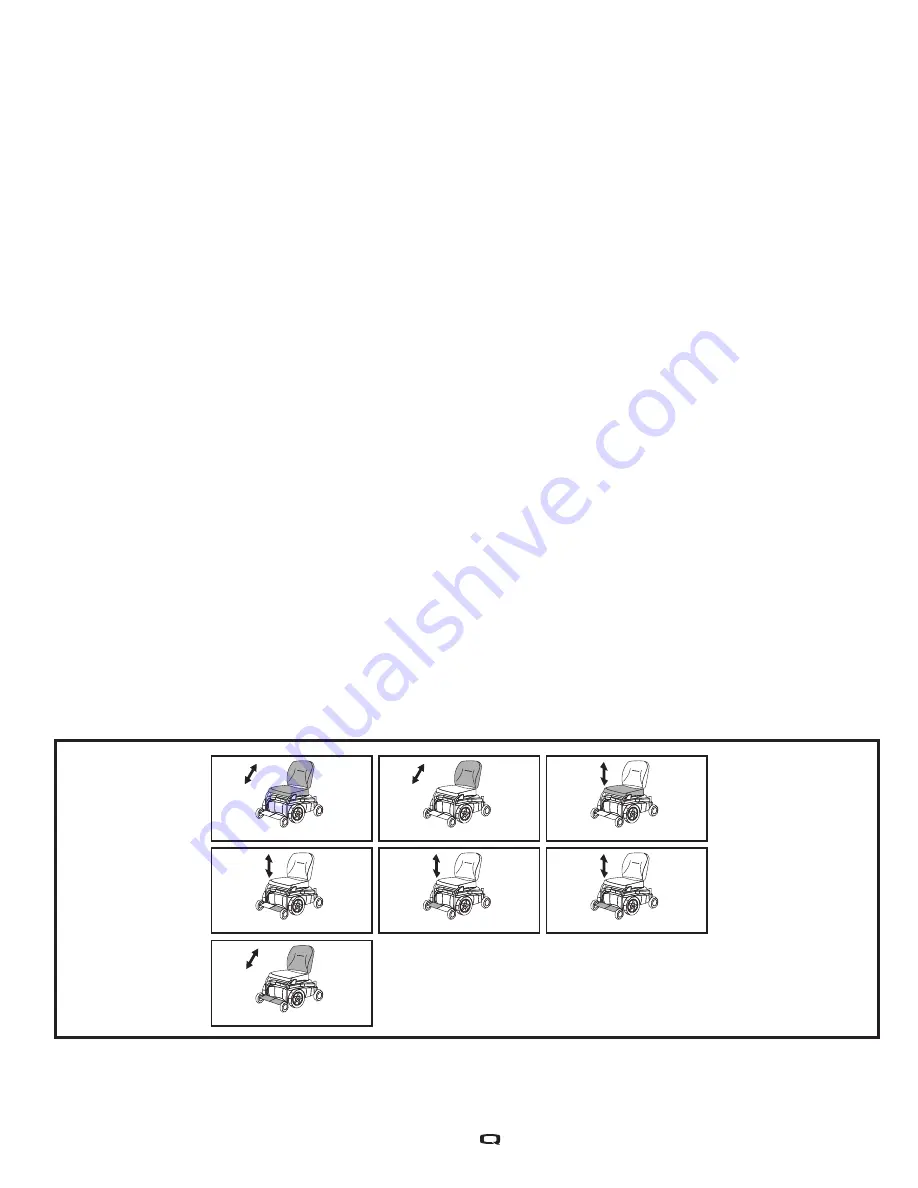
2.  Press the mode button to display the actuator screen. 

See figure 4.

3.  Push the joystick to the right to cycle through the available actuators. The available actuators will be 

displayed on the LCD screen or keypad on the controller regardless of whether you are using the 

controller or attendant control.

4.  When the desired actuator is displayed, give a forward or reverse command to the joystick to adjust 

the actuator.

5.  Press the mode button until the drive screen appears to return to drive mode. The drive profile will be 

displayed momentarily before the drive screen is displayed.

2.  Release the on/off button.

3.  Push the joystick to the full forward position until the R-net beeps.

4.  Pull the joystick to the full rearward position until the R-net beeps.

5.  Release the joystick. There should be a long beep.

6.  The R-net is now locked.

Tilt

Left ELR/ALR

Recline

Elevate

Recline and ELR/ALR

Right ELR/ALR

Both ELR/ALR

Figure 4. Actuator Screens

Summary of Contents for R-net

Page 1: ...Basic Operation Instructions R net ...

Page 2: ...Identification Key Copyright 2016 INFMANU4815 Rev A December 2016 1 2 2 3 7 4 5 6 14 15 13 12 11 2 10 9 8 2 ...

Page 3: ... 15 Controller On Off Button Mode LED Hazard Button LCD Screen Controller Left Turn Indicator Button Joystick Speed Decrease Button Speed Increase Button Turn Right Indicator Button Profile Button Horn Button Light Button Charger Port Mode Stop Switch Input ...

Page 4: ...4 Identification Key 1 2 3 4 5 6 2 9 8 7 2 10 11 2 13 14 12 15 ...

Page 5: ...ler On Off Button Mode LED Hazard Button Actuator LEDs Maximum Speed Profile Indicator Left Turn Indicator Button Joystick Speed Decrease Button Speed Increase Button Turn Right Indicator Button Mode Button Horn Button Light Button Battery Condition Meter Charger Port ...

Page 6: ...ted as a white symbol on a blue dot with a white border PROHIBITED These actions are prohibited These actions should not be performed at any time or in any circumstances Performing a prohibited action can cause personal injury and or equipment damage On the product this icon is represented as a black symbol with a red circle and red slash NOTE This owner s manual is compiled from the latest specif...

Page 7: ...ipment 9 Mode Button Actuator Adjustment for Optional Equipment 10 Profile Button 10 Right Left Turn Indicator Buttons and LEDs for Optional Equipment 10 Speed Increase Decrease Buttons 10 Battery Condition Meter 11 LCD Screen 11 Main Menu 12 3 pin Off board Charger Programming Socket 12 Locking Unlocking the R net 12 Actuator Adjustment 13 Sleep Mode 14 Thermal Rollback 14 Fault Codes 14 Care and...

Page 8: ...important for you to read and understand them completely Avoid exposure to rain snow ice salt or standing water whenever possible Maintain and store in a clean and dry condition EMI RFI This product has been tested and passed at an immunity level of 20 V m Disposal and recycling Contact your Pride Quantum Rehab Provider for information on proper disposal and recycling of your Pride Quantum product...

Page 9: ...joystick controls the direction and speed of your power chair When you move the joystick from the neutral center position the electromagnetic brakes release and allow your power chair to move The farther you push the joystick from its neutral position the faster your power chair moves When you release the joystick and allow it to return to the neutral position the electromagnetic brakes engage and...

Page 10: ...hair Press the speed increase button to increase the speed Press the speed decrease button to decrease the speed For controllers equipped with an LCD screen the maximum speed of the current speed setting is displayed on the maximum speed indicator The current speed is also displayed on the LCD screen For controllers equipped with LEDs the maximum speed of the current speed setting is displayed on ...

Page 11: ...ED INDICATOR 6 PROFILE NAME 7 PROFILE INDICATOR Figure 1 LCD Screen Main Menu for Optional Equipment The Main Menu screen displays a list of preference settings that are user adjustable set time 12 hr 24 hr clock odometer and tripmeter resetting amount of backlighting background color and Infra Red IR settings if equipped To make a selection from the Main Menu 1 Push the on off button to power on ...

Page 12: ... figure 3 4 Push the joystick up or down to highlight the Clear Trip Distance option then push the joystick right to select that function 5 Once all changes have been made push the joystick up or down to select Exit and then push the joystick right or left to return to the previous screen Repeat this step to exit screens until you reach the drive screen 3 pin Off board Charger Programming Socket Y...

Page 13: ...r 2 Press the mode button to display the actuator screen See figure 4 3 Push the joystick to the right to cycle through the available actuators The available actuators will be displayed on the LCD screen or keypad on the controller regardless of whether you are using the controller or attendant control 4 When the desired actuator is displayed give a forward or reverse command to the joystick to ad...

Page 14: ...er chair s electrical system it may decide to stop the power chair depending on the severity of the problem The R net is designed to maximize the user s safety under all normal conditions The following table identifies the individual fault codes Fault codes are displayed as a rapid flashing of the lights If you encounter one of these fault codes or experience any other problems with your power cha...

Page 15: ...sal instructions Temperature Some of the parts of your power chair are susceptible to extreme changes in temperature Always keep your power chair between the temperatures of 18 F 8 C and 122 F 50 C Warranty Refer to your power chair owner s manual for specific information on controller warranty ...

Page 16: ...16 Notes ...

Page 17: ...17 ...

Page 18: ...18 ...

Page 19: ......

Page 20: ...alia 20 24 Apollo Drive Hallam Victoria 3803 www quantumrehab com au New Zealand 38 Lansford Crescent Avondale Auckland New Zealand 1007 www pridemobility co nz Italy Via del Progresso ang Via del Lavoro Loc Prato della Corte 00065 Fiano Romano RM www quantumrehab italia it B V Castricummer Werf 26 1901 RW Castricum The Netherlands www quantumrehab eu www quantumrehab com ...

Reviews: