background image

28

Initial Configuration

DXi6701/DXi6702 Installation and Configuration Guide

Figure 18  Login Window

Completing the Getting 

Started Wizard

To complete the DXi6701/DXi6702 

Getting Started

 wizard:

1

On the 

Login

 window, select 

Administrator

, type 

password

 for the password, and 

click 

Login

.

The 

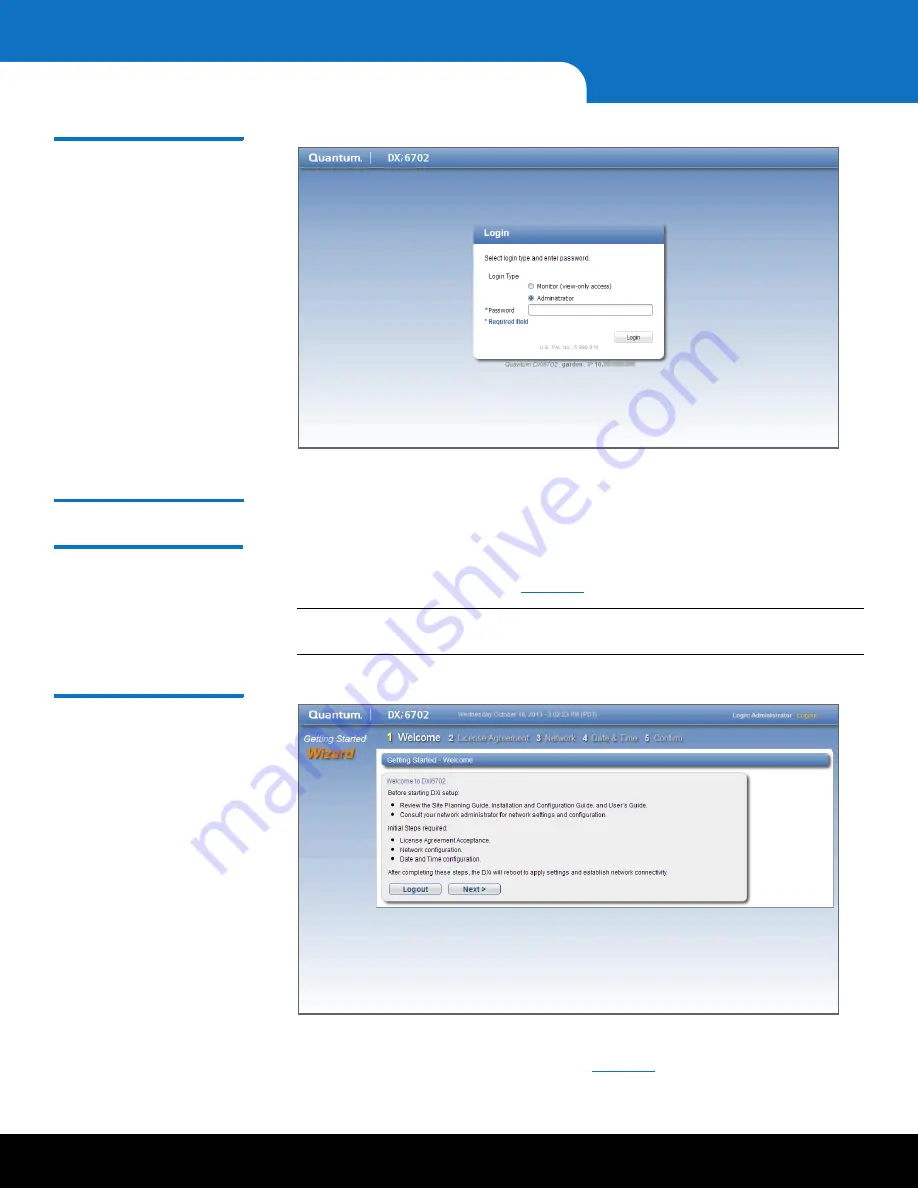
Welcome 

page displays (see 

Figure 19

).

Note:

If a message on the page indicates the DXi is in Limited Mode, wait ten 

minutes, and then log on again.

Figure 19  Getting Started 
Wizard: Welcome

2

Read the information about the wizard, and then click 

Next

 to continue.

The 

License Agreement 

page displays (see 

Figure 20

).

Summary of Contents for DXi6701

Page 1: ...S FIRST THIS DOCUMENT PROVIDES INSTALLATION INSTRUCTIONS FOR YOUR DXi6701 OR DXi6702 SYSTEM IMPORTANT READ THIS ENTIRE INSTALLATION DOCUMENT BEFORE YOU START TO UNPACK OR INSTALL YOUR DXi6701 OR DXi6702 SYSTEM ...

Page 2: ......

Page 3: ... DXi6701 DXi6702 Remote Management Interface 25 Completing the Getting Started Wizard 28 Connecting the Ethernet Cables 36 Creating a Typical Backup Configuration 38 DXi6701 and DXi6702 Installation and Configuration Guide This guide provides basic installation and configuration instructions for the DXi6701 and DXi6702 systems see Figure 1 For more information see the Quantum DXi6000 User s Guide ...

Page 4: ... ports DXi6702 1 Node 2 or 4 RAID controller cards 2 x 1 GbE Ethernet ports 2 x 10 GbE Ethernet ports optical or Twinax 4 x 8 Gb Fibre Channel ports 8 TB 3U for node 2U for each expansion module 16 TB 1 24 TB 2 24 TB 1 32 TB 3 32 TB 1 1 40 TB 4 40 TB 2 48 TB 5 48 TB 1 2 56 TB 6 56 TB 3 64 TB 7 64 TB 1 3 72 TB 8 72 TB 4 80 TB 9 80 TB 1 4 DXi6701 and DXi6702 configurations with 0 or 1 expansion modu...

Page 5: ...s for the DXi6701 DXi6702 You can obtain DXi6701 and DXi6702 product documentation at http www quantum com dxi6700docs Rack Space Requirements Table 2 contains the rack requirements for the DXi6701 DXi6702 components Table 2 Rack Requirements Environmental Conditions The installation site must have the following environmental conditions Humidity 20 to 80 non condensing Temperature 50 to 95 F 10 to...

Page 6: ...ting up initial system configuration Taking ESD Precautions Some components within the DXi6701 DXi6702 system contain static sensitive parts To avoid damaging these parts while performing installation procedures always observe the following precautions Keep the DXi6701 DXi6702 system turned off during all installation procedures Keep static sensitive parts in their original shipping containers unt...

Page 7: ...aining the DXi6701 DXi6702 node contains the following items DXi6701 DXi6702 node Rack mount rails Bezel shipping bag contains the front bezel Accessory kit which includes the following Doc Kit All models Quantum Products Regulatory Documentation CD Registration Warranty card Terms and Conditions Document OST License Certificate Base Node Kit All models Adapter kit Rapid Rail 1 Cable CAT6 RJ45 Non...

Page 8: ...E NIC DXi6702 Optical Cable 10 GbE 10 meter 2 Cable Kit Dual 10 GbE NIC DXi6702 Twinax Cable 10 GbE 5 meter 2 Cable Kit DUAL FC HBA Cable 10 GB 6 meter 2 Loose Items Node bezel Installation Guide Drive Slot Serial Number Map Carefully unpack and remove the components from the packing materials see Figure 1 ...

Page 9: ...Unpacking the DXi6701 DXi6702 7 DXi6701 DXi6702 Figure 1 Unpacking the DXi6701 DXi6702 Node DXi6701 DXi6702 Node Foam Box Rack mount rails Front bezel Accessory kit Bezel shipping bag Foam ...

Page 10: ...ront bezel Accessory kit which includes the following Base Expansion Module Kit All Models Adapter Kit Rapid Rail 1 Screw M4X6 FH Phillips 4 Screw 10 32 X 3 4 in Black 2 Conical Spring Washer M5 Zinc Plated 8 Screw FHPH 10FX 50 SSBK 100 8 C13 to C14 power cord 2 North American power cord 2 SAS interconnect cable Storage Capacity License Certificate Loose Items Expansion module bezel Drive Slot Ser...

Page 11: ...Unpacking the DXi6701 DXi6702 9 DXi6701 DXi6702 Figure 2 Unpacking the DXi6701 and DXi6702 Expansion Module Expansion module Foam Box Rack mount rails Front bezel Accessory kit Bezel shipping bag Foam ...

Page 12: ...rails You must allow 3U 5 2 in 13 2 cm of vertical space for the DXi6701 and DXi6702 node and 2U 3 5in 8 9 cm of vertical space for each expansion module installed in the rack Rack cabinets that meet EIA 310 standards have an alternating pattern of three holes per rack unit with center to center hole spacing beginning at the top hole of a 1U space of 15 9 mm 15 9 mm and 12 7 mm 0 625 inch 0 625 in...

Page 13: ...ottom of each 1 U space is at the middle of the narrowest metal area between holes marked with a horizontal line on some rack cabinets Installing the DXi6701 and DXi6702 Node Installing the DXi6701 and DXi6702 node consists of the following steps 1 Installing the DXi6701 DXi6702 Node Rack Mounting Rails on page 11 2 Installing the DXi6701 DXi6702 Node on page 15 Installing the DXi6701 DXi6702 Node...

Page 14: ...assis Rail Right hand Shown 2 Install the internal chassis rails on the chassis tabs see Figure 6 a Slide the internal chassis rail toward the front of the chassis to engage the chassis tabs b Secure with a single Phillips screw on each side of the node chassis Quick release latch Rack mounting rail expanded Internal chassis rail ...

Page 15: ...secure them by engaging the rail tabs into the hole pattern of the rack rails If the rack rails have round holes use the adapter bracket provided in the accessory kit see Figure 7 Note The rack mounting rails extend to support rack depths from 26 5 to 36 4 inches 67 3 to 92 5 cm Internal chassis rail Internal chassis rail Chassis tabs Phillips screw Phillips screw ...

Page 16: ...d Configuration Guide Figure 7 Installing the Rack Mounting Rails Rack mounting rails Rack mounting rail tabs Rack front Rack rail hole pattern square holes Adapter bracket Phillips screws Rack rail hole pattern round holes Rack mounting rail tabs 1U 1U 1U Slide release latch ...

Page 17: ... you do not remove the hard drives from the chassis If they have been removed for any reason during or after the installation you MUST install the hard drives in the same position in which they were removed Refer to the DXi6701 and DXi6702 Drive Slot Serial Number Map which is included with the system for proper hard drive positions Figure 8 Installing the DXi6701 DXi6702 Node Chassis Caution Ensu...

Page 18: ...Rails Follow these steps to install the expansion module rack mounting rails 1 Expand each rack mounting rail disengage the quick release latch and remove the internal chassis rail from the rack mounting rail see Figure 9 Figure 9 Removing the Internal Chassis Rail Right hand Shown 2 Install the internal chassis rails on the chassis tabs see Figure 10 a Slide the internal chassis rail toward the f...

Page 19: ... secure them by engaging the rail tabs into the hole pattern of the rack rails If the rack rails have round holes use the adapter bracket provided in the accessory kit see Figure 11 Note The rack mounting rails extend to support rack depths from 26 5 to 36 4 inches 67 3 to 92 5 cm Phillips screws x 2 Internal chassis rail Phillips screws x 2 Internal chassis rail Chassis tabs ...

Page 20: ...nd Configuration Guide Figure 11 Installing the Rack Mounting Rails Rack mounting rails Rack front Rack mounting rail tabs Rack rail hole pattern square holes Adapter bracket Phillips screws Rack rail hole pattern round holes Rack mounting rail tabs 1U 1U Slide release latch ...

Page 21: ...remove the hard drives from the chassis If they have been removed for any reason during or after the installation you MUST install the hard drives in the same position in which they were removed Refer to the DXi6701 and DXi6702 Drive Slot Serial Number Map which is included with the system for proper hard drive positions Figure 12 Installing the Expansion Module Chassis Caution Ensure that all har...

Page 22: ...result in data corruption and or potential data loss Plugs are inserted in the SAS connectors and Ethernet ports to help guide you where to insert the GbE network and expansion module cables Connect the SAS and Ethernet cables to open ports only not to ports with plugs Ports with plugs are only used for Fibre Channel ports a SAS connector 1 on the DXi6701 DXi6702 node is connected to SAS connector...

Page 23: ...ure system availability in case of a power failure expansion module power supplies should be checked periodically for audible and LED warnings 3 Do NOT connect any Ethernet cables at this time 4 Connect Fibre Channel cables to each Fibre Channel port up to four Note FC ports 1 and 3 are used for VTL host connections and FC ports 0 and 2 are used for Path to Tape PTT connections ...

Page 24: ... 0 1 1 2 3 4 5 6 1 0 2 3 0 0 0 0 0 0 Power cables Power cables Power cables Power cables Power cables Power cables Power cables Fibre Channel ports 0 and 2 for PTT 1 and 3 for VTL Expansion Module 1 Expansion Module 2 Expansion Module 3 Expansion Module 4 Expansion Module 5 Expansion Module 6 Service ports not for customer use Not used 1 GbE Ethernet ports DXi6701 Node ...

Page 25: ...4 5 6 4 5 1 0 2 3 0 0 0 0 0 0 Power cables Power cables Power cables Power cables Power cables Power cables Power cables DXi6702 Node Fibre Channel ports Expansion Module 1 Expansion Module 2 Expansion Module 3 Expansion Module 4 Expansion Module 5 Expansion Module 6 Service ports not for customer use Not used 1 GbE Ethernet ports ...

Page 26: ...onfiguration Guide Figure 15 Cabling the Expansion Modules 7 through 9 0 0 0 0 0 0 1 1 1 Power cables Power cables Power cables Power cables Power cables Power cables Expansion Module 4 Expansion Module 5 Expansion Module 6 Expansion Module 7 Expansion Module 8 Expansion Module 9 ...

Page 27: ...te the initial setup Note If you attempt to install multiple DXi6701 DXi6702 systems at the same time an IP address conflict can occur because each system is configured with the same default IP address 10 1 1 1 To avoid this problem install one system and configure it to use a different IP address before you connect another system to the network Accessing the DXi6701 DXi6702 Remote Management Inte...

Page 28: ...ote This procedure assumes you are running Windows XP on the computer The steps might be different if you are using another operating system a On the Windows Start menu click Connect To Show all connections b Right click the network connection that corresponds to the Ethernet port on the computer for example Local Area Connection and click Properties c Select Internet Protocol TCP IP in the list o...

Page 29: ... Web browser type 10 1 1 1 in the Address box and press Enter The Login window displays see Figure 18 Note For Web browsers DXi6701 and DXi6702 support Firefox 10 or higher Chrome 21 or higher or Internet Explorer 8 or higher use compatibility mode for Internet Explorer 10 Note If the Login window does not display verify that you entered the correct IP address 10 1 1 1 and that the network setting...

Page 30: ... On the Login window select Administrator type password for the password and click Login The Welcome page displays see Figure 19 Note If a message on the page indicates the DXi is in Limited Mode wait ten minutes and then log on again Figure 19 Getting Started Wizard Welcome 2 Read the information about the wizard and then click Next to continue The License Agreement page displays see Figure 20 ...

Page 31: ... configured as individual devices Not Bonded A single network interface with one IP address is configured for eth1 All traffic types management data and replication travel over the single network interface All other settings are at default values The actual network settings you will enter depend on the configuration of your company s network and may differ from those below Work with your network a...

Page 32: ...rk switch is not supplied with the DXi6701 DXi6702 The DXi6701 DXi6702 bonding settings must match the switch settings If the switch settings and the DXi6701 DXi6702 settings do not match your system may become inaccessible through the switch Note The figure below is for illustrative purpose only The Network page will reflect the actual number of physical ports in the system ...

Page 33: ...Initial Configuration 31 DXi6701 DXi6702 Figure 21 Getting Started Wizard Network ...

Page 34: ...ntain only letters A Z numbers 0 9 dots and hyphens d Optional In the Primary Secondary and Tertiary DNS IP Address boxes enter the IP address of up to three DNS servers used to resolve domain names and translate them into IP addresses Caution You must specify a DNS IP address if you plan to use hostname format when configuring an NTP time server outgoing e mail server replication sources and targ...

Page 35: ...y The gateway of the DXi6701 DXi6702 This is usually not the same as the default gateway d Select the Any check box to allow all traffic types management replication and data on the interface e Click Update to save the changes you made to the IP Address table 8 Do not make any changes under IP Address Configuration Routing Details unless directed by your network administrator Note If the DXi needs...

Page 36: ...he system time with an NTP time server To select a timeserver pool you must have specified at least one DNS IP address in step 5d above Otherwise you must specify the IP address of the timeserver pool For more information see the Quantum DXi6000 User s Guide 6 67199 11 In the Timezone drop down box select the time zone where the DXi6701 DXi6702 is located 12 Next to Time Format select the format t...

Page 37: ...15 After you have confirmed all settings click Finish A message appears stating that completing the setup will restart the system 16 Click Yes to restart the system 17 Disconnect the computer from the DXi6701 DXi6702 Reset the computer network settings back to its default values 18 Wait for the system to fully restart This can take up to 30 minutes Continue with the next section to create a typica...

Page 38: ...e appropriate cable for your system Connect 10 GbE optical cables to each 10 GbE port up to two Note Quantum DXi6702 systems support 10 GbE optical cable lengths of up to 300 meters with OM3 cables and up to 100 meters with OM2 cables Quantum recommends using the two 10 meter LC to LC optical cable type that are shipped with the DXi6500 Model 6550 system Consult your 10GbE Optical switch SFP docum...

Page 39: ... front of the DXi6701 DXi6702 node to prevent the removal of the system from the rack see Figure 26 Note The keys that lock and unlock the front bezel are located in the accessory kit Figure 26 Installing the Front Bezels 1 2 3 4 5 6 4 5 1 0 2 3 10 GbE Ethernet ports Service ports not for customer use 1GbE Motherboard ports Not used DXi6701 DXi6702 node bezel Expansion module bezel Expansion modul...

Page 40: ...ertificate NAS License VTL License Backup Application Specific License Data Deduplication License Replication License Storage Capacity License 8 to 80 TB License Certificate for OST Note To verify the licenses that are installed on the DXi6701 DXi6702 system in the remote management console navigate to the Utilities License Keys page Using the VTL Wizard The VTL wizard provides guided assistance f...

Page 41: ... i6000 Quantum DXi6700 or Quantum DXi8500 Quantum DX3000 or Quantum DX5000 Quantum PX500 or Quantum PX720 ATL M2500 ATL P1000 or ATL P7000 If you select a library such as the ATL P1000 or ATL P7000 the DXi6701 DXi6702 appears as the selected library to the host and backup application If you select Quantum DXi6701 DXi6702 the host and backup application recognize the device as a Quantum DXi6701 DXi...

Page 42: ...and LTO 3 IBM LTO 1 LTO 2 LTO 3 LTO 4 or LTO 5 HP LTO 1 LTO 2 LTO 3 LTO 4 or LTO 5 Number of Virtual Tape Drives Accept the default number of tape drives based on DXi model or enter the number of virtual tape drives in the partition Note If all tape drives are currently assigned to other partitions you must remove one or more tape drives from an existing partition to make them available for use in...

Page 43: ...s to create in the partition Starting Barcode The first barcode number in the cartridge sequence You can enter any alpha numeric string for the starting barcode Subsequent barcodes are incremented accordingly For example if you enter AA the cartridges are numbered AA0000 AA0001 AA0002 and so on If you enter a starting barcode with less than 6 characters zeroes are appended to the barcode to make i...

Page 44: ...ld wide name WWN of the host make sure the host is connected to a Fibre Channel port on the DXi6701 DXi6702 and click Discover Remote Hosts again The Backpanel Locations section displays a graphical representation of the Fibre Channel and Ethernet ports as they appear on the rear of the system Note An Active status indicates the host is currently logged on to one or more Fibre Channel target ports...

Page 45: ...net ports as they appear on the rear of the system A dark border displays around the currently selected target 2 Optional Select the Use CCL check box to use the Command and Control LUN Note The CCL Command and Control LUN is not used in most environments This option is recommended for host access groups that contain an HP UX host It can also be used if hosts that are not assigned to any host acce...

Page 46: ... 32 If necessary click Previous to return to a previous step to make changes 2 To make changes to a VTL partition media or host access group you added first select the item and click Delete to delete it Then click Previous to return to the appropriate step and add a new item 3 After you have confirmed all settings click Finish The wizard configures the DXi6701 DXi6702 with the settings you selecte...

Page 47: ... Email Reports a Make sure a valid outgoing e mail server is specified on the Configuration Notifications Email Server page b Optional Specify any additional recipients to receive the reports on the Configuration Notifications Email Email Reports Recipients page c Make sure a weekly Email Reports schedule is configured on the Configuration Scheduler page Configure two weekly recurring events one f...

Page 48: ...ers Protected by Pending and Issued U S and Foreign Patents including U S Patent No 5 990 810 6 67196 06 A 46 6 67196 06 Rev A December 2013 DXi6701 DXi6702 Installation and Configuration Guide Replication Wizard Helps you configure the DXi to send replicated data to or receive replicated data from another DXi system Email Alerts Wizard Helps you configure the DXi to automatically send notificatio...

Reviews: