background image

4

Installing the Tabletop Tape Drive

A-Series Tape Drives Quick Start Guide

Connecting the Tabletop 
Tape Drive

0

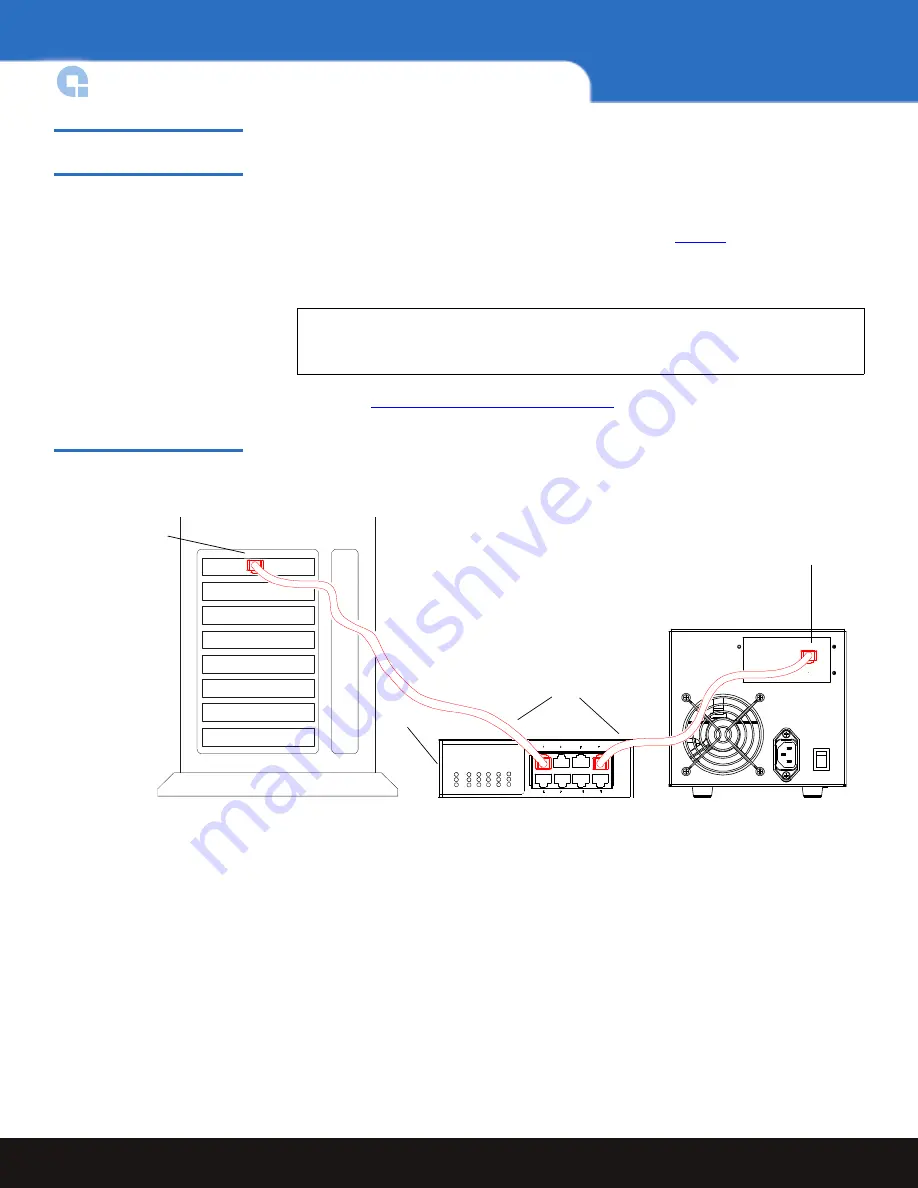
Connect the tabletop tape drive to the host computer through the network port:

1

Connect one end of an Ethernet cable (use either a straight cable or crossover cable) to 

the network port located on the rear of the tape drive. The system will auto-configure 

based on the type of cable used.

2

Connect the other end to a network switch or router (see 

figure 3

)

The drive may be connected directly to a computer host network port; no external 

network is necessary.

3

Proceed to 

Configuring the A-Series Tape Drive

.

Figure 3  Connecting to the 
Network Port

Note:

The GigE network port is backward compatible with 100BaseT and 

10BaseT networks. To get the full performance of your A-Series tape drive, 

it is advisable to use a GigE network.

Network port

Ethernet cables

Router

Note:
Optionally, the tape drive may be 
directly connected to the host 
network port.

Host network port

Summary of Contents for A-Series FTP

Page 1: ...ilable in two configurations tabletop and rackmount Follow the installation procedures appropriate to your tape drive see Installing the Tabletop Tape Drive or Installing the Rackmount Tape Drive Refe...

Page 2: ...conditions that could cause electrostatic discharge ESD Discharge static electricity from your body by touching a known grounded surface such as your computer s metal chassis Use an antistatic wrist s...

Page 3: ...on the rear panel see figure 2 Figure 2 Checking the Tabletop Tape Drive The tape drive performs a self diagnostic test called a power on self test POST each time you power it on The sequence varies...

Page 4: ...f cable used 2 Connect the other end to a network switch or router see figure 3 The drive may be connected directly to a computer host network port no external network is necessary 3 Proceed to Config...

Page 5: ...anel see figure 4 Figure 4 Checking the Rackmount Tape Drive The tape drive performs a self diagnostic test called a power on self test POST each time you power it on The sequence varies depending on...

Page 6: ...e 6 Figure 6 Connecting the Power and Network Cables 4 Connect one end of the Ethernet cable to the network port located on the rear of the A Series tape drive and connect the other end to a network s...

Page 7: ...al Machine to run This Java Plug in is provided by Sun Microsystems The Java FTP client will install immediately When you load the Java FTP client for the first time a display window may ask you to do...

Page 8: ...Client The A Series Client FTP client allows you to transfer files to and from the tape drive partially restore MXF files and view the MXF metadata FTP Client Tab 0In the Home page FTP Client is the...

Page 9: ...drive and be presented with a screen similar to the one shown in figure 9 below This screen offers menu selections in the left most column and shows two panes containing file listings for your local h...

Page 10: ...cal PC to from a non A Series server e g Filezilla A Series server to from a non A Series server A Series server to from another A Series server FXP transfer To transfer files select one or more items...

Page 11: ...isplays and the cartridge is ejected If the tape drive recognizes a valid media cartridge containing data that is not A Series compatible a warning message displays 2 Click Yes to start formatting Not...

Page 12: ...d network of resellers OEMs and other suppliers to meet customer s evolving data protection needs For assistance contact Quantum Technical Assistance center North America 1 800 284 5101 UK France and...

Reviews: