background image

31

16. TYPICAL LIGHTING SITUATIONS

This section covers some typical lighting situations that photographers find
themselves in.  Here is how Qflash can help.

16.1  Portrait

Setting up a 3:1 portrait ratio (or any other ratio) has always been time
consuming.  It is usually accomplished with three flashes: Main, Fill,
Background set to manual.  Each flash needs to be adjusted and metered
separately.  If the Main is in an umbrella or soft box this becomes even
more time consuming.

The Qflash ‘Wireless Control’ mode (with a FreeXWire) or ‘Wired Control’
mode (with a QF50 cable) provides a method for setting up portrait light-
ing which takes only a few moments.  See Section 15 for details of the
Control Modes.

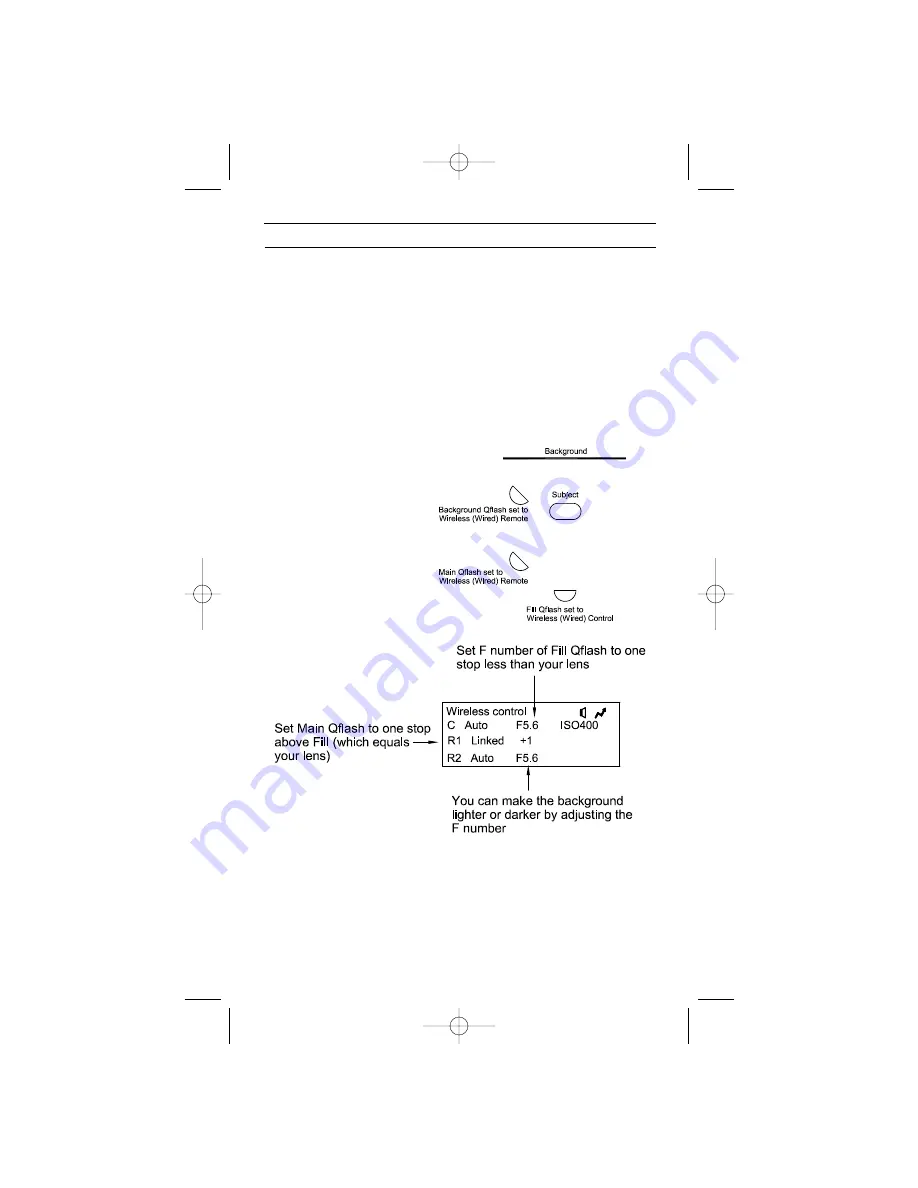
Now the system is set up for perfect portrait lighting, with no metering
needed.  The on-camera Qflash (Control) which is producing a flat light will
shut off one stop below the lens setting (Fill).  Remote 1 Qflash will pro-
duce a light from the left (loop lighting) that is equal to the lens setting
(Main).  This will achieve the portrait 3:1 ratio.  The ratio can be adjusted
by changing the F number of the Control Qflash and the linked ratio.

For a ratio of 5:1 set the F number of the Control Qflash to 2 stops below
the lens setting, and set the Linked ratio to +2.

Set the Qflashes as shown in
the diagram to the right.
Place the camera at the Fill
Qflash position. The Main
Qflash can be placed in an
umbrella or soft box.

Once the Qflashes are
set up, make the fol-
lowing settings to the
Control Qflash:

QFT5D INSTRUCTIONS  10/5/06  10:27 AM  Page 35

Summary of Contents for QFT5d-R

Page 1: ...ash Models QFT5d R QFX5d R Operating Instructions Quantum Instruments Designed and manufactured in the USA QFT5d R powered by Quantum Turbo batteries QFX5d R powered by Quantum Qpaq System QFT5D INSTRUCTIONS 10 5 06 10 27 AM Page 1 ...

Page 2: ...M Open Flash Test Option Button L Down Button Up Button J Modeling Light Set Button G Mode Button I Flash Indicator Reflector Lock Ring QFT5D INSTRUCTIONS 10 5 06 10 27 AM Page 2 ...

Page 3: ...QFT5D INSTRUCTIONS 10 5 06 10 27 AM Page 3 ...

Page 4: ...ash recycling Front curtain sync Rear curtain syns Reflector in normal Bare bulb reflector Reflector with diffusing disks wide angle dome or soft box Telephoto reflector Auto sensor limit turned off Flash Display Symbols QFT5D INSTRUCTIONS 10 5 06 10 27 AM Page 4 ...

Page 5: ...ures for most lighting needs are accessible as required We highly recommend reading this entire instruction manual Whether or not you require all of Qflash s capability now you will want to know it exists when the need arises Series Qflash 5d R adds wireless preflash TTL and wireless remote auto to the Qflash features These features apply when Qflash 5d R is used in combination with Dw R series QT...

Page 6: ...U means the Qflash model will have this feature when upgrad ed to series 5d R An F means this feature is available in the model shown Feature Qflash Models T and X types QF4d QF5d QF5d R Wireless Control in Nikon Canon systems with Qnexus U U F Wireless multiple ratio TTL with Dw R Adapters FreeXWire U U F Wireless preflash TTL with digital cameras using Dw Dw R Adapters and FreeXWire U F F Wirele...

Page 7: ...lected by a switch located on the back of the adapter Auto focus assist If your camera requires an infrared focus assist the QTTL adapter will project a beam when the camera focuses Flash Sync speed control If flash readiness is achieved the camera s automatic system switches the shutter speed to the correct flash sync speed Ready light Flash readiness is established when the Ready indicator appea...

Page 8: ...e head to the desired position Release the button and slightly move the head until it clicks and locks the head into the vertical and horizontal planes 5 GETTING STARTED 5 1 Inserting the Flash Tube Match the red dot on the base of the flash tube with the red dot in the sock et of Qflash Push the flash tube in until it is seated snugly into the socket Excessive force is not required Replace the fl...

Page 9: ...nect a QF53 Hot Shoe sync to the camera For wireless connection Use the FreeXWire system See Section 14 Wireless Qflash Operation Consult your dealer or www qtm com for the latest TTL and QTTL adapter models Note When using a household type two prong sync cord if you have difficulty getting the flash to fire Remove the two prong plug from the Qflash and reinsert it in the opposite direction This c...

Page 10: ...erture or Shutter priority or Manual camera modes Set your metering area to center weight partial metering instead of matrix or multi spot metering Your Qflash provides 150 watt seconds of power compared to 50 watt seconds of a typical shoe mount flash When shooting 6 ft 2m or closer at ISO 200 or greater with a wide open F you must always diffuse the light Otherwise your subject will be over expo...

Page 11: ...3 Sync Turn Off If you are using Qflash as an on camera flash and want to disable the flash for a few shots you can use the sync turn off feature To prevent Qflash from firing press Mode I twice The word OFF will appear in the display To return to normal operation press any button except Test M Other Qflashes connected to this on camera flash whether by cable or wirelessly will fire unless they al...

Page 12: ...Down L buttons to make the change Option Menu 1 8 1 Flash Sensor Limit for Auto Mode Flash sensor limit is an option that limits the distance that the sensor sees when the Qflash is in Auto mode This option is described in detail in section 10 Speaker You may want the speaker off for sensitive shooting or turn it on for audi ble confirmation of flash exposure The earphone signals always sound whet...

Page 13: ...calibrates Qflashes to American National Standards Institute ANSI standards with laboratory equipment traceable to the National Institute of Standards and Technology NIST From time to time photog raphers may wish to fine tune Qflash exposures to match their exposure meters to compensate for variations in cameras or films to match partic ular styles for effects or for individual taste There are two...

Page 14: ...tons to adjust compensation until the f number in the display matches the f the f number on the meter The light output can be increased or decreased by as much as 2 stops in 1 3 steps 8 2 3 Auto mode Qflash Compensation This procedure will calibrate Qflash to a reflected light flash meter you use and trust Note that only reflected light measurements are reliable for auto exposure settings This is ...

Page 15: ...an enter this menu by pushing the Option button until it shows up on the Qflash s display The Set G button will cycle through the available settings Use the Up J Down L buttons to make a change 8 4 Restoring Factory settings Qflash options and settings are preset at the factory You can restore the factory settings by the following method 1 Turn Turbo or Qpaq OFF Connect Qflash to Turbo or Qpaq 2 P...

Page 16: ... 3 steps from full power to 1 64th power like this 1 1 1 1 1 2 1 2 1 2 1 32 1 32 1 64 1 64 Using ISO and Aperture settings Qflash calculates the optimal flash distance Match these settings to your camera s film speed and aperture Flash Compensation setting allows you to fine tune your Qflash in manu al mode from 2 to 2 stops in 1 3 step increments For model X5d R only there is an additional Manual...

Page 17: ... a flash meter and a flash set manu ally Automatic and TTL are a compromise based on the need for speed Setting the flash for a manual power setting and taking an incident meter reading takes time and resources the average photographer may not have So we use automatic flash exposure and know that in some situa tions the sensor may be fooled The Qflash 5d R allows for easy manual shooting without m...

Page 18: ...lash ratio may be set on the QTTL Adapter The camera may be set to manual shutter or aperture priority however light output is controlled by Qflash 10 1 Automatic Mode with Sync only Connection Using only a plain sync cord Qflash displays Auto Mode F and ISO are set on the Qflash display manually Press Set G to select f then press the Up J Down L keys to change the setting Similarly press Set G tw...

Page 19: ...nd three beeps for Undr or Over 15 10 3 Auto Fill Auto mode with QTTL adapter Auto Fill is useful when you prefer to control exposure with the Qflash sensor instead of a camera s own TTL or pre flash metering Many photographers find that Auto Fill mode provides more consistent expo sures for digital cameras Fill flash ratio may be set using the Fill dial on the QTTL adapter Choose any setting from...

Page 20: ... Sensor Limit Setting Qflash to Auto exposure makes picture taking fast and easy However an automatic flash has a flaw the sensor on the flash expects the subject to be wide flat and fill the view of the sensor A person standing against a wall fits this description people in a catering hall or in a park at night do not When the background is located far behind the subject the automatic flash strug...

Page 21: ...25 To set or cancel a sensor limit quickly Press the Option button until you bring up the menu with the Sensor limit setting Then without pressing the Set G button use the Up J Down L buttons to toggle between maximum sensor limit and the last sensor limit set in the procedure above You can also use Program Section 13 to preset the sensor limits you want Then just toggle between them using the Up ...

Page 22: ...ignoring anything further Two subjects separated by a gap Sometimes two subjects are sepa rated by a gap When this occurs the sensor is looking between the two subjects and may miss them The Sensor Limit will correct for this by reading only the light from objects within the limit set in this case 15 feet The light from objects further away will be ignored With the Sensor Limit it is no longer nec...

Page 23: ...mode When using a D Dw or Dw R series QTTL adapter TTL is replaced by QTTL on the Qflash display QTTL mode has all the features of the Auto Fill mode including adjustment of fill ratio The difference is that QTTL mode lets the camera not Qflash control exposure Set your camera to manual aperture or shutter priority or program mode for QTTL dedication to Qflash 5d R Some cameras allow compensation ...

Page 24: ...ll parameters 13 PROGRAM MODE OPERATION Press the Set G to cycle through Frequency Number of Flashes and Strobo Power in that order Connect a sync cord or any Quantum QF D Dw or Dw R series Adapter to the camera After the flash has finished firing a confirmation message will be displayed The flash will display the actual number of flashes fired Strobo is a manual exposure mode Over and Under expos...

Page 25: ...des There are times when you will want to clear a Program from memory Clearing unwanted programs allows for quicker switching between stored programs during actual shoots For example if you need just 3 Programs for a job and you clear out the other 5 Program numbers you will cycle through just the 3 Programs you want for a shoot using the Up J Down L buttons To clear out a Program Start in the Pro...

Page 26: ...is occurs when the camera shutter is pressed 1 2 way 14 1 2 Set up the Remote Qflash s Connect a FreeXWire receiver to the remote Qflash s FreeXWire model FW7Q connects directly to Qflash models FW8R or FW10w require an FW31 cable for connection Press Mode I on the Remote Qflash then press the Up J Down L but tons until the display shows Linked to Local 14 2 QTTLwR Wireless Multiple Flash Ratio TT...

Page 27: ...XWire receiver to the remote Qflash s FreeXWire model FW7Q connects directly to Qflash models FW8R or FW10w require an FW31 cable for connec tion To set a Remote flash to the Local group Press Mode I then Up J Down L until the display shows Linked to Local This Remote Qflash exposure will be the same as the Local on camera Qflash To set a Remote flash to the Group R1 or Group R2 Press Mode I then ...

Page 28: ...reduce your control of the shots 14 3 1 A local on camera flash is optional To change the linked value Press the Set G button once Use the Up J Down L buttons to select the desired option To change the Fill value use the Fill dial located on top of the QTTL adapter 14 3 2 Set up the Mode of the Remote Qflash s Connect a FreeXWire receiver to the remote Qflash s FreeXWire model FW7Q connects direct...

Page 29: ...data for Control C and Group R1 and Group R2 Next from the Local Qflash panel select the settings for the Remote Qflashes Press Set G until either C R1 or R2 blinks in the display If necessary press Up _or Down _ until R1 blinks to set the parameters for Group R1 or until R2 blinks for Group R2 Press Set G again and the Mode of R1 or R2 will blink Use the Up J Down L buttons to select the Mode of ...

Page 30: ...cannot fire while sending data to wireless Remotes or when the display is blinking To speed up data transmission press Set G on the Control Qflash until SEND appears in the display to make Qflashes ready When using a QTTL adapter the camera settings for f and ISO will appear on the Control Qflash display Generally to update the camera settings press the camera shutter 1 2 way to wake up the camera...

Page 31: ...tion of modes are possible for Local and Remote Qlfashes In the table below pay particular attention to the models of FreeXWires and QTTL adapters required to achieve the results in the chart We recom mend some testing when using one of the combinations of operating modes before shooting an assignment QFT5D INSTRUCTIONS 10 5 06 10 27 AM Page 31 ...

Page 32: ... or Wireless the Qflashes will no longer behave independently Example of independent Qflash operation 14 6 SYNC only setup By employing this type of setup each Qflash operates independently of the others This is the simplest and most straightforward way of using multi ple wireless Qflashes QFT5D INSTRUCTIONS 10 5 06 10 27 AM Page 32 ...

Page 33: ... Wired Control Usually this is the one at the camera Connect a QTTL Adapter D Dw or Dw R series Using the Control Qflash panel select the operating Mode and settings for Control Remote 1 and or 2 Wired Control 15 1 Set up the Control Unit The number of Qflashes can be 2 or 3 Turn on all Qflashes The Qflash displays will prompt you to select the Control flash for the Wired Control setup Press the M...

Page 34: ...e settings for the Remote Qflash s Press Set G until either C R1 or R2 blinks in the display If necessary press Up J Down L until R1 blinks to set the parameters for Remote 1 or until R2 blinks for Remote 2 Press Set G again and the Mode of R1 or R2 will blink Use the Up J Down L buttons to select the Mode of the Remote Qflash Press Set G again to set the parameters of the Mode selected 15 3 Selec...

Page 35: ...etails of the Control Modes Now the system is set up for perfect portrait lighting with no metering needed The on camera Qflash Control which is producing a flat light will shut off one stop below the lens setting Fill Remote 1 Qflash will pro duce a light from the left loop lighting that is equal to the lens setting Main This will achieve the portrait 3 1 ratio The ratio can be adjusted by changi...

Page 36: ...the camera Typically it is set to one stop under the camera s aperture but can be as low as 2 1 2 stops under Next Adjust the Linked ratio for the difference between Fill flash and the camera s aperture Example If the camera is set for F8 0 and the Fill is set for F5 6 the Linked ratio needs to be set to 1 the camera is one stop higher than the Fill 16 3 Lighting ratios using a control cable This ...

Page 37: ...airs up to a limit of 85 with your credit card We will bill you only for actual costs up to that limit If repair costs exceed your pre approval we will contact you Paying by check will delay the repair until the check clears up to 15 days Payment by money order is acceptable Normal repair time is 10 15 days For expedited service contact our Service Department Summary Ship via UPS Parcel Post or ot...

Page 38: ...Qflash ACCESSORIES 34 QF63T QF36X REMOTE FLASH HEAD QFT2 X2 QFT2d X2d QFT4d X4d QFT5d X5d QF68 SOFTBOX QF69 FOLDING SOFT BOX HOT SPOT REDUCER QFT5D INSTRUCTIONS 10 5 06 10 27 AM Page 38 ...

Page 39: ...35 OTHER QUANTUM PRODUCTS RADIO SLAVE TURBO SC FW7Q QNEXUS TURBO 2X2 TURBO COMPACT FREEXWIRE QFT5D INSTRUCTIONS 10 5 06 10 27 AM Page 39 ...

Page 40: ...Quantum Instruments Inc 10 Commerce Drive Hauppauge NY 11788 3968 USA Tel 1 631 656 7400 Fax 1 631 656 7410 www qtm com P635 QFT5D INSTRUCTIONS 10 5 06 10 27 AM Page 40 ...

Reviews: