background image

13

Quadra-Fire  •  QVI30S, QVI35S  •  340-901 Rev. i  •  6/09 

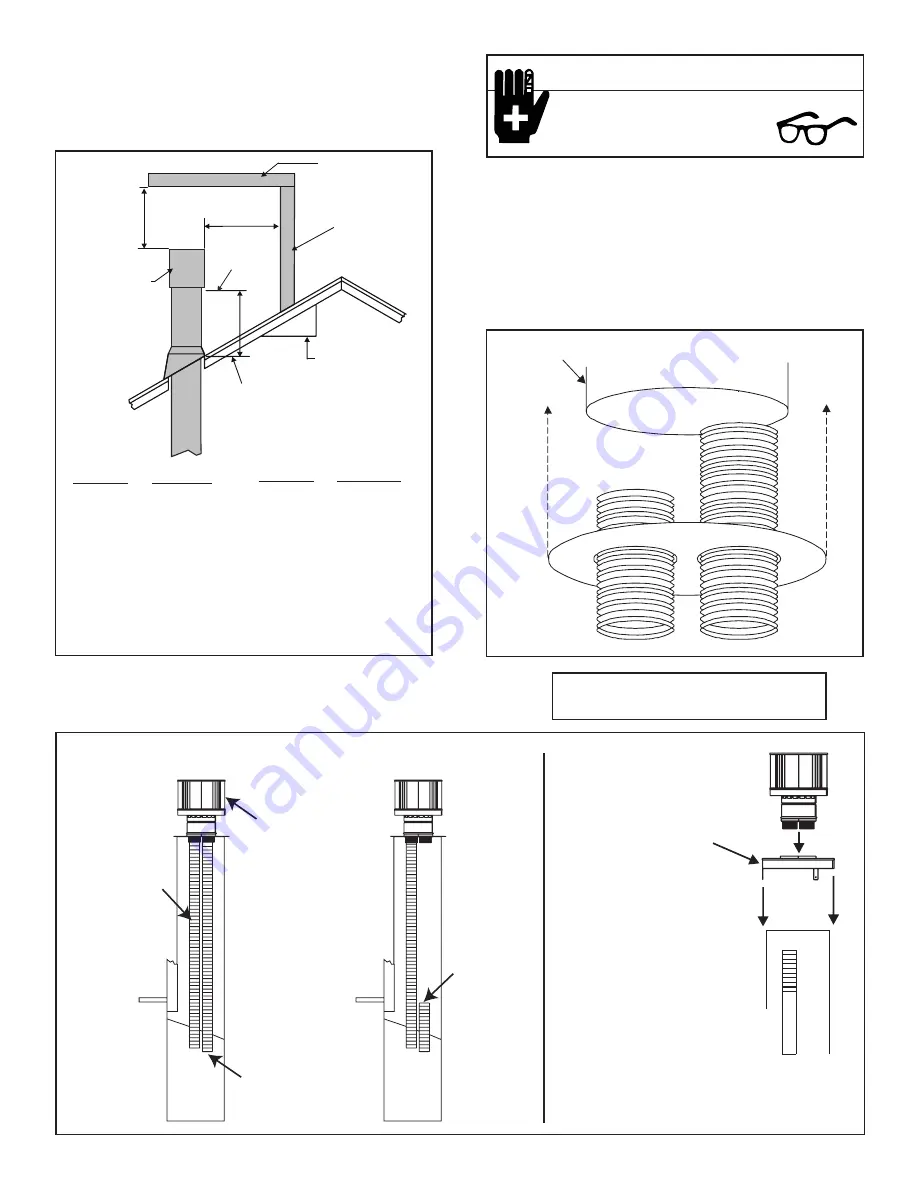
D.  Installing Adaptor and Termination Cap

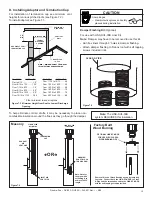
For installation of termination cap see minimum vent 
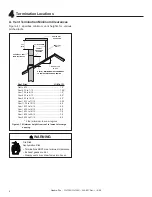
heights for various pitched roofs (see Figure 7.2) . 

To install adaptor see Figure 7.3. 

Roof Pitch       H (Min.) Ft.
Flat to 6/12....................1.0*
Over 6/12 to 7/12 ........1.25*
Over 7/12 to 8/12 ..........1.5*
Over 8/12 to 9/12 ..........2.0*
Over 9/12 to 10/12 ........2.5*
Over 10/12 to 11/12 ..... 3.25

Figure 7.2  Minimum Height from Roof to Lowest Discharge  
 Opening

* 3 foot minimum in snow regions

Roof Pitch       H (Min.) Ft. 
Over 11/12 to 12/12 ....... 4.0
Over 12/12 to 14/12 ....... 5.0
Over 14/12 to 16/12 ....... 6.0
Over 16/12 to 18/12 ....... 7.0
Over 18/12 to 20/12 ....... 7.5
Over 20/12 to 21/12 ....... 8.0

CLASS A PIPE

Figure 7.3    

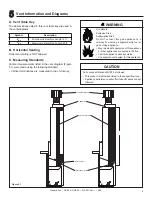
Damper Flashing Kit 

(Optional)

For use with LINK-DV4-30B Liner Kit.

Note

:  Damper may have to be removed to use this kit.

• Run fl ex liners through 3” holes in damper fl ashing.

• Attach damper fl ashing to fi rebox roof with self tapping 

screws included in kit.

Figure 7.4  

To help eliminate cold air drafts, it may be necessary to place non-
combustible insulation around the fl ues as they go though the damper.

Note

: The LINK-DV4-30B

system REQUIRES this insulation.

Masonry

Factory Built 

Wood Burning

EXHAUST

AIR

VENT PIPE 

TERMINATION 

CAP 

LINK-DV30B

Installation

LINK-DV4-30B

Installation

INLET AIR 

VENT PIPE 

WARNING: 

DO NOT BLOCK 

THIS PIPE END! 

Note: Untwist 
the pipe while 
extending it, to 
achieve full 30’ 
length.

Remove 18 inch x 18 inch fl ashing on cap by removing 
3 screws. Connect both the LINK-ZC-ADPB to Class 
A Pipe and the termination cap to the LINK-ZC-ADPB 
with the self tapping screws provided.

OPTIONAL LINK-ZC-ADPB

FOR USE WITH CLASS A

WOODBURNING PIPE

Í

OR

Î

CAUTION

Sharp Edges
•  Wear protective gloves and safety 

glasses during installation.

HORIZONTAL

OVERHANG

VERTICAL

WALL

GAS DIRECT VENT 
TERMINATION CAP

12

X

ROOF PITCH

IS  X/ 12

LOWEST

DISCHARGE

OPENING

2 FT.

MIN.

20 INCHES MIN.

H (MIN.) - MINIMUM HEIGHT FROM ROOF
TO LOWEST DISCHARGE OPENING

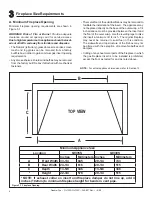
Summary of Contents for QVI30S

Page 1: ...ted on the rating plate Leave this manual with party responsible for use and operation DO NOT DISCARD Important operating and maintenance instructions included Read understand and follow these instructions for safe installation and operation In the Commonwealth of Massachusetts installation must be performed by a licensed plumber or gas fitter a CO detector shall be installed in the room where the...

Page 2: ...ith with local local codes codes if if any any if if not not follow follow ANSI ANSI Z223 1 Z223 1 in in the the USA USA or or CAN CGA CAN CGA B149 B149 installation installation codes codes Installer Installer l appareil l appareil selon selon les les codes codes ou ou reglements reglements locaux locaux ou ou en en l absence l absence de de tels tels reglements reglements selon selon les les cod...

Page 3: ...e A Venting Components 11 B Connecting Vent Pipe 11 C Placing Securing and Leveling the Appliance 12 D Installing Adaptor and Termination Cap 13 8 Gas Information A Fuel Conversions 14 B Gas Pressures 14 C Gas Connection 14 9 Electrical Information A Wiring the Appliance 16 B Junction Box Installation 17 10 Finishing A Mantel Projections 19 11 Appliance Setup A Remove Shipping Materials 20 B Clean...

Page 4: ...s of Gas Burn ing Heating Appliances for Manufactured Homes and Recreational Vehicles and Gas Fired Appliances for Use at High Altitudes Models U S or Canada Maximum Input BTU h Minimum Input BTU h Orifice Size DMS QVI30S NG US 0 2000 FT 32 000 22 000 35 CANADA 2000 4500 FT 28 800 19 800 36 QVI35S NG US 0 2000 FT 35 500 23 500 32 CANADA 2000 4500 FT 31 950 21 150 33 QVI30S LP US 0 2000 FT 31 000 1...

Page 5: ...UST comply with local regional state and national codes and regulations Consult insurance carrier local building fire officials or authorities having jurisdiction about restrictions installation inspection and permits A Design and Installation Considerations Quadra Fire direct vent gas appliances are designed to operate with all combustion air siphoned from outside of the building and all exhaust ...

Page 6: ... furniture and draperies The firebrick refractory glass doors screen rails screen mesh and log grates can be removed from a factory built firebox in order to gain minimum gas insert opening requirements Any smoke shelves shields and baffles may be removed from the factory built firebox if attached with mechanical fasteners The metal floor of the solid fuel firebox may be removed to facilitate the ...

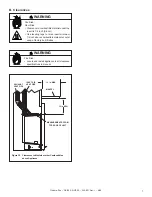
Page 7: ...nce to all clearance specifications in manual Fire Risk Odor Risk Clearance to combustible material under the insert is 1 4 inch 0 6 cm Use leveling legs to raise insert minimum 1 4 inch above combustible material or outer wrap of factory built firebox MEASUREMENTS FROM TOP EDGE OF UNIT 12 in MIN 12 in MAX MANTEL EXHAUST VENT PIPE INLET AIR VENT PIPE WARNING WARNING ...

Page 8: ...2 to 8 12 1 5 Over 8 12 to 9 12 2 0 Over 9 12 to 10 12 2 5 Over 10 12 to 11 12 3 25 Over 11 12 to 12 12 4 0 Over 12 12 to 14 12 5 0 Over 14 12 to 16 12 6 0 Over 16 12 to 18 12 7 0 Over 18 12 to 20 12 7 5 Over 20 12 to 21 12 8 0 Figure 4 1 Minimum height from roof to lowest discharge opening 4 4 Termination Locations 3 foot minimum in snow regions WARNING HORIZONTAL OVERHANG VERTICAL WALL GAS DIREC...

Page 9: ...inations are measured to top of chimney Fire Hazard Explosion Risk Asphyxiation Risk Do NOT connect this gas appliance to a chimney flue serving a separate solid fuel or gas burning appliance May impair safe operation of this appliance or other appliances connected to the flue Vent this appliance directly outside Use separate vent system for this appliance B Horizontal Venting Horizontal venting i...

Page 10: ...lid fuels unless all original parts have been replaced and the fireplace re approved by the authority having jurisdiction F Remote Control The receiver for the remotes must be installed BETWEEN the base pan of the insert and the firebox of the wood burning fireplace see photo below Note If the factory built fireplace has no gas access hole provided an access hole of 1 inch 25 mm diameter or less m...

Page 11: ...NG COLLAR BRACKET INLET AIR STARTING COLLAR LOCKING TAB INLET AIR VENT PIPE Figure 7 1 B Connecting Vent Pipe Reference instructions in the termination kit Install the 3 inch flexible vent pipe s down through the chimney Use three screws to secure the exhaust flexible vent pipe to the 3 foot section stainless steel flexible vent pipe using the factory installed 3 inch collar in the stainless steel...

Page 12: ... may be installed between the back of the decorative surround and the face of the existing fireplace surround to which the insert is being installed This insulation is not required but can assist in the prevention of infiltration of cold air and odors from the chimney Attach surround Follow instructions accompanying surround Push insert so that surround becomes tight against face of fireplace Fire...

Page 13: ...lashing to firebox roof with self tapping screws included in kit Figure 7 4 To help eliminate cold air drafts it may be necessary to place non combustible insulation around the flues as they go though the damper Note The LINK DV4 30B system REQUIRES this insulation Masonry Factory Built Wood Burning EXHAUST AIR VENT PIPE TERMINATION CAP LINK DV30B Installation LINK DV4 30B Installation INLET AIR V...

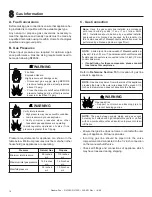
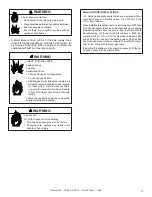
Page 14: ... psig Close the manual shutoff valve BEFORE pressure testing gas line at test pressures equal to or less than 1 2 psig Verify inlet pressures High pressure may cause overfire condition Low pressure may cause explosion Verify minimum pressures when other household gas appliances are operating Install regulator upstream of valve if line pressure is greater than 1 2 psig NOTE Gas line may be run from...

Page 15: ...e check with the local gas utility If installing this appliance at an elevation above 4500 feet in Canada check with local authorities CHECK FOR GAS LEAKS Explosion Risk Fire Risk Asphyxiation Risk Check all fittings and connections Do not use open flame After the gas line installation is complete all connections must be tightened and checked for leaks with a commercially available non corrosive l...

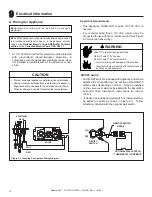
Page 16: ... is recommended that a 110 VAC junction box be connected for use with fan or remote control See Figure 9 2 for junction box wiring Prevent accidental appliance operation when not attended Unplug or remove batteries from remote control if absent or if appliance will not be used for an extended period of time Property damage possible from elevated temperatures CAUTION ON OFF ON OFF SWITCH REMOTE SWI...

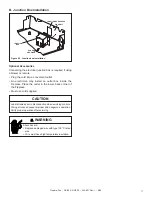
Page 17: ...ote Plug the cord into a convenient outlet An electrician may install an outlet box inside the fireplace Place the outlet in the lower back corner of the fireplace Must use cord supplied CAUTION Label all wires prior to disconnection when servicing controls Wiring errors can cause improper and dangerous operation Verify proper operation after servicing Shock hazard Replace damaged wire with type 1...

Page 18: ...ANCE MUST BE REPLACED IT MUST BE REPLACED WITH TYPE 1050 C RATED WIRE JUNCTION BOX VARIABLE SPEED CONTROL TEMPERATURE SENSOR SWITCH WHT GRN BLK BLK 110 120 VAC BLOWER BLOWER RECEPTACLE BLK BLK BLK BLK WHT GROUND WHT BLK BLK BLK FAN TEMPERATURE SENSOR SWITCH SPEED CONTROL RHEOSTAT JUNCTION BOX GROUND WIRE ATTACH TO ANY METAL SURFACE BEND UP TABS ...

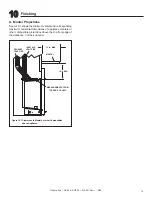
Page 19: ...aximum horizontal dimensions of appliance mantels or other combustible projections above the top front edge of the appliance not the surround 10 10 Finishing Figure 10 1 Clearances to Mantels or other Combustibles above Appliance MEASUREMENTS FROM TOP EDGE OF UNIT 12 in MIN 12 in MAX MANTEL EXHAUST VENT PIPE INLET AIR VENT PIPE ...

Page 20: ...losion Risk Follow ember placement instructions in manual Do NOT place embers directly over burner ports Replace ember material annually Improperly placed embers interferes with proper burner operation Placing the Ember Material Ember material is shipped with this gas appliance To place the ember material Embers CANNOT be placed directly over ports When placing Glowing Embers onto the burner care ...

Page 21: ...all refractory against the back wall of the unit The cut out will be over the pilot and air intake hole On some models the refractory will be behind the pilot bracket see Figure 11 2 Note Refractory patterns and colors vary and may be different from the ones represented in the instructions E Refractory Placement MODELS Supreme XT Grand XT QVI30 QVI35 ADI60 Refractory Placement CAUTION Refractory i...

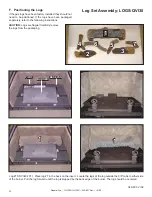
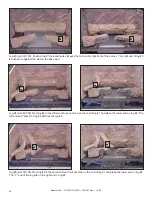
Page 22: ...t need to be positioned If the logs have been packaged separately refer to the following instructions Log 1 SRV340 701 Place log 1 in the back on the insert Locate the legs of the log outside the 3 8 tabs to either side of the burner Pull the log forward until the log is stopped by the back edge of the burner The log should be centered 340 935 2 02 1 1 2 2 5 5 4 4 3 3 6 6 7 7 PILOT PILOT BASEPAN B...

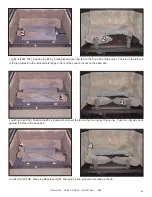
Page 23: ...t end of the log slides into the vertical metal edge in front of the square cut out on the base pan Log 3 srv340 703 Position log 3 by locating its slot over the tab on the front right of the burner Push the right side back against the step in the base pan Log 4 srv340 704 Place log 4 across log 1 and log 2 in the grooved out areas as shown 2 2 2 2 3 3 3 3 4 4 4 4 ...

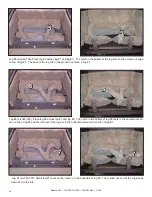
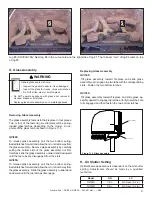
Page 24: ...ts in the grooved out area in log 1 Log 6 srv340 705 Place log 6 across log 1 and log 5 The notch in the bottom of log 6 rests in the carved out sec tion on top of log 5 and the left end of the log sits in the horizontal carved out section of log 1 Log 7 srv740 707 Small log 7 rests on the ramp on the backside of log 3 The burned out end of the log slopes down and to the left 5 5 5 5 6 6 6 6 7 7 7...

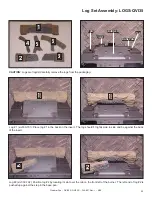
Page 25: ...1 1 PILOT PILOT TAB TAB TAB TAB BURNER BURNER BASEPAN BASEPAN Log 1 srv330 701 Place log 1 in the back on the insert The log should fit tightly side to side and be against the back of the insert 1 1 2 2 2 2 Log 2 srv330 702 Position log 2 by locating its slot over the tab on the front left of the burner The left end of log 2 is pushed up against the step in the base pan ...

Page 26: ... pushed up against the step in the base pan 4 4 Log 4 srv340 705 Rest log 4 in the left smooth cut out area on the end of log 1 and place the lower end on log 2 The left end and bump of log 4 both rest on log 2 5 5 Log 5 srv330 704 Rest log 5 in the second smooth cut out area on the end of log 1 and place the lower end on log 2 The Y end of the log sits on the right end of log 2 5 5 ...

Page 27: ... four of the fastening mechanisms will be spring loaded glass latches depending on the model An ex ample of the glass latch is shown in Figure 11 5 QVI30S To release glass assembly pull the two bottom spring loaded latches forward and allow them to retract away from the glass assembly Remove glass assembly by carefully pulling the bottom side of the glass assembly out first Carefully slide the gla...

Page 28: ...tion manual provided with this appliance For assistance or additional information consult a qualified installer service agency or the gas supplier Do NOT use this appliance if any part has been under water Immediately call a qualified service technician to inspect the appliance and to replace any part of the control system and any gas control which has been under water WARNING WARNING WARNING WARN...

Page 29: ...tion and ventilation air If not installed operated and main tained in accordance with the man ufacturer s instructions this product could expose you to substances in fuel or fuel combustion which are known to the State of California to cause can cer birth defects or other reproduc tive harm Keep burner and control compartment clean See installation and operating instructions accompanying appliance...

Page 30: ... products used in the paint and logs During this break in period it is recommended that some windows in the house be opened for air circulation This will help avoid setting off smoke detectors and help eliminate any odors associated with the appliance s initial burning Figure 12 1 Proper Pilot Flame If adjustment is needed remove cap screw from gas valve using 1 8 inch standard screwdriver see Fig...

Page 31: ...nce Combustible materials may ignite ISSUE SOLUTIONS Condensation on the glass This is a result of gas combustion and temperature variations As the appliance warms this condensation will disappear Blue flames This is a result of normal operation and the flames will begin to yellow as the appliance is al lowed to burn for 20 to 40 minutes Odor from appliance When first operated this appliance may r...

Page 32: ...ame impingement Ensure that the thermocouple connection at the gas valve is fully inserted and tight hand tighten plus 1 4 turn Disconnect the thermocouple from the valve place one millivolt meter lead wire on the tip of the thermcouple and the other meter lead wire on the thermocouple copper lead Start the pilot and hold the valve knob in If the millivolt reading is less than 15mV replace the the...

Page 33: ... tank Check the LP propane tank Refill the fuel tank b Inner vent pipe leaking exhaust gases back into the system Check venting system for damage Replace repair improperly assembled pipe sections c Glass too loose and air tight packet leaks in corners after usage Replace glass panel assembly d Bad thermopile or thermocouple Replace if necessary e Improper vent cap installation Check for proper ins...

Page 34: ...ssembly with care NOTE Clean glass after initial 3 4 hours operation Longer operation without cleaning glass may cause a permanent white film on glass CAUTION When cleaning glass door Avoid striking scratching or slamming glass Do NOT use abrasive cleaners Use a hard water deposit glass cleaner on white film Do NOT clean glass when hot Turn off appliance after 3 4 hours of operation and ALLOW TO C...

Page 35: ... and repaint as necessary 2 Replace appliance if firebox has been perforated Burner Ignition and Operation 1 Verify burner is properly secured and aligned with pilot or igniter 2 Clean off burner top inspect for plugged ports corrosion or deterioration Replace burner if necessary 3 Replace ember materials with new dime size and shape pieces Do not block ports or obstruct lighting paths 4 Check for...

Page 36: ...ters A 33 1 32 839 29 1 32 737 B 24 1 4 616 20 5 32 512 C 12 1 8 308 10 3 32 256 D 36 7 8 937 32 5 16 821 E 32 813 27 25 32 706 F 14 3 4 375 12 7 16 316 G 27 686 22 23 32 577 H 22 3 4 578 20 1 4 514 I 23 11 16 602 21 5 32 537 J 8 7 16 REF 215 8 7 16 REF 215 MODEL DIMENSIONS LOCATION QVI35S QVI30S Inches Millimeters Inches Millimeters K 2 5 16 58 2 5 16 58 L 4 7 16 112 4 7 16 112 M 5 5 32 131 5 5 3...

Page 37: ...cessory Kits see Figure 15 3 Flash Damp Zero clearance damper flashing kit for use with LINK DV30B or LINK DV4 30B liner kits LINK ZC ADP Zero clearance chimney adapter SVRLINK ADP Adapter kit colinear to coaxial 3 inches included in above kits FLEX3 30 One 3 inch flexible liner expands to 30 feet FLEX3 30 2 Two 3 inch flexible liners expands to 30 feet each FLEX CNCT Connector kit 3 inch liner to...

Page 38: ... Rev i 6 09 38 Service Parts Diagram QVI30S Beginning Manufacturing Date Aug 2007 Ending Manufacturing Date ______ R C Service Parts Part number list on following page Log Set Assembly 1 2 3 4 5 6 7 8 9 10 11 12 13 14 15 16 17 18 20 19 ...

Page 39: ... Nov 2008 80784 Post Nov 2008 2014 300 12 Control Panel 319 129 13 Flame Control Knob 571 533 Y 14 Piezo Ignitor 291 513 Y 15 Glass Door Assembly GLA 349 Y 16 Rheostat Knob 100 512 Y 17 Pilot Control Knob 571 534 Y 18 On Off Rheostat 319 510A Y 19 Blower GFK 160A 20 Junction Box 040 250A Y Base Refractory 349 124 Flex Pipe Handle 438 351 Glass Latch Assembly 386 122A Y Lava Rock 705 420 Left Panel...

Page 40: ...01 Rev i 6 09 40 Service Parts Diagram QVI35S Beginning Manufacturing Date Aug 2007 Ending Manufacturing Date ______ Service Parts R 7 8 9 10 11 12 13 14 15 16 17 18 19 Part number list on following page Log Set Assembly 1 2 3 4 5 6 ...

Page 41: ...re Nov 2008 80784 Post Nov 2008 2014 300 11 Piezo Ignitor 291 513 Y 12 Flame Control Knob 571 533 Y 13 Glass Door Assembly GLA 339 Y 14 Rheostat Knob 100 512 Y 15 Pilot Control Knob 571 534 Y 16 Control Panel 319 129 17 On Off Rheostat 319 510A Y 18 Blower GFK 160A 19 Junction Box 040 250A Y Flex Pipe Handle 438 351 Glass Latch Assembly 386 122A Y Lava Rock 705 420 Left Panel Extension 330 265 Min...

Page 42: ...t Bracket 319 164 3 Shutter Bracket Assembly 2026 130 Y 4 Valve Plate Gasket 319 401 5 Top Handle 319 170 6 Bottom Handle 319 168 7 Bracket 319 120 8 Valve Bracket 319 146 9 Flexible Gas Connector 477 301A Y 10 Valve NG 230 0710 Y Valve LP 230 0720 Y 11 Flex Ball Valve Assembly 531 320A Y 12 Temp Sensor Switch 046 018A Y 13 Bracket Burner Support 319 166 14 Burner 319 336 Y Wire Assembly 2020 069 ...

Page 43: ...43 Quadra Fire QVI30S QVI35S 340 901 Rev i 6 09 D Limited Lifetime Warranty Î ...

Page 44: ...Quadra Fire QVI30S QVI35S 340 901 Rev i 6 09 44 ...

Page 45: ...4766876 4793322 4811534 5000162 5016609 5076254 5113843 5191877 5218953 5263471 5328356 5341794 5347983 5429495 5452708 5542407 5601073 5613487 5647340 5688568 5762062 5775408 5890485 5931661 5941237 5947112 5996575 6006743 6019099 6048195 6053165 6145502 6170481 6237588 6296474 6374822 6413079 6439226 6484712 6543698 6550687 6601579 6672860 6688302B2 6715724B2 6729551 6736133 6748940 6748942 6769...

Reviews: