Quadra-Fire • LOGS-QFI30 Log Instructions • 2227-935 Rev. B • 7/11
2
Log #2 (SRV2227-702)
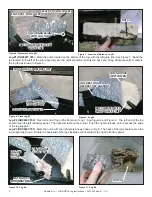
: Rest left end of log on the fl at spot of Log 1. See Figure 6 and Figure 8. The left end of the log
should touch the left refractory panel. The right end rests on the burner. Push the right end back, until it touches the edge
of the log support.
Log #3 (SRV2227-701)
: Mate the notch with the right grate tine as shown in Fig 9. The back of the log should rest on the
log support as shown. Rotate the back end of the log clockwise until it contacts the right refractory panel.
Figure 8. Place Log #2
LOG CONTACTS REFRACTORY
LOG CONTACTS REFRACTORY
LOG RESTS ON BURNER
LOG RESTS ON BURNER
LOG CONTACTS
LOG CONTACTS
LOG SUPPORT
LOG SUPPORT
Figure 9. Log #3
LOG RESTS ON
LOG RESTS ON
REFRACTORY SUPPORT
REFRACTORY SUPPORT
LOG GROOVE
LOG GROOVE
(FOR LOG #6)
(FOR LOG #6)
NOTCH MATES WITH
NOTCH MATES WITH
RIGHT GRATE TINE
RIGHT GRATE TINE
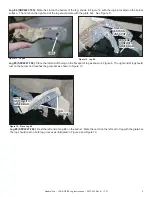
Figure 10. Log #4
Figure 11. Log #4
LOG PIN
LOG PIN
MATES
MATES
WITH SLOT
WITH SLOT
LOG GROOVE
LOG GROOVE
(FOR LOG #6)
(FOR LOG #6)
NOTCH
NOTCH
MATE NOTCH
MATE NOTCH
WITH GRATE BAR
WITH GRATE BAR
2
2
3
3
4
4
Figure 6. Placement of Log #1
Log #1 (SRV2227-703)
: Mate the notch located on the bottom of the log, with the left grate tine. See Figure 7. Bend the
tab located to the left of the pilot assembly into the vertical position. Rotate the back end of log clockwise until it contacts
the log tab as shown in Figure 6.
FLAT SPOT FOR LOG #5
FLAT SPOT FOR LOG #5
NOTCH
NOTCH
FLAT SPOT FOR LOG #2
FLAT SPOT FOR LOG #2
NOTCH MATES WITH LEFT
NOTCH MATES WITH LEFT
GRATE TINE
GRATE TINE
Figure 7. Location of Notch on Log #1
LOG CORNER ALIGNS
LOG CORNER ALIGNS
WITH LOG TAB
WITH LOG TAB
1
1


