background image

Quadra-Fire  •  QVI-30FB  •  2020-900  Rev. H  •  9/07

16

Step 2.  Positioning, Leveling, and
               Securing the Insert

• Place the insert into position.

• Level the insert from side to side and from front to back.

Use the leveling legs if necessary to set each corner of
the base.  The levelling legs are mounted behind the fan
cover plate.  For location of fan cover plate, see Figure
11 on page 17.

!

!

Step 3. The Gas Control System

WARNING: THIS UNIT IS NOT FOR USE WITH
SOLID FUEL.

These models use a standing pilot ignition type of gas con-
trol system.

Standing Pilot Ignition System

This system includes millivolt control valve, standing pilot,
thermopile/thermocouple flame sensor, and piezo ignitor.

WARNING: 110-120 VAC MUST NEVER BE
CONNECTED TO A CONTROL VALVE IN A
MILLIVOLT SYSTEM.

STANDING PILOT

Figure 6.  Gas Controls System

Step 4.  The Gas Supply Line

NOTE: Have the gas supply line installed in accordance
with  local  building codes by a qualified installer
approved and/or licensed as required by the locality.
(In the Commonwealth of Massachusetts installation
must be performed by a licensed plumber or gas
fitter).

NOTE: Before the first firing of the fireplace, the gas
supply line should be purged of any trapped air.

NOTE: Consult local building codes to properly size
the gas supply line leading to the 1/2 inch (13 mm)
hook-up at the unit.

This gas fireplace is designed to accept a 1/2 inch
(13 mm) gas supply line. To install the gas supply line:

• A listed (and Commonweatlh of Massachusetts approved)

1/2 inch (13mm) tee-handle manual shut-off valve and a
listed  flexible gas connector are connected to the 1/2
inch (13mm) inlet of the control valve. 

NOTE:

 If substi-

tuting for these components, please consult local codes
for compliance.

• Locate the gas line access hole in the outer casing of

the fireplace.

• Insert the gas supply line through the gas line hole and

connect it to the shut-off valve.

• When attaching the pipe, support the control so that the

lines are not bent or torn.

• After the gas line installation is complete, all connec-

tions must be tightened and checked for leaks with a
commercially-available, non-corrosive leak check solu-
tion. Be sure to rinse off all leak check solution following
testing.

WARNING: DO NOT USE AN OPEN FLAME TO
CHECK FOR GAS LEAKS.

!

Figure 7.   Gas Supply Line

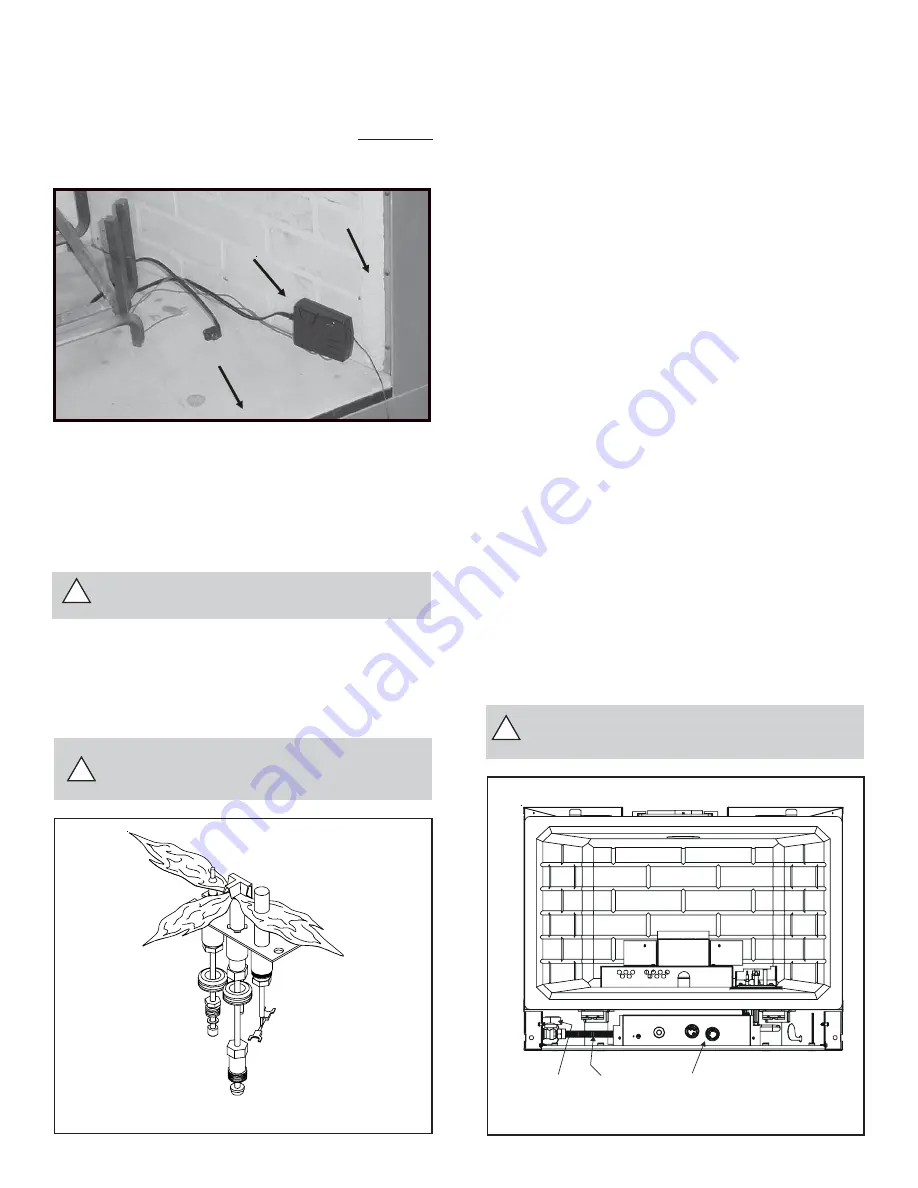
Remote Control

The receiver for the remotes must be installed 

BETWEEN

the base pan of the insert and the firebox of the wood-burn-
ing fireplace (see photo below).

EXISTING BOTTOM

OF FIREPLACE

REMOTE

RECEIVER

UNIT

EXISTING SIDE

REFRACTORY

GAS

SHUT-OFF

FLEXIBLE
GAS LINE

CONTROLS

Summary of Contents for Gas Firebrick qvi30fb

Page 1: ...ac tured mobile home wherenotprohibited by local codes 2 This appliance is only for use with the type of gas indicated on the rating plate This appliance is not convertible for use with other gases unless a certified kit is used WARNING IF THE INFORMATION IN THESE INSTRUCTIONS IS NOT FOLLOWED EXACTLY A FIRE OR EXPLOSION MAY RESULT CAUS ING PROPERTY DAMAGE PER SONAL INJURY OR DEATH Please contact y...

Page 2: ...ace front READ and UNDERSTAND all instructions carefully before starting the installation FAILURE TO FOLLOW these installation instructions may result in a possible fire hazard and will void the warranty Prior to the first firing of the fireplace READ the Using Your Fireplace section of the Owners Guide DO NOT USE this appliance if any part has been under water Immediately CALL a qualified service...

Page 3: ...e Insert 12 Step 1 Installing the Vent System 12 Step 2 Positioning Leveling and Securing the Insert 16 Step 3 The Gas Control Systems 16 Step 4 The Gas Supply Line 16 Step 5 Gas Pressure Requirements 17 Step 6 Wiring the Appliance 17 Step 7 Installing Logs and Ember Material 19 Shutter Settings 19 Positioning the Logs 19 Placing the Ember Material 19 Step 8 Installing Trim Surround 19 Step 9 Befo...

Page 4: ...Quadra Fire QVI 30FB 2020 900 Rev H 9 07 4 4 1 6 2 7 3 5 8 9 10 11 13 14 15 16 17 19 20 18 12 Part number list on following page Log Set Assembly Service Parts Diagram Service Parts QVI 30FB ...

Page 5: ...Y 19 Blower Assembly GFK 160A 20 Cover Plate 778 185 Temp sensor 107 531 Y Wiring Assembly 2020 059 Y Vent Pipe Assembly 768 380A Glass Latch Assembly 386 122A Y Mineral Wool 050 721 Vermiculite Embers MYSTIC EMBERS Gasket Assembly Contains pilot Gasket pilot bracket and air passage gaskets Thermocouple 446 511 Y Thermopile 060 512 Y Pilot tube SRV485 301 Y Patch Kit SRV PACK Conversion Kit NG NGK...

Page 6: ...Knob 571 531 5 Valve Bracket 773 145 Pilot Assembly NG 485 510A Y Pilot Assembly LP 485 511A Y Orifice NG 31A 506 800 Y Orifice LP 49A 065 801 Y 8 Bracket Orifice 778 169 9 Bracket Pilot 783 170 10 Flexible Gas Connector 477 301A Y 7 IMPORTANT THIS IS DATED INFORMATION The most current information is located on your dealers VIP site When ordering supply serial and model numbers to ensure correct s...

Page 7: ...in accordance with local codes or in the absence of local codes with the National Electric Code ANSI NFPA No 70 in the United States or to the CSAC22 1 Canadian Electric Code in Canada These models may be installed in a bedroom or bed sitting room in the U S A and Canada 1Approvals and Codes High Altitude Installations U L Listed gas appliances are tested and approved with out requiring changes fo...

Page 8: ...xhaust vent terminal for the horizontally vented gas fu eled heating appliance or equipment The sign shall read in print size no less than one half 1 2 inch in size GAS VENT DIRECTLY BELOW KEEP CLEAR OF ALL OB STRUCTIONS Inspection The state or local gas inspector of the side wall horizontally vented gas fueled equipment shall not approve the installa tion unless upon inspection the inspector obse...

Page 9: ...EARTH EXTEN SION IF PRESENT MUST COMPLY WITH EI THER OF THE FOLLOWING 1 THE SOLID FUEL BURNING FIREPLACE MANUFACTURER S SPECIFICATION OR 2 LOCAL BUILDING CODES REQUIRED BY AUTHORITY HAVING JURISDICTION WARNING THE SOLID FUEL FIREPLACE HAS BEEN CONVERTED FOR USE WITH GAS ONLY AND CANNOT BE USED FOR BURNING WOOD OR SOLID FUELS UNLESS ALL ORIGINAL PARTS HAVE BEEN REPLACED AND THE FIRE PLACE HAS BEEN ...

Page 10: ...NOTE If exhaust collar on insert and fireplace damper do not line up add 4 inches 102mm to minimum fireplace height for bends in vent pipe Figure 1 Diagram of insert and minimum fireplace dimensions B 2 50 8mm A C TOP VIEW GAS ACCESS SURROUND DOOR GAS CONTROL VALVE RATING PLATE ELECTRICAL JUNCTION BOX ACCESS INLET AIR STARTING COLLAR EXHAUST STARTING COLLAR ON OFF SWITCH GLASS ASSEMBLY ...

Page 11: ... 3 8 746 1 D 26 1 16 661 E 20 5 8 524 F 14 5 8 371 G 22 1 8 562 H 21 1 4 540 Dimensions in brackets are millimeters Figure 2 Diagram and model dimensions D F E H 1 9 16 40 6 5 8 169 ø 2 2 13 16 71 G 3 9 16 91 1 1 16 28 ELECTRICAL ACCESS IF EQUIPPED GAS INLET C 13 3 4 350 A 5 9 16 142 2 1 2 64 B 2 1 16 52 3 1 8 80 REF 4 102 ...

Page 12: ... the maximum vertical rise is 50 feet These dimensions are measured from the starting collars of the unit to the end of the last section of vent pipe See dimension V in Figure 4 Vent System Approvals A vertical vent termination system installed on this model will require one 1 length of 3 stainless steel liner one 1 length of 3 inch flexible vent pipe for the combustion air one 1 length of 3 inch ...

Page 13: ...ABOVE THE ROOF TOP THESE MINIMUM HEIGHTS ARENECESSARYINTHEINTEREST OF SAFETY SEE THE FOLLOWING DIAGRAM FOR MINIMUM HEIGHTS PROVIDED THE TERMINATION CAP IS AT LEAST 2 FEET FROM A VER TICAL WALL AND 2 FEET BELOW AHORIZONTAL OVERHANG NOTE This also pertains to vertical vent systems installed on the outside of the building Roof Pitch H min ft flat to 6 12 1 0 6 12 to 7 12 1 25 over 7 12 to 8 12 1 5 ov...

Page 14: ...HE EXHAUST COLLAR ON COLLAR SLIDE PLATE THE INLET AIR PIPE MUST ONLY BE CONNECTED TO THE INLET AIR COLLAR OF THE UNIT AND EITHER ATTACHED TO THE INLETAIRCOLLAROFTHETERMINATIONCAP OR TERMINATED IN THE CHIMNEY TERMINATION CAP EXHAUST VENT PIPE V 14 FT MINIMUM 50FT MAXIMUM 3 INCH COLLAR Factory installed to stainless steel section WARNING DO NOT BLOCK PIPE END WITH INSULATION OR ANY OTHER SEALING MAT...

Page 15: ... ADAPTER FOR EXHAUST MUST BE INSTALLED INLET AIR VENT PIPE 3 INCH COLLAR OPTIONAL LINK ZC ADPB For Flashing Class A Pipe TERMINATION CAP SQUARE FLASHING REMOVED EXHAUST VENT PIPE SUPPLIED WITH TERMINATION KIT INLET AIR VENT COLLAR LINK DV30 SHOWN ALTERNATIVE INSTALLATION FOR VENTING THROUGH WOOD BURNING CLASS A PIPE CLASS A WOOD PIPE LOCKING TABS LOCKING HANDLE SLIDING PLATE ...

Page 16: ...purged of any trapped air NOTE Consult local building codes to properly size the gas supply line leading to the 1 2 inch 13 mm hook up at the unit This gas fireplace is designed to accept a 1 2 inch 13 mm gas supply line To install the gas supply line A listed and Commonweatlh of Massachusetts approved 1 2 inch 13mm tee handle manual shut off valve and a listed flexible gas connector are connected...

Page 17: ...ft of 20 AWG is provided with the appli ance to connect the wall switch to the appliance Instead of the supplied assembly wire with a length of 25 ft or less and a gauge of 20 AWG through 14 AWG is acceptable The wire needs a jacket with a temperature rating of 140o F 60o C or higher At the appliance connect the wire to the ON OFF switch pigtails CAUTION LABEL ALL WIRES PRIOR TO DISCONNEC TION WHE...

Page 18: ...L TEMPERATURE SENSOR SWITCH WHT GRN BLK BLK 110 120 VAC BLOWER BLOWER RECEPTACLE BLK BLK BLK BLK WHT GROUND WHT BLK BLK BLK REMOTE RECEPTACLE FAN COVER PLATE GROUND WIRE JUNCTION BOX SIDEWALL FEED PLUG THROUGH HOLE INSERT STRAIN RELIEF AROUND CORD IN THIS END FROM OUTSIDE OF UNIT SCREW PROVIDED To service or clean Remove the ground wire of the fan can clip on the side of the base pan Remove the bl...

Page 19: ... and sides of burner pan Save the remaining ember materials for use during fire place servicing The embers provided are sufficient for 2 to 4 applications Place MYSTIC EMBERS over burner surface and around base of the burner do not cover any burner port holes Can be used on floor of firebox for a realistic ash bed Replace the glass door on the fireplace Re install and latch the decorative front Fi...

Page 20: ... the gas supply lines unless the gas valve has been turned to the OFF position in which case the air would have to be purged NOTE The fireplace should be run 3 to 4 hours on the initial start up Turn it off and let it cool completely Remove and clean the glass Replace the glass and run the fireplace for an additional 8 hours This will help to cure the products used in the paint and logs 3 Attach t...

Page 21: ...PILOT position turn the control knob counter clockwise to the PILOT position 6 To light the pilot press the control knob and then press the red or black piezo button once every second The piezo makes a clicking sound It may be necessary to repeat this step If the pilot does not light after 10 seconds go back to step 2 The control knob should be held down for a MINUTE after pilot ignition If the co...

Page 22: ...r vacuum the control compartment fireplace logs and burner areas surrounding the logs Checking Flame Patterns Flame Height Frequency Periodically By Qualified service technician Home owner Task Make a visual check of your fireplace s flame patterns Make sure the flames are steady not lifting or floating See Figure 16 The thermopile thermocouple standing pilot tips should be covered with flame See ...

Page 23: ... copper lead Start the pilot and hold the valve knob in If the millivolt reading is less than 15mV replace the thermocouple b Defective valve If the thermocouple is producing more than 15 millivolts replace faulty valve 3 The pilot is burning there is no gas burner the valve knob is in the ON position and the ON OFF switch is in the ON position a ON OFF switch or wires defective Check the ON OFF s...

Page 24: ...f necessary e Improper vent cap installation Check for proper installation and freedom from debris or blockage 6 Glass soots a Flame impingement Adjust the log set so that the flame does not excessively impinge on it b Improper venturi setting Adjust the air shutter at the base of the burner c Debris around venturi Inspect the opening at the base of the burner NO MATERIAL SHOULD BE PLACED IN THIS ...

Page 25: ...e Technologies discontinues the model and two 2 years for optional accessories Adjustments regular maintenance cleaning and temporary repairs do not qualify for a service call fee and will not be covered The replacement of consumer replaceable items and installation of upgraded component parts do not quality for a service call fee and will not be covered This limited Lifetime Warranty does not ext...

Reviews: