


6
7039-174C
August 01, 2016
Discovery I
F. Install Checklist
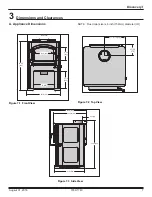
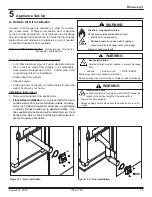
Appliance Install
Appliance is leveled and connector is secured to appliance.
Hearth extension size/height decided.
Outside air kit installed.
Floor protection requirements have been met.
If appliance is connected to a masonry chimney, it should be cleaned and
inspected by a professional. If installed to a factory built metal chimney, the
chimney must be installed according to the manufacturer’s instructions and
clearances.
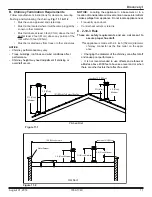
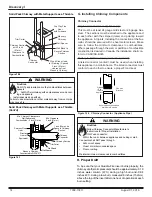
Chimney
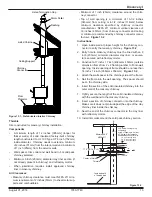
Chimney installed, locked and secured in place with proper clearance.
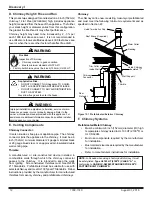
Chimney meets recommended height requirements (14-16 feet).
Terminations installed and sealed.
Clearances
Combustible materials not installed in non-combustible areas.
Mantels and wall projections comply with installation manual requirements.
Protective hearth strips and hearth extension installed per manual requirements.
Appliance Setup
All packaging and protective materials removed.
All labels have been removed from the door.
All packaging materials are removed from inside/under the appliance.
Manual bag and all of its contents are removed from inside/under the appliance
and given to the party responsible for use and operation.
ATTENTION INSTALLER:
Follow this Standard Work Checklist
This standard work checklist is to be used by the installer in conjunction with, not instead of, the instructions contained in this installation manual.
Customer: __________________________________________________________________________
Date Installed: __________________________________________________________________________
Lot/Address: __________________________________________________________________________
Location of Appliance:
______________________________________________________________
Installer:
__________________________________________________________________________
Dealer/ Distributor Phone #: ______________________________________________________________
Serial #:
__________________________________________________________________________
Model : __________________________________________________________________________
WARNING! Risk of Fire or Explosion!
Hearth & Home Technologies recommends the following:
• That this checklist remain visible at all times on the appliance until the installation is complete.
Comments:
Further description of the issues, who is responsible (Installer/Builder/Other Trades, etc.) and corrective action needed:
Comments communicated to party responsible by on
(Builder/Gen. Contractor) (Installer) (Date)
YES IF NO, WHY?


