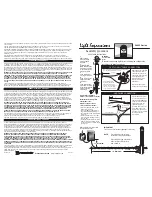
Installation:
•
The HIPAR-126 is supplied with a dual hanging bracket, which can also be used as a free-standing
support.
•
When installing the fixture, ensure all fixings are secure, controls and connections are accessible and
allow enough space for air to circulate around the housing. Do not aim directly in line of sight or very
close to people where the extremely bright output of the fixture may be harmful to eyesight.
•
The HIPAR-126 is IP65 weatherproof, and all electrical connections are hard-wired with waterproof
connectors. An XLR to waterproof connector is provided for adapting the DMX input lead to a
standard DMX signal input. A mains plug to waterproof connector is provided to adapt the power
input lead to a standard mains supply.
•
Connect the waterproof connectors securely, ensuring that the notches are aligned for correct
polarity.
•
The waterproof plugs have a threaded collar which must be fully tightened onto the waterproof
socket.
•
The HIPAR-126 also has DMX through and power through leads for connecting onto further HIPAR
cans in a daisy-chain manner. Ensure that the mains power supply is capable of the total load of all
cans connected.
Cleaning:
•
Use a soft cloth with a neutral detergent to clean the casing and lens as required
•
Do not use strong solvents for cleaning the unit
Rear panel controls:
Manual control menu:
Press the “
MENU
”
button to enter the settings menu.
P
ress “
UP
” and “
DOWN
”
buttons to navigate through various setting functions.
P
ress “
ENTER
”
button to save the desired setting.