

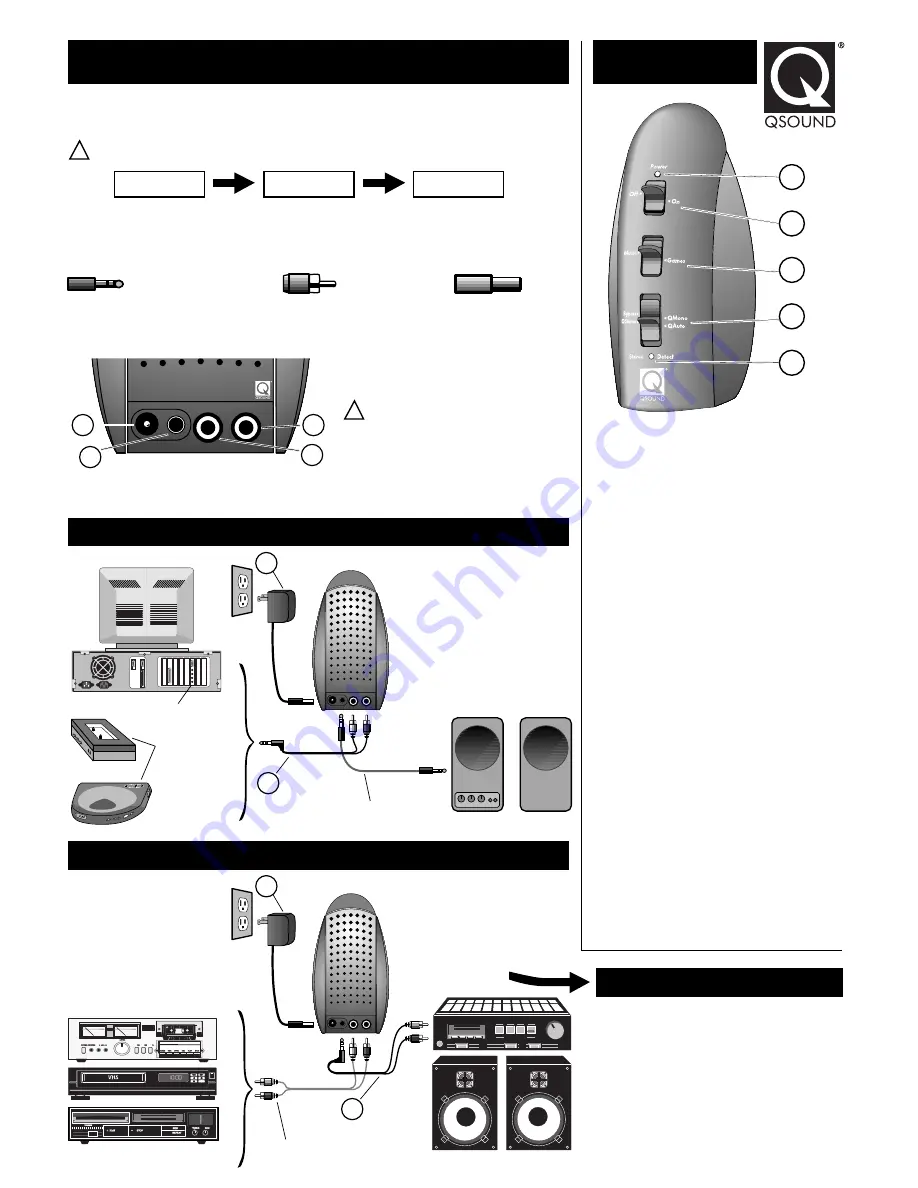
Power In
12VAC
Stereo
Output
Stereo Input
Right Left
4
2
3
1
Power In
12VAC
Stereo
Output
Stereo Input
Right Left
PC Sound Card Line Out
VCR, CD etc. Line Out or Tape Deck "Play"
(Note: will not work with Turntable. See 1c.)
Amp or receiver & speakers
AC Power Adaptor
Tape or CD Player
Line Out or
Headphone Out
6
Supplied Cable
Existing Cable
5
Multimedia Speakers
Power In
12VAC
Stereo
Output
Stereo Input
Right Left
AC Power Adaptor
6
Supplied Cable
Existing Phono Cable
5
B
C
D
E
A
1. Turn on the UltraQ unit, using the Power Switch (B). The Power
Indicator (A) should light. If not, check your power adaptor.
2. Turn on the rest of your equipment.
3. Adjust the playback volume to a suitable level and start playback
from your sound source.
4. Adjust the UltraQ settings according to the following guidelines.
Expansion Mode Switch (C)
This switch provides two effect settings. The Music setting is
recommended for listening to CD audio, while the Game setting
provides more extreme expansion suitable for sound effects.
The Translation Mode Switch (D)
Bypass defeats the QSound effect and passes the input signal
directly to the output. (Power must still be present.)
QMono provides a Mono-to-3D function that synthesizes a QSound
3D stereo signal from mono or stereo input. (In this mode, any
stereo signals are combined to mono before being processed.)
QStereo provides a Stereo-to-3D mode, in which true stereo
signals will be translated to a wide QSound 3D image while the
respective positions of various component sounds is retained.
(Mono signals will be essentially unaffected in this mode.)
QAuto automatically chooses QMono or QStereo mode according
to the nature of the input signal. The Stereo Detector (E) indicates
that the input signal is stereo. This shows which mode will be
selected by the automatic feature, and may also be used as a guide
for manual mode selection. Note that a stereo signal
naturally has
brief periods of mono; it is normal for the Stereo Detector to turn on
and off when monitoring stereo content. If automatic switching
occurs frequently, you may wish to select QStereo mode.
If your receiver or amplifier has a spare set of tape deck jacks,
connect the Output or "Rec" left and right tape jacks to the UltraQ
left and right input jacks using a dual phono-to-phono cable. Then
connect the amp Input or "Play" left and right tape jacks (phono) to
the UltraQ output (mini) using the supplied cable (5).
Now select "Tape Monitor" mode for the tape deck connectors you
have used on your amp or receiver. (See your amp manual.) Now all
sources including radio and turntable can be selected as you
normally do and UltraQ will enhance every signal in your system!
UltraQ Guide Rev. 2.0 07/97
1. Connecting UltraQ
1a. Connecting to a Mini Plug System
2. Using UltraQ
UltraQ is designed to be inserted between the
sound source (computer, CD player, etc.) and a pair of amplified ("powered") speakers or a
suitable stereo amplifier / speaker combination. It is a
line level device, meaning that is intended to work with the intermediate signal levels
common in audio systems. UltraQ is not intended to drive unpowered speakers directly.
The most common connectors used for audio are the 3.5mm
mini plug and the phono plug. The mini plug is usually stereo, that is, one
connector carries both left and right signals. The phono plug is only capable of connecting a single signal, so in stereo audio systems
phono plugs are always used in pairs. They are often are colour-coded, e.g. black for left and red for right. The
barrel plug is never used for
audio connections but is almost exclusively used for AC power adaptors.
UltraQ uses phono-style jacks (panel connectors) for input and a 3.5mm mini jack for output. It is supplied with an audio connection cable
(5) having a 3.5mm mini plug at one end, and two phono plugs at the other. In most cases this combination will allow you to connect to all
common audio systems. Certain situations may require additional cables or adaptors.
The diagram at left shows the UltraQ connection panel.
The UltraQ AC power adaptor (6) connects at (1).
Use the supplied cable (5) to connect your sound
source (mini plug) to the UltraQ input (phono
plugs). Make sure the Red phono plug goes to
the Right UltraQ input (3) and the Black phono
plug goes to the Left input (4). Then use your
existing mini-plug-to-mini-plug cable to connect
your amplified speakers to the UltraQ output (2).
Connect the AC power adaptor (6) to a wall socket
and the UltraQ Power In jack (1) and you're done!
Connect the AC power adaptor (6) to a wall socket
and the UltraQ Power In jack (1) and you're done!
If your receiver or amplifier has an unused set of
tape deck connectors (usually marked "Play" and
"Rec") you can use these to connect UltraQ so
that it will work with
all the sound sources you
have available. See section 1c.
1b. Connecting to a Phono Plug System
1c. The "Tape Loop" Connection Method
First use your existing phono-to-phono cable
to connect your sound source output to the
UltraQ input, matching left and right. Then
use the supplied cable (5) to connect the
UltraQ output (mini plug) to your receiver or
amplifier (phono plugs - Red for Right, Black
for Left). Use the same input on your
amplifier that your tape deck, VCR, CD
player, game console, etc. was previously
connected to.
Sound Source
UltraQ
Amplifier / Speakers
!
Caution:
!
Caution:
UltraQ should not be connected to the output of a power amplifier. Serious damage may result!
3.5mm mini plug (stereo)
phono plug
barrel plug
The UltraQ power adaptor produces 12VAC. Use of any other
AC adaptor may cause malfunction or damage to the unit!
Output to your amplifier or amplified speakers is available from the 3.5mm mini jack at (2), while the right and left input signals from your
sound source connect at the phono jacks (3) and (4) respectively.


