background image

8

12

www.qsfptek.com

V1.0

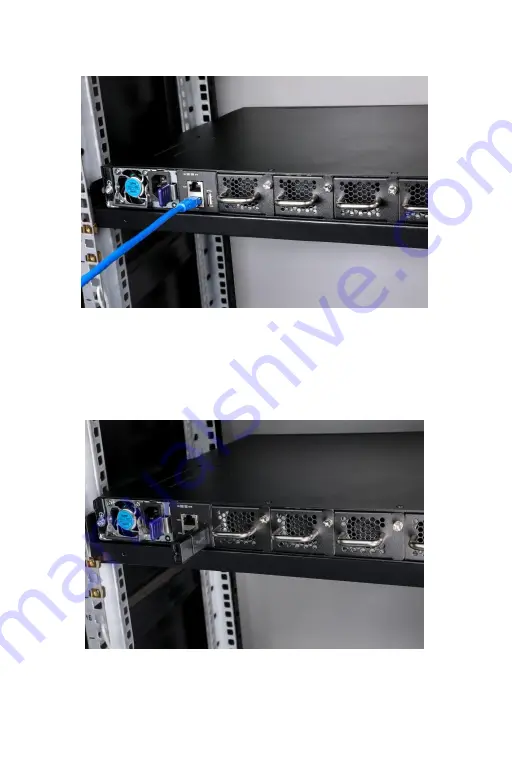
Connecting the ETH Port

1. Prepare an standard RJ45 Ethernet patch cable.
2. Insert one end of the RJ45 Ethernet patch cable to the computer RJ45 port.
3. Connect the RJ45 connector on the other end of the patch cable to the ETH port on the switch.

Connecting the USB Port

1. Prepare an Universal Serial Bus (USB) flash disk.
2. Insert the USB to the switch USB port.

Summary of Contents for S7600-24Y4C

Page 1: ...1 12 www qsfptek com V1 0 V1 0 S7600 24Y4C Quick Start Guide 24 Port 25Gb Ethernet L3 Switch 24x 25G SFP28 with 4x 100G QSFP28 Uplinks Support MLAG ...

Page 2: ... meet the requirements of next generation Enterprise Data Center Metro and HCI Hyper Converged Infrastructure networks We appreciate your decision to select S7600 24Y4C This manual is intended to help you become acquainted with the switch design and provide instructions for implementing the switches into your network Accessories ...

Page 3: ...P28 ports for 10G 25G connection QSFP28 QSFP28 ports for 40G 100G connection Back Panel Ports Ports Description CON An RJ45 console port for serial management ETH An RJ 45 Ethernet management port USB A USB management port for software and configuration backupand offline software upgrade ...

Page 4: ...rt link Off Port not link SFP28 Port 1 24 Green On 25G port link Blinking 25G packets receiving or transmitting Amber On 10G 1G port link Blinking 10G 1G packets receiving or transmitting Off Port not link QSFP28 Port 25 28 Green On 100G 40G port link Blinking 100G 40G packets receiving or transmitting Amber On 10G 1G port link Blinking 10G 1G packets receiving or transmitting Off Port not link Br...

Page 5: ...s ESD preventive wrist strap Temperature Humidity Requirements Cleanliness Requirements Substance Unit Concentration limit DUST Particle m3 3 X 10⁴ No visible dust on the tabletop for three days SO2 mg m3 0 2 H2S mg m3 0 006 NH3 mg m3 0 05 Cl2 mg m3 0 01 Note The dust particle size is 5 μm Temperature Humidity 0 45 C 10 95 ...

Page 6: ...port on the back rear 2 Connect the other end of the power cord to a AC power source equipment Connecting the SFP28 Port 1 Insert the SFP28 module into the SFP28 port 2 Plug a fiber patch cable to the SFP28 transceiver 3 Connect the other end of the fiber to the device that you want to realize data communication ...

Page 7: ...e other end of the fiber to the device that you want to realize data communication Connecting the Management Ports Connecting the Console Port 1 Prepare an console cable 2 Insert the RJ45 connector of the console cable into the console port on the switch 3 Connect the D89 female connector on the other end of the console cable to the serial port on the computer host ...

Page 8: ...h cable 2 Insert one end of the RJ45 Ethernet patch cable to the computer RJ45 port 3 Connect the RJ45 connector on the other end of the patch cable to the ETH port on the switch Connecting the USB Port 1 Prepare an Universal Serial Bus USB flash disk 2 Insert the USB to the switch USB port ...

Page 9: ... Ethernet cable and open a web browser Step 2 Set the IP address of the computer to 192 168 1 x where x is any number from 2 to 254 and the subnet mask to 255 255 255 0 Step 3 Open a web browser and type http 192 168 1 2 in the address bar Enter the default username and password admin admin Step 4 Click sign in to access the web based configuration page ...

Page 10: ...ch console port to your computer Step 2 Launch the terminal simulation software such as HyperTerminal on the computer Step 3 Configure the parameters of the terminal emulation software as follows 115200 bits per second 8 data bits no parity 1 stop bit and no flow control Step 4 Enter the default username and password admin admin ...

Page 11: ...e see Chapter 5 for how to enter 2 Input boot_flash_nopass command to start the system in uBoot mode Note After using the boot_flash_nopass command the system will clear up the startup config files before starting this operation the startup config files will be stored in flash startup config conf old file Power System Troubleshooting The switch can judge if its power system is faulty according to ...

Page 12: ...A selecting terminal emulation VT100 Support and Other Resources Contact us https www qsfptek com company contact us html Email sales qsfptek com Customer Success https www qsfptek com resources customer success stories Product Warranty S7600 series switches are backed by a 5 year limited warranty supported by QSFPTEK And you are eligible to apply for a return or exchange of your items within 14 d...

Reviews: