background image

12

Q-Sys™ I/O Card Remove and Replace Procedure

This procedure is for Q-Sys Type 2 I/O Cards only. Card installation should only be done by a trained 
and qualified technician.

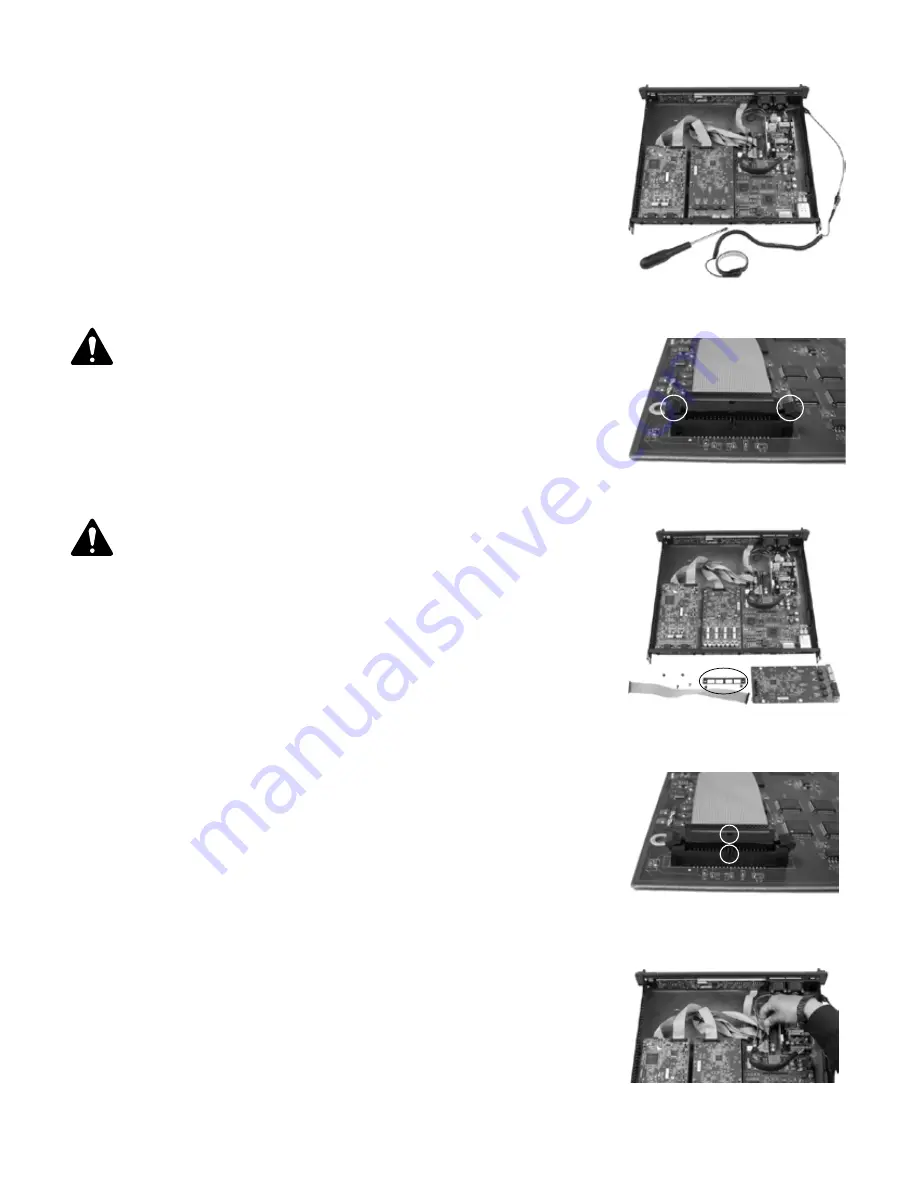
Tools


Refer to 

Figure 9

•  Phillips screwdriver
•  ESD grounded wrist strap
•  1/4” hex driver/socket (not shown) for replacing Q-Sys I/O Cards in positions C or D.

CAUTIONG!:


An ESD grounded wrist strap must be worn throughout the remove and 

replace procedure. The end of the wrist strap should be connected to an unpainted 
surface on the product chassis such as the ground stud.

1.  Disconnect the AC mains power cord from the Q-Sys I/O Frame.

2.  Connect and put on the ESD grounded wrist strap.

3.  Remove the sheet metal screws securing the lid to the Q-Sys I/O Frame chassis. Remove the lid by 

lifting it approximately 1" at the rear of the chassis while sliding it back from the front.

NOTE!:


To remove an I/O Card in position C or D, you must first remove the appropriate 

card above it in position A or B. The following steps apply to both top and bottom cards.

4.  Locate the I/O Card to be replaced and, except for the Blank Card, remove the ribbon cable from the 

card by gently pushing outward on the cable ejector tabs. 

(Figure 10)

 The connector should be free 

of the socket.

5.  Remove the two screws securing the I/O Card mounting bracket to the rear of the chassis. Remove 

the bracket. 

(Figure 11)


6.  Remove the I/O Cards:

a.  For cards in positions A or B, remove the four Phillips head screws securing the card to the 

standoffs. Remove the card. If you are not replacing a card in position C or D, skip to step 

7

.

b.  For cards in positions C or D, perform step 

6.a

, then remove the four hex standoffs securing the 

lower card, and remove the card. 

7.  Install the new I/O Card by reversing steps 

5

 and 

6

. Be sure to align and secure the rear panel 

mounting bracket before tightening the hex standoffs or card-securing screws. 

If you are replacing 

a card in positions C or D, complete step 

8

 now, and then install the upper card and 

repeat step 

8

 for the upper card.


8.  Reconnect the ribbon cable to the I/O Card, by aligning the tab on the cable connector housing with 

the key on the card connector as shown in 

Figure 12

. Gently push down on the cable connector 

housing to seat the cable into the card connector. When properly seated, the cable ejectors will lock 
in place with the thumb tabs upright.

9.  When replacing the Blank Card with an I/O Card, the new ribbon cable must also be attached to the 

I/O Frame main board. To do this, locate the main board audio connectors 

(Figure 13)

 , Then locate 

the appropriate card position indicator on the main board for the card being replaced (A, B, C or D). 
Attach the ribbon cable in the same manner as the I/O Card, ensuring that the cable connector tab 
is aligned with the main board connector key and that the cable is properly seated with the ejector 
tabs in their locked position. 

10. Replace the I/O Frame lid and secure the sheet metal screws. 

— Figure 9 — 

— Figure 10 — 

— Figure 11 — 

— Figure 12 — 

— Figure 13 — 

Summary of Contents for Q-SYS Core 1000

Page 1: ...TD 000284 00 Core 1000 Centralized audio and control processor Core 3000 Centralized audio and control processor Core 4000 Centralized audio and control processor I O Frame Networked audio and contro...

Page 2: ...ing Install in accordance with the manufacturer s instructions Do not install near any heat sources such as radiators heat registers stoves or other apparatus including amplifiers that produce heat Do...

Page 3: ...QSC has any authority to alter or modify in any manner the disclosures and recommendations set forth herein QSC Audio Products 3 Year Limited Warranty QSC Audio Products LLC QSC guarantees its produc...

Page 4: ...arton Q Sys Core 1000 Core 3000 Core 4000 or Q Sys I O Frame product Rubber feet Hardware Manual Q Sys Designer software CD Core 1000 Core 3000 and Core 4000 products only IEC power cord and cord lock...

Page 5: ...ds are ordered in the product configuration a shop kit containing the mating plugs is included in the carton contents Plug the Euro terminal block plug into the appropriate input or output receptacle...

Page 6: ...pointing device PC Hardware Requirements for Windows XP Professional PC with 300 megahertz or higher processor clock speed recommended 233 MHz minimum required single or dual processor system Intel Pe...

Page 7: ...name or the name of the I O Frame component in Q Sys Designer so they match A new I O Frame is shipped with both LANs enabled and the addressing Mode set to Auto Auto If there is a DHCP server on the...

Page 8: ...ptional provides the interface between digital devices such as mixing consoles recording devices other devices and Q Sys Blank Card Optional fills card slot when no card is needed Q Sys Designer Softw...

Page 9: ...lth and to synchronize control settings 2N Network redundancy Two separate networks In this configuration you can have each Q Sys Core and or I O Frame connected to both networks 2N I O redundancy For...

Page 10: ...n Button 6 Device ID Button locates device in Q Sys Designer GUI 7 Status LED reports network health ID and firmware update status 8 Power On LED 9 Clear Settings Paperclip Button resets network prope...

Page 11: ...are available for field installation by qualified service personnel Front Panel Rear Panel Figure 7 1 2 3 4 5 7 8 6 1 Fan Exhaust Vents 2 Audio I O Signal and Card Present Indicators 3 240 x 64 Monoc...

Page 12: ...in positions A or B remove the four Phillips head screws securing the card to the standoffs Remove the card If you are not replacing a card in position C or D skip to step 7 b For cards in positions...

Page 13: ...oE 3560E 24PD SG 300 10P SLM2024 3500yl 48G PWR 3560E 48PD SG 300 10MP SLM2048 3500yl 48G PoE 3560E 48TD SG 300 20 SRW Series Managed Switches EOL 5406zl all modules 3560E 48PD F SG 300 28 SRW2008 541...

Page 14: ...ignal Five tri color LEDs 240 x 64 monochrome LCD graphics display Power On Blue LED Device Status Tri color LED Audio Signal Five tri color LEDs per I O card slot 240 x 64 monochrome LCD graphics dis...

Page 15: ...110 dB 110 dB 110 dB 110 dB 110 dB 100 dB 110 dB 100 dB 110 dB 95 dB 100 dB 100 dB 110 dB Frequency Response 20 Hz 20 kHz max Frequency Response 20 Hz 20 kHz typ 0 5 dB 0 2 dB 0 5 dB 0 2 dB 0 5 dB 0 2...

Page 16: ...d legacy V1 models 4 Group Delay assumes that the sample rate converter is enabled CobraNet I O Card CobraNet Input Output CCN32 Description Up to 32 input and 32 output channels of CobraNet digital a...

Page 17: ...CA 92626 1468 USA Main Number 714 754 6175 Sales Marketing 714 957 7100 or toll free USA only 800 854 4079 Sales Marketing FAX 714 754 6174 Customer Service FAX 714 754 6173 qscaudio com info qscaudio...

Reviews: