background image

PNO3WB

 MIDI Upgrade Kit Instruc ons 

 83529 

 6 

Accessing


and


Naviga ng


the


PNO3WB


Control


Menu


[Connect


to


the


QRS


Wi

Fi]


PNO3WB processors have built

in Wi

Fi and are shipped to operate as soon as the system powers on. 


Use your smart device [iPhone, iPad, iPod, Android phone/tablet or laptop] to wirelessly connec on to 

QRSPNO3_#####

 Wi

Fi. 

Enter the password = 

qrsmusic

.


Open your web browser; Apple Safari, Android Browser or Google Chrome. 
Enter 

10.3.2.

1


in the address bar.  

This QRS Splash Screen will appear. 
Touch the center of the screen to open the QRS Menu. 

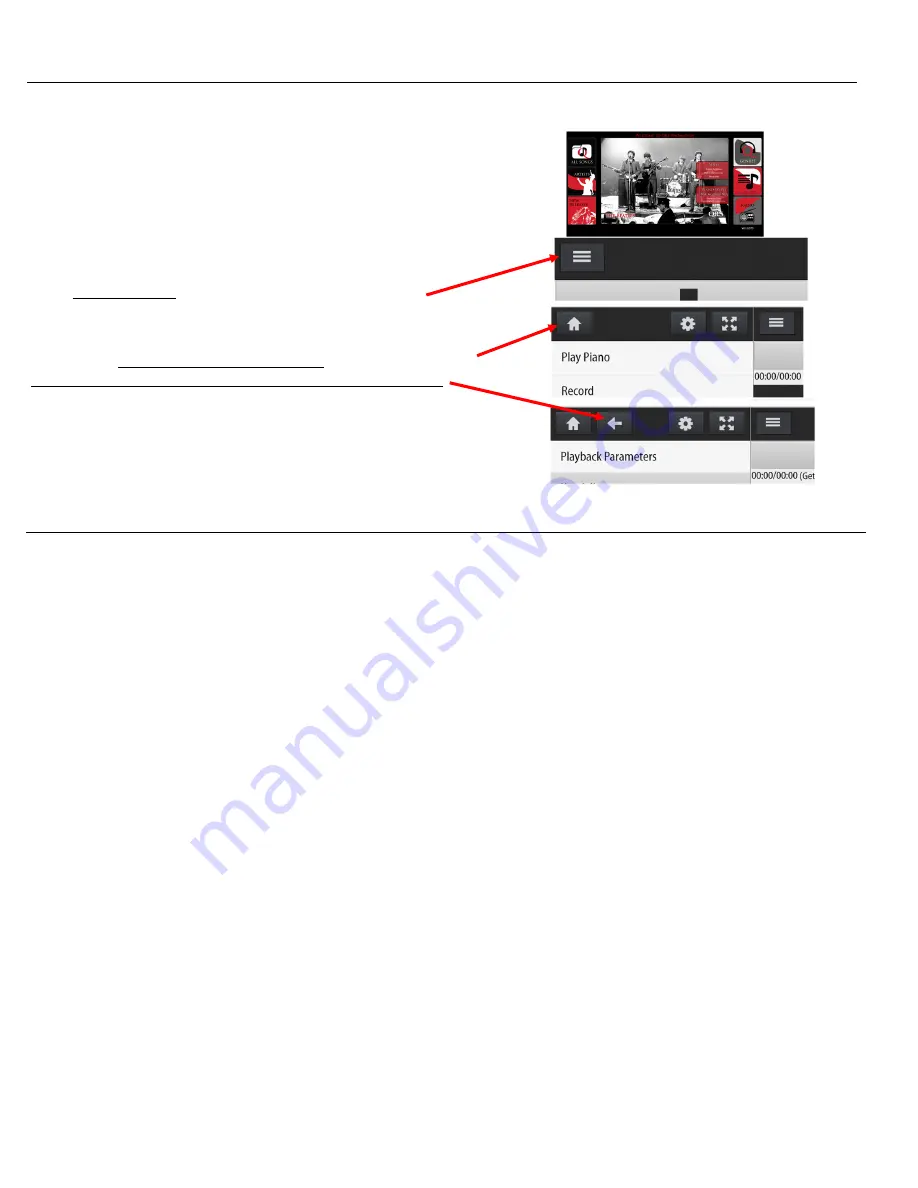
You will see one of several possible screens. 

      Look for the menu column on the le , not in the body of the screen. 

If only three white bars show at the top le  of the QRS screen... 
...the Menu column is closed. 
     Tap three bars to open the Menu column. 

An image of a white house, with no white arrow, and you’re at the 

Home


page

White arrow point toward the house, you’re NOT at the home page.  
      Tap the white arrow to go back in the menu one page at a  me. 
      Tap the white house to go directly to the home page. 
      The gear image takes you to the System Setup page.   
      The four arrows opens the window to Full Screen. 
      Tap the three bars to close the menu column. 

MIDI


Se ngs


[The piano won’t play un l 5 Pin MIDI Out op on is turned ON.] 

From Home, go to: System Setup / Performance Setup / Rou ng & Delay Se ngs / MIDI Op ons / 

General


MIDI Player System=ON 


Controller 7 Volume Control = ON 


Apply Volume Curve to Velocity = ON 


Per Channel Controller 7 Enable = Select #1  


Number of MIDI Out Notes = 88 


Lowest MIDI Out Note = 21 


Go to: System Setup / Performance Setup / Rou ng & Delay Se ngs / MIDI Op ons /  

5


Pin


Out


5


Pin


MIDI


Out


=


ON


[The


PNO3WB


won’t


send


data


to


the


MIDI


Out


port


unless


this


is


ON.]


 MIDI 

5

Pin Out Send Individual Notes O

 for all Notes to Stop = Select #1. 


Summary of Contents for PNO3WB

Page 1: ...not needed when using the PNO3WB processor YOU MAY WANT TO ADD A MIXER OR ANOTHER SPEAKER If the original controller AND the QRS PNO3WB units are used a mixer would be used to combine the audio outputs from the two controllers into one speaker The second op on would be to add another powered speaker to use with the QRS PNO3WB processor PNO3WB processors used as MIDI controllers are powered from th...

Page 2: ...Kit Instruc ons 81525i 1 PNO3 User Guide QGJPM3 0418 1 PNO3 Quick Guide MIDI Upgrade Kit Conversion Parts added to a QRS Upgrade Kit 70166 2 Adapter MIDI Barrel Connector 803081 1 PNO3WB Power Adapter 9V 2A 70152 1 Cable 10 MIDI One MIDI cable came with the QRS upgrade kit adding another here Table of Contents Page Page Mount the PNO3WB Processor 3 Master Volume Curves 8 Assemble and A ach the Mag...

Page 3: ...e end of the PNO3WB processor The center RFC connector is NOT used Connect the Op onal Record System if installed The QRS PNO3WB can record from the following ports The USB CLIENT This port will connect to the PLX box Record and playback with music so ware via a computer connec on MIDI IN Record from any MIDI record system on the piano Connect the MIDI OUT of the exis ng MIDI Interface to the MIDI...

Page 4: ...ux Input Connect to AMI OUT on a Qsync to play piano from the QRS SyncAlong DVDs Play Piano External Input Auxiliary Line In Audio 2 OUTPUT Mixed Out Mixed Output to home stereo system Go to System Setup Performance Delay Se ngs Mixed Out Turn ON Mixed Out Upper Right Use to send separate audio signal synth piano with the background to a home stereo system Audio 3 OUTPUT to Speaker Use the 990026 ...

Page 5: ...ect the power adapter into the 9VDC jack on the end of the PNO3WB processor Connect the power adapter to an AC outlet PDS128 Plus CPU Interface Disklavier Mark III Controller PNO3WB is Powering ON The PNO3WB processor begins to boot as soon as it s connected to power The PLX lights begin to scan as the opera ng system is loaded Voice prompts announcements should be heard in about 90 seconds These ...

Page 6: ...Menu column An image of a white house with no white arrow and you re at the Home page White arrow point toward the house you re NOT at the home page Tap the white arrow to go back in the menu one page at a me Tap the white house to go directly to the home page The gear image takes you to the System Setup page The four arrows opens the window to Full Screen Tap the three bars to close the menu colu...

Page 7: ...g the PianoDisc or Disklavier controller To increase the MIDI level going out to the player Tap Use the or bu ons to go to the note that you want to adjust Min MIDI Out Use the bu on to increase the level The minimum se ng is 1 The bu on at the end of the row sets the current value to all keys upscale from the selected note Changes are automa cally saved Tap Stop when finished MIDI Out Pedal Adjus...

Page 8: ... the PLAYBACK QRS MP3 AUDIO CURVE 0 to 10 Set the PLAYBACK QRS MP3 PIANO CURVE 0 Tap NEXT to the Volume Curve Configura on Full Expression Playback page Set the PLAYBACK QRS MP3 AUDIO CURVE 100 Set the PLAYBACK QRS MP3 PIANO CURVE 50 Tap NEXT to go to the Volume Curve Configura on Loud Playback page Set the PLAYBACK QRS MP3 AUDIO CURVE 190 200 Set the PLAYBACK QRS MP3 PIANO CURVE 90 100 Tap Finish...

Page 9: ...n is made Wireless Network Link the PNO3WB to the home Wi Fi as follows System Setup Network Se ngs Wireless Network Verify that the Network Mode is DHCP Client Tap the Connect to Client Wi Fi bu on Select your home network from the list Enter the password to your home network Tap Connect IF the PNO3WB links to your home network you should Hear the IP address announced over the piano speakers nota...

Page 10: ...the system cannot be networked call the QRS office at 800 247 6557 for an Internet Bypass Code Go to System Setup Trial Ac va on Tap on the green Customer Trial Ac va on bu on and then OK Fill out the form and tap the Save and Register bu on To verify the release Go to System Setup Service View Se ngs Scroll down the page to find the Ac ve DRM sec on Look for a DRM ID number indica ng release songs ...

Page 11: ... under a QRS Music Subscrip on Plan To determine the warranty period for your system Go to System Setup Service View Se ngs and scroll down the page to find the Ac ve DRM sec on Look for a DRM ID number with these descrip ons Release songs for 1 year Expires This is the ini al music trial period Release Songs for 2 years Expires Extended Parts Warranty period Release Songs for 4 years Expires Exte...

Page 12: ......

Reviews: