QRS PMII Upgrade Instructions Download Page 3

3  

QRS PMII to PNO3WB Upgrade Instruc ons 

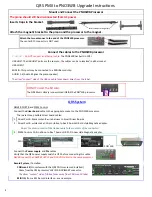
Unplug the piano from the AC outlet and locate the PMII Processor. 

Locate the PMII Processor. 

Look under the soundboard area on a grand piano.  


Remove the Lower Panel on an upright. 

Lower Panel 

SD Card

DO NOT remove, you won’t need it.


The QRS Music Library is now stored INSIDE the PNO

3

WB


 processor. 

Return the PMII processor 

with the SD card 

to QRS Music using the UPS Return Label provided. 

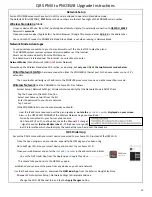
Unscrew and remove the PMII processor from the piano. 
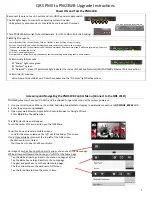
MIDI Controller


 MIDI 

IN 

 This port may be connected to a MIDI Record strip. 

 MIDI 

OUT 

 This port connects to the MIDI slave device that the QRS processor is controlling. 

 9VDC 

Power 

Adapter 

Disconnect and Remove the PMII Processor 


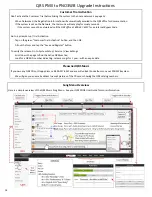
Disconnect the cables and remove PMII processor from the piano. 
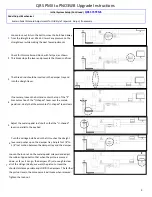
 

USB HOST

The


USB


HOST


ports


are


the


same


so,


the


cables


can


be


re

inserted


in


either


socket.


 USB 

CLIENT 


 ETHERNET 


 AUDIO 

1

4

Label the Audio cables before disconnec ng

.  


 MIDI 

IN

This port may be connected to a MIDI Record strip. 


 KEYSCAN 

ALT 


 POWER 

SUPPLY 


 KEYSCAN 

PRIMARY 


If


the


PNOscan


Record


System


is


installed


QRS System 

 MIDI 

IN 

 This port may be connected to a MIDI Record strip. 


 Driver 

Port

Disconnect the driver board cable, one of these three types. 


  Port 

B: 

20

pin connector [Black ribbon cable

black plas c connector] 

Port B: 37

pin connector [Gray ribbon cable

metal connector w/blue plas c] 

Port A: 20

pin 

fl

at connector [Black ribbon cable

no connector] 

 KEYSCAN 

PRIMARY 


If


the


PNOscan


Record


System


is


installed


Summary of Contents for PMII

Page 1: ...QRS PMII to PNO3WB Upgrade Instructions Manual Revision March 2022 PNO3 OS Versions 5 xx Above PNO3 PMII...

Page 2: ...ed as a MIDI Controller QRS System QRS Part Number for the PNO3WB QRS Upgrade Kit is 83525 A PMII processor used on a complete QRS system will have a ribbon cable connected to this POWER SUPPLY socket...

Page 3: ...ntrolling 9VDC Power Adapter Disconnect and Remove the PMII Processor Disconnect the cables and remove PMII processor from the piano USB HOST The USB HOST ports are the same so the cables can be re in...

Page 4: ...that the QRS power supply switch is OFF before connec ng this cable NEVER connect the POWER SUPPLY and DC 9VDC cables to the same processor Record System if installed PNOscan 10 On systems with the QR...

Page 5: ...Connect the MIDI cable from the MIDI OUT of the PNO3WB processor to the MIDI IN of the Disklavier On the back of the Disklavier controller set the HOST SELECT switch to MIDI Some units may not have t...

Page 6: ...e selected note Changes are automa cally saved Tap Stop when finished MIDI Out Pedal Adjust Go to System Setup Performance Setup Rou ng Delay Se ngs MIDI Out Pedal Adjust Pedal Test On Time 500 just s...

Page 7: ...e speaker and the Prompts light flashes yellow Accessing and Naviga ng the PNO3WB Control Menu Connect to the QRS Wi Fi PNO3WB processors have built in Wi Fi and are shipped to operate as soon as the...

Page 8: ...l ON If no pedal solenoid is a ached Lowest Note Test Files Middle C This se ng is a MIDI Reference and NOT the actual note key number Example If C played during the Middle C test increasing the Lowes...

Page 9: ...d center the top of the Z bracket sec on of the U shaped lever over the sustain pedal rod Verify that the assembled U shaped lever clears 5 Adjust the sustain pedal rod s bolt so that the U shaped lev...

Page 10: ...ds and select Enter Return on your keyboard Pedal Pre Play Time 0 Pedal A ack 2000 Pedal Hold 0 Pedal Retro 0 Get in a posi on where you can see the piano dampers and then Tap the Start bu on Pedal A...

Page 11: ...st number to change value Depress the Sustain Pedal to the floor Tap the Down bu on and wait for the Down number to change value Release the Sustain Pedal Slowly depress the Sustain Pedal while tappin...

Page 12: ...he PLAYBACK QRS MP3 AUDIO CURVE 0 to 10 Set the PLAYBACK QRS MP3 PIANO CURVE 0 Tap NEXT to the Volume Curve Configura on Full Expression Playback page Set the PLAYBACK QRS MP3 AUDIO CURVE 100 Set the...

Page 13: ...WB to the home Wi Fi as follows System Setup Network Se ngs Wireless Network Verify that the Network Mode is DHCP Client Tap the Connect to Client Wi Fi bu on Select your home network from the list En...

Page 14: ...Ac va on Tap on the green Customer Trial Ac va on bu on and then OK Fill out the form and tap the Save and Register bu on To verify the release Go to System Setup Service View Se ngs Scroll down the...

Page 15: ...ervice View Se ngs and scroll down the page to find the Ac ve DRM sec on Look for a DRM ID number with these descrip ons Release songs for 1 year Expires This is the ini al music trial period Release...

Page 16: ......

Reviews: