background image

13  

QRS PMII to PNO3WB Upgrade Instruc ons 

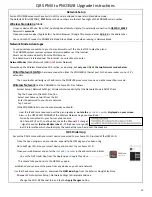
Network Setup 

Current PNO3WB processors have built

in Wi

Fi and are shipped to operate in Standalone mode. 

The default  SSID is QRSPNO3_##### where the # numbers are the last 

fi

ve digits of the PNO3WB serial number. 

Wireless Standalone 

Mode


Use your device [iPhone, iPad, iPod, Android phone/tablet or laptop] to wirelessly connec on to 

QRSPNO_#####


Password = 

qrsmusic 

Open your web browser [Apple Safari / Android Browser / Google Chrome] and enter 

10.3.2.

1


in the address bar. 


You


can


ALWAYS


connect


to


PNO3WB


in


Stand


Alone


Mode...even


when


running


in


Network


Mode.


Network Mode Advantages 


Your device stays connected to your home network to surf the internet OR to play the piano. 
The PNO3WB system receives system and music updates over the Internet. 
Music can be ordered directly from the PNO3 menu. 
Purchased music is released over the Internet...no unlock keys to enter. 


Network Modes 

[Wired Network (LAN) 

OR

 Wireless Network]


Always keep the Wireless Standalone Wi

Fi ac ve, as a backup, but 

only use 

ONE 

of the two Network modes below


Wired Network (LAN) 

A hard

wire connec on from the PNO3WB’s Ethernet port to the home router or one of it’s 

extenders.  


The home router will assign an IP address to the PNO3WB processor as soon as a viable connec on is made. 


Wireless Network 

Link the PNO3WB to the home Wi

Fi as follows... 


System Setup / Network Se ngs / Wireless Network

Verify that the Network Mode is DHCP Client. 


  Tap the Connect to Client Wi

Fi bu on. 

  Select your home network from the list 
  Enter the password to your home network 
  Tap Connect 


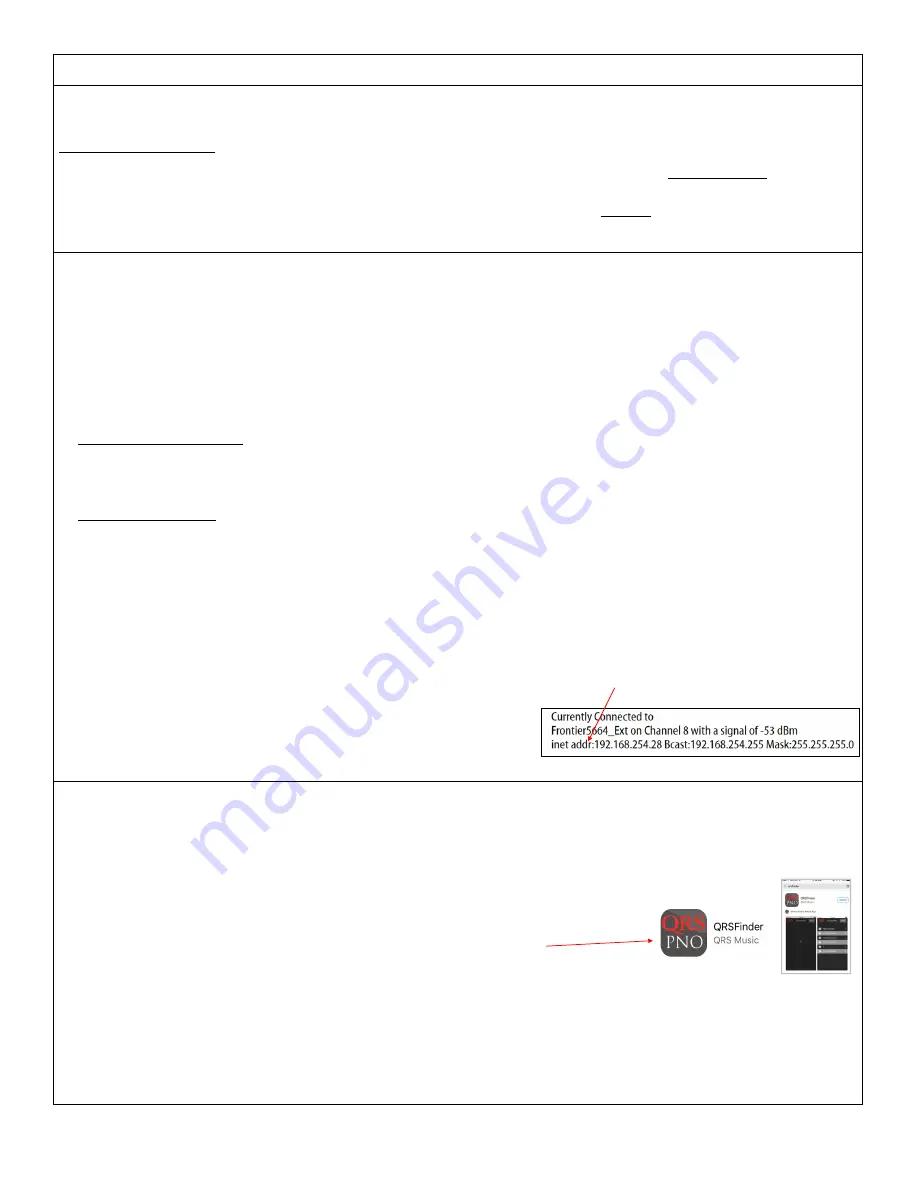
IF the PNO3WB links to your home network you should: 


    Hear the IP address announced over the piano speakers…

notate the 

inet addr: number 

displayed on your screen

    Also…in the UPPER LEFT CORNER of the Wireless Network page you should see: 
     Currently connected to…your home network name 
     On Channel X [if on 11, con nue but, make the 

Channel 11 

change.] 

     ...signal of 

xxdbm [

Below 

65dbm is best

. –70 & above is not good] 

     Inet IP informa on which should display the number that you heard over the speakers. 


Access the PNO3 menu with your smart device connected to your home Wi

Fi instead of the QRS Wi

Fi.  


Close the open programs on your device, especially the QRS page you’ve been using. 

Go to Se ngs / Wi

Fi on your smart device and connect to your home Wi

Fi. 

Open your web browser and enter the 

inet addr: number 

in the address bar and Enter. 


Or,


use


the


QRS


Finder


App


from


the


Apple


App


or


Goggle


Play


store.


This


should


take


you


back


into


the


QRS


Menu


again.


   established you can access the piano from any device on your home network. 

  Use the IP address announced or, download the 

QRSFinder App 

from the Safari or Google Play Store 


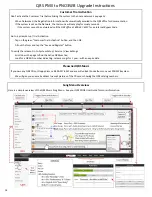
Channel 11 

Go to System Setup / Network Se ngs / Wireless Standalone 

     Change the Wi

Fi AP Channel to 6 and tap the 

Apply Changes 

bu on. 


QRS Finder App 


Summary of Contents for PMII

Page 1: ...QRS PMII to PNO3WB Upgrade Instructions Manual Revision March 2022 PNO3 OS Versions 5 xx Above PNO3 PMII...

Page 2: ...ed as a MIDI Controller QRS System QRS Part Number for the PNO3WB QRS Upgrade Kit is 83525 A PMII processor used on a complete QRS system will have a ribbon cable connected to this POWER SUPPLY socket...

Page 3: ...ntrolling 9VDC Power Adapter Disconnect and Remove the PMII Processor Disconnect the cables and remove PMII processor from the piano USB HOST The USB HOST ports are the same so the cables can be re in...

Page 4: ...that the QRS power supply switch is OFF before connec ng this cable NEVER connect the POWER SUPPLY and DC 9VDC cables to the same processor Record System if installed PNOscan 10 On systems with the QR...

Page 5: ...Connect the MIDI cable from the MIDI OUT of the PNO3WB processor to the MIDI IN of the Disklavier On the back of the Disklavier controller set the HOST SELECT switch to MIDI Some units may not have t...

Page 6: ...e selected note Changes are automa cally saved Tap Stop when finished MIDI Out Pedal Adjust Go to System Setup Performance Setup Rou ng Delay Se ngs MIDI Out Pedal Adjust Pedal Test On Time 500 just s...

Page 7: ...e speaker and the Prompts light flashes yellow Accessing and Naviga ng the PNO3WB Control Menu Connect to the QRS Wi Fi PNO3WB processors have built in Wi Fi and are shipped to operate as soon as the...

Page 8: ...l ON If no pedal solenoid is a ached Lowest Note Test Files Middle C This se ng is a MIDI Reference and NOT the actual note key number Example If C played during the Middle C test increasing the Lowes...

Page 9: ...d center the top of the Z bracket sec on of the U shaped lever over the sustain pedal rod Verify that the assembled U shaped lever clears 5 Adjust the sustain pedal rod s bolt so that the U shaped lev...

Page 10: ...ds and select Enter Return on your keyboard Pedal Pre Play Time 0 Pedal A ack 2000 Pedal Hold 0 Pedal Retro 0 Get in a posi on where you can see the piano dampers and then Tap the Start bu on Pedal A...

Page 11: ...st number to change value Depress the Sustain Pedal to the floor Tap the Down bu on and wait for the Down number to change value Release the Sustain Pedal Slowly depress the Sustain Pedal while tappin...

Page 12: ...he PLAYBACK QRS MP3 AUDIO CURVE 0 to 10 Set the PLAYBACK QRS MP3 PIANO CURVE 0 Tap NEXT to the Volume Curve Configura on Full Expression Playback page Set the PLAYBACK QRS MP3 AUDIO CURVE 100 Set the...

Page 13: ...WB to the home Wi Fi as follows System Setup Network Se ngs Wireless Network Verify that the Network Mode is DHCP Client Tap the Connect to Client Wi Fi bu on Select your home network from the list En...

Page 14: ...Ac va on Tap on the green Customer Trial Ac va on bu on and then OK Fill out the form and tap the Save and Register bu on To verify the release Go to System Setup Service View Se ngs Scroll down the...

Page 15: ...ervice View Se ngs and scroll down the page to find the Ac ve DRM sec on Look for a DRM ID number with these descrip ons Release songs for 1 year Expires This is the ini al music trial period Release...

Page 16: ......

Reviews: