Qorvo MDEK1001 Quick Start Manual Download Page 5


Auto-Position the Anchors (for up to 4 anchors) 

Note 1:  

The Auto-Positioning function is a quick setup feature to automatically determine 

the anchor locations.  Note that this feature may result in a small error in anchor location, 
making reported tag locations less accurate.  For best results it is recommended that 
anchor positions are measured to cm accuracy and manually entered (see below) 

Note 2:  

Ensure Line-of-Sight between the anchors during these steps 


1.  START 

On the ‘Network Details’ screen, tap the “Auto-Position” button in the 
upper right pull-down menu (anchors within Bluetooth range appear) 
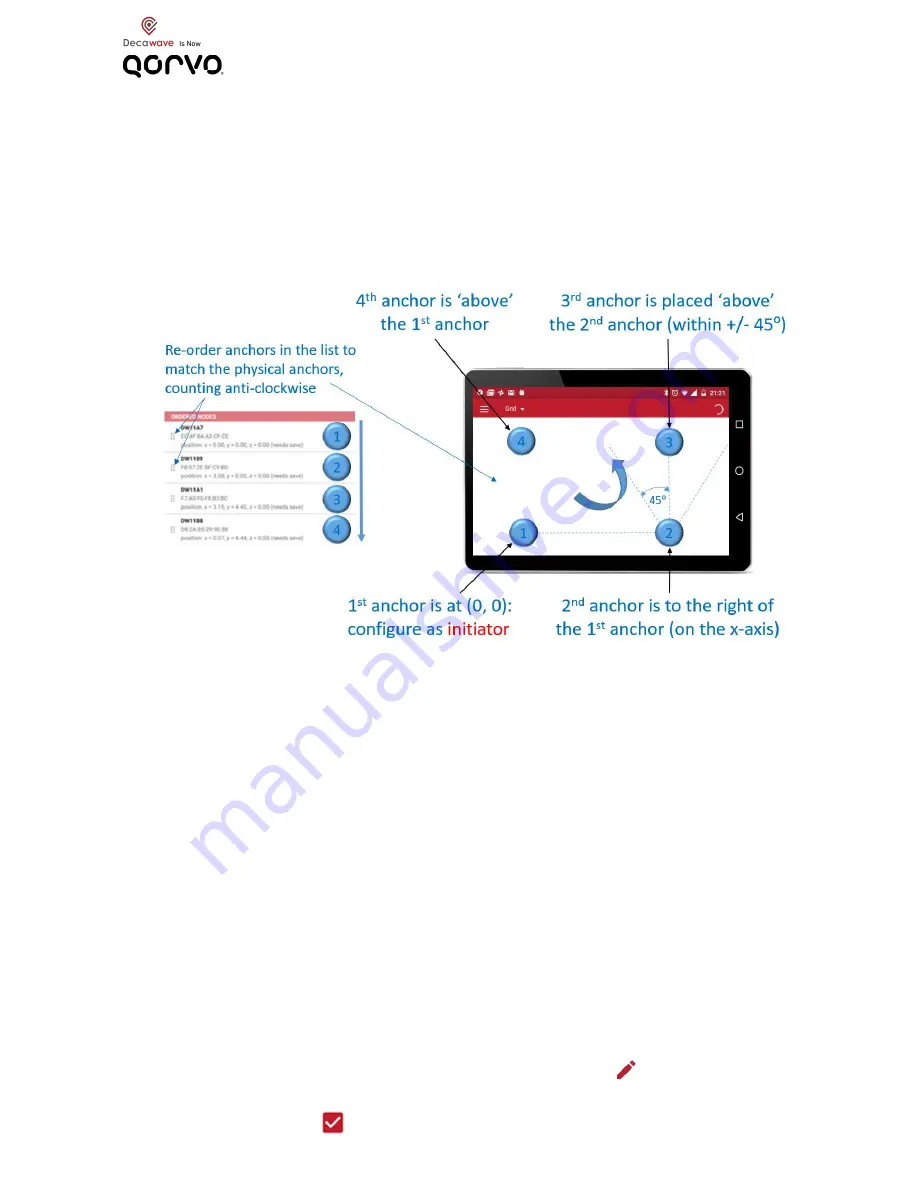
2.  RE-ORDER 

Re-order the anchors in the list to match their locations in the room: 

a.  Order the anchors anti-clockwise in the room (as shown above) 
b.  The 1

st

 anchor in the list is the (0,0) co-ordinate 

3.  MEASURE 

Tap “Measure” to start the auto-positioning


4.  PREVIEW


Tap ‘PREVIEW’ to check locations before saving


5.  SET HEIGHTS

    Enter heights of the anchors by tapping ‘Z-AXIS’


6.  SAVE 

Save the anchors setup by tapping ‘SAVE’


Manually Position the Anchors 

Anchor co-ordinates can be measured manually and entered in the 
settings screen of each anchor: 

1.  START        

On  ‘Network Details’ screen, tap 

 to edit each anchor


2.  MEASURE  

Enter the x,y,z co-ordinate in the ‘

POSITION

’ section


3.  SAVE          

Tap   to save


Summary of Contents for MDEK1001

Page 1: ...ng quickly The system can be easily configured and visualised using a tablet running an Android application Check the Decawave website regularly for updated firmware releases Please follow the links b...

Page 2: ...DEV development board DWM1001C module Including MDEK1001 System User Manual Firmware API Guides Hardware datasheets ALSO REQUIRED NOT INCLUDED Power sources for the RTLS units RTLS units can be power...

Page 3: ...g USB mains power supplies or USB battery packs Prepare the Tags 1 Select 1 RTLS unit to be a tag 2 Power the tag by either a connecting a USB battery pack or b opening the enclosure and inserting a r...

Page 4: ...e Configure the RTLS Units as Anchors or Tags Tap the network name and then tap each device in turn to configure it 1 First identify the RTLS unit by unchecking the LED and tap to save The LEDs on tha...

Page 5: ...r right pull down menu anchors within Bluetooth range appear 2 RE ORDER Re order the anchors in the list to match their locations in the room a Order the anchors anti clockwise in the room as shown ab...

Page 6: ...tag ranging circle to change to or to show it on the grid 3 Ranging starts automatically 4 Tap the Grid option at the top of the screen to see the grid 5 Pinch to zoom 6 Tags automatically select 4 a...

Page 7: ...to a PC A PC can be used to connect directly via USB to a tag or to an RTLS unit configured as a listener in order to collect and log the location data from the tags This can be done using a terminal...

Page 8: ...ations or other authority governing radio emission This MDEK1001 may not be resold by users for any purpose The MDEK1001 as supplied by Decawave may not be incorporated directly into user devices or p...

Reviews: