QNAP TS-h3087XU-RP User Manual Download Page 44

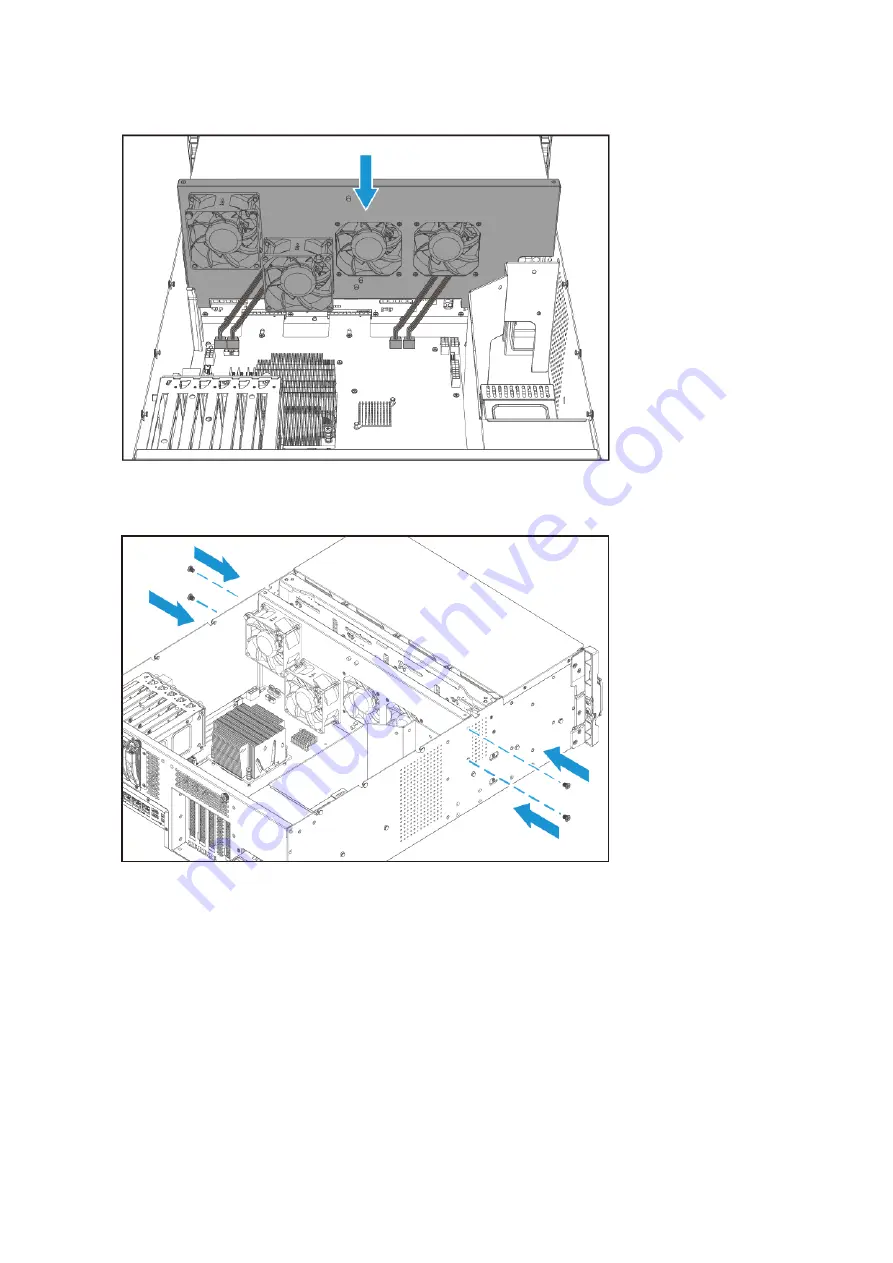
c. Attach the screws that secure the fan unit to the chassis. 

11. Attach the 2.5-inch drive bay fan duct.

a. Attach the 2.5-inch drive bay fan duct to the back of the 2.5-inch drive bay enclosure. 

TS-h3087XU-RP User Guide

Installation and Configuration   

43

Summary of Contents for TS-h3087XU-RP

Page 1: ...TS h3087XU RP User Guide Document Version 2 11 11 2022...

Page 2: ...eplacing Fans 33 Rail Kits 47 Expansion Unit Installation 47 QuTS hero Installation 52 Initializing QuTS hero Using Qfinder Pro 53 Initializing QuTS hero Using the Cloud Installation Website 55 3 Basi...

Page 3: ...QuTS hero 67 7 Notices Limited Warranty 68 Disclaimer 68 Copyright and Trademarks 68 GNU Public License 69 CE Notice 76 UKCA Notice 76 FCC Notice 76 VCCI Notice 77 BSMI Notice 77 SJ T 11364 2006 78 2...

Page 4: ...rvice center for maintenance or replacement Any attempt to repair or perform maintenance procedures on the product by you or an unauthorized third party invalidates the warranty QNAP is not responsibl...

Page 5: ...s 3 5 inch bays 3 5 inch SATA hard disk drives 2 5 inch SATA solid state drives Tip For the list of compatible drive models go to https www qnap com compatibility The drive bays are backward compatibl...

Page 6: ...tery If swallowed a lithium button battery can cause severe or fatal injuries within 2 hours Keep batteries out of reach of children To avoid potential battery explosion causing injury or damage to co...

Page 7: ...screws Quick Installation Guide QIG 1 Ethernet cable 1 x 10 GbE Cat6A Ethernet cable Components Front Panel No Component No Component 1 Drive activity LED 4 System status LED 2 Drive status LED 5 LAN...

Page 8: ...bays 11 2 5 Gigabit Ethernet speed LEDs 4 PCIe slot 3 cover 12 10GBASE T ports RJ45 5 PCIe slot 2 cover 13 10 Gigabit Ethernet activity LEDs 6 PCIe slot 1 cover 14 10 Gigabit Ethernet speed LEDs 7 Po...

Page 9: ...k 2 PCIe slot 2 PCIe Gen 4 0 x4 7 Memory slot 4 Channel B DIMM 2 blue 3 PCIe slot 3 PCIe Gen 4 0 x4 8 2 5 inch drive bay fan 4 Memory slot 1 Channel A DIMM 1 black 9 CPU fan 5 Memory slot 2 Channel A...

Page 10: ...3 5 inch Drive Bays Network Port Numbering TS h3087XU RP User Guide Product Overview 9...

Page 11: ...to the device To avoid potential injury or damage to components ensure that the drives and other internal system components have cooled before touching them Observe electrostatic discharge ESD procedu...

Page 12: ...hile the device is connected to a power source Moving components Keep your body parts away from other moving components The device is not suitable for use in locations where children are likely to be...

Page 13: ...nstalling Expansion Cards 4 Optional Connect expansion units For details see Expansion Unit Installation 5 Install drives For details see the following topics Installing 3 5 inch Drives on 3 5 inch Tr...

Page 14: ...S h3087XU RP is compatible with 3 5 inch hard drives and 2 5 inch solid state drives Installing 3 5 inch Drives on 3 5 inch Trays For the list of compatible drive models go to https www qnap com compa...

Page 15: ...ray so that the holes on the sides of the drive are aligned with the holes on the sides of the tray b Attach the screws 4 Load the tray into the bay a Insert the tray into the bay b Push the handle TS...

Page 16: ...he list of compatible drive models go to https www qnap com compatibility Warning Installing a drive deletes all data on the drive Observe electrostatic discharge ESD procedures to avoid damage to com...

Page 17: ...y handle c Pull the tray out 3 Install a drive on the tray a Place the drive on the tray so that the holes on the bottom of the drive are aligned with the holes on the bottom of the tray b Attach the...

Page 18: ...4 Load the tray into the bay a Insert the tray into the bay b Push the handle TS h3087XU RP User Guide Installation and Configuration 17...

Page 19: ...odels go to https www qnap com compatibility Warning Installing a drive deletes all data on the drive Observe electrostatic discharge ESD procedures to avoid damage to components 1 Power off the NAS 2...

Page 20: ...ay so that the holes on the bottom of the drive are aligned with the holes on the bottom of the tray b Attach the screws 4 Load the tray into the bay a Insert the tray into the bay b Push the handle T...

Page 21: ...installing two modules use slots 2 and 4 Ensure that the modules are identical When installing four modules use slots 2 and 4 for the first pair and slots 1 and 3 for the second pair Ensure that each...

Page 22: ...l outlet 3 Disconnect all cables and external attachments 4 Remove the case cover Warning To avoid potential injury or damage to components ensure that the drives and other internal system components...

Page 23: ...duct a Detach the 2 5 inch drive bay fan duct from the back of the 2 5 inch drive bay enclosure b Detach the 2 5 inch drive bay fan duct from the 2 5 inch drive bay fan module TS h3087XU RP User Guid...

Page 24: ...ng module a Push the retention clips outward simultaneously to release the module Warning Attempting to remove a module that is not completely released may damage the module and the system board b Hol...

Page 25: ...onnectors are completely inserted into the slot d Carefully press down on the module until the retention clips lock the module into place 8 Attach the 2 5 inch drive bay fan duct a Attach the 2 5 inch...

Page 26: ...the 2 5 inch drive bay fan duct to the 2 5 inch drive bay fan module 9 Attach the case cover a Place the cover on the device b Slide the cover forward TS h3087XU RP User Guide Installation and Configu...

Page 27: ...the electrical outlet 12 Power on the device 13 Verify that the module is recognized by the device a Log on to QuTS hero as administrator b Go to Control Panel System System Status Hardware Informati...

Page 28: ...g fan blades Other moving components Keep your hands and other body parts away from other moving components 1 Check the expansion cards and brackets supported by your model on the QNAP website a Go to...

Page 29: ...er back c Lift the cover off the device 6 Remove the PCIe cover a Remove the screw that secures the cover to the bracket b Pull the cover away from the slot TS h3087XU RP User Guide Installation and C...

Page 30: ...to the expansion card a Remove all screws of the existing bracket b Carefully pull the bracket away from the card c Attach the QNAP bracket to the card using the same screws TS h3087XU RP User Guide...

Page 31: ...tall the expansion card a Hold the card by the edges b Insert the card into the slot c Attach the screw 9 Attach the case cover a Place the cover on the device b Slide the cover forward TS h3087XU RP...

Page 32: ...Connect the power cords to the electrical outlet 12 Power on the device Hot swapping Redundant Power Supplies NAS devices with redundant power supply units PSUs support hot swapping Warning Electric s...

Page 33: ...failure alerts and notifications go to Control Panel System Hardware General and deselect Enable redundant power supply mode 1 Disconnect the power cord from the electrical outlet and the power suppl...

Page 34: ...ischarge ESD procedures to avoid damage to components Moving fan blades Keep your hands and other body parts away from moving fan blades Other moving components Keep your hands and other body parts aw...

Page 35: ...c Lift the cover off the device 5 Remove the 2 5 inch drive bay fan duct a Detach the 2 5 inch drive bay fan duct from the back of the 2 5 inch drive bay enclosure TS h3087XU RP User Guide Installatio...

Page 36: ...b Detach the 2 5 inch drive bay fan duct from the 2 5 inch drive bay fan module c Lift the 2 5 inch drive bay fan duct out of the device TS h3087XU RP User Guide Installation and Configuration 35...

Page 37: ...CPU fan duct a Remove the screws securing the CPU fan duct to the system board b Detach the bottom hooks of the CPU fan duct from the CPU heatsink screws TS h3087XU RP User Guide Installation and Conf...

Page 38: ...c Lift the CPU fan duct out of the device 7 Remove the fan unit from the chassis a Remove the screws that secure the fan unit to the chassis TS h3087XU RP User Guide Installation and Configuration 37...

Page 39: ...b Lift the fan unit up c Disconnect the power connectors of all fans from the system board TS h3087XU RP User Guide Installation and Configuration 38...

Page 40: ...d Lift the fan unit out of the chassis 8 Remove the fan a Remove the screws that secure the fan to the fan unit 2 5 inch Drive Bay Fan TS h3087XU RP User Guide Installation and Configuration 39...

Page 41: ...U Fan System Fan 9 Install a new fan a Align the fan to the screw holes on the fan unit b Attach the screws that secure the fan to the fan unit TS h3087XU RP User Guide Installation and Configuration...

Page 42: ...2 5 inch Drive Bay Fan CPU Fan TS h3087XU RP User Guide Installation and Configuration 41...

Page 43: ...System Fan 10 Install the fan unit a Connect the power connectors of all fans to the system board b Insert the fan unit TS h3087XU RP User Guide Installation and Configuration 42...

Page 44: ...secure the fan unit to the chassis 11 Attach the 2 5 inch drive bay fan duct a Attach the 2 5 inch drive bay fan duct to the back of the 2 5 inch drive bay enclosure TS h3087XU RP User Guide Installat...

Page 45: ...e 2 5 inch drive bay fan duct to the 2 5 inch drive bay fan module 12 Attach the CPU fan duct a Attach the CPU fan duct to the CPU heatsink and CPU fan TS h3087XU RP User Guide Installation and Config...

Page 46: ...b Attach the screws securing the CPU fan duct to the system board c Attach the bottom hooks of the CPU fan duct to the CPU heatsink screws TS h3087XU RP User Guide Installation and Configuration 45...

Page 47: ...13 Attach the case cover a Place the cover on the device b Slide the cover forward c Tighten the screws TS h3087XU RP User Guide Installation and Configuration 46...

Page 48: ...ible Rail Kit TS h3087XU RP RAIL A02 90 You can find installation information in the rail kit package Expansion Unit Installation The TS h3087XU RP supports SAS SATA JBOD and USB expansion units For d...

Page 49: ...to Type C cable TR 004U Uses a USB 3 2 Gen 1 Type C interface Supports SATA HDD SSD USB 3 2 Gen 1 Type A to Type C cable RAIL B02 TL D800C Uses a USB 3 2 Gen 2 Type C interface Supports SATA HDD SSD...

Page 50: ...erface Supports SATA HDD SSD 1 x SFF 8088 connector cable QXP 400eS A1164 host bus adapter RAIL B02 Connecting SAS Expansion Units To connect the device to SAS expansion units a storage expansion card...

Page 51: ...ower on the expansion units 4 Verify that the expansion units are recognized by the device a Log on to QuTS hero as administrator b Go to Main Menu Storage Snapshots Overview System c Verify that the...

Page 52: ...the NAS a Log on to QuTS hero as administrator b Go to Main Menu Storage Snapshots Overview System c Verify that the expansion unit is listed Connecting USB Expansion Units To connect the TS h3087XU...

Page 53: ...stall QuTS hero using any of the following methods You can also install the QNAP QTS operating system If your NAS is connected to the internet the option to install QTS will appear in the Smart Instal...

Page 54: ...Qfinder Pro which is an utility designed to help you locate and manage QNAP devices on your network Warning Installing QuTS hero deletes all data on the drives Back up your data before proceeding 1 P...

Page 55: ...me cannot contain the following special characters grave accent asterisk equal sign plus sign square brackets curly brackets slash vertical bar semicolon colon apostrophe quotation mark comma less tha...

Page 56: ...he NAS using a mobile device The web page lists all the uninitialized QNAP NAS devices on the local network 4 Find your NAS from the list and then click Initialize Tip If your NAS is connected to the...

Page 57: ...re installation Skip Click Skip Skips firmware installation 11 Specify the following information NAS name Specify a name with 1 to 14 characters The name supports letters A to Z a to z numbers 0 to 9...

Page 58: ...lick Next 17 Review the settings 18 Click Apply A confirmation message appears Warning Clicking Initialize deletes all data on the drive before installing QuTS hero 19 Click Initialize QuTS hero initi...

Page 59: ...rst MAC address in uppercase letters without special characters For example if the first MAC address is 00 08 9B F6 15 75 then the admin password would be 00089BF61575 Note You can find the first MAC...

Page 60: ...en updating the firmware do not remove the power cord or USB cable and do not force exit the application Red A drive is invalid A shared folder has reached its full capacity A shared folder is about t...

Page 61: ...5 Gigabit Ethernet Speed LED Status Description Green The network connection is operating at 2 5 Gbps Orange The network connection is operating at 1 Gbps or 100 Mbps Off The network connection is ope...

Page 62: ...ected Off No JBOD expansion unit has been detected No expansion unit has been detected Audio Alerts Duration Frequency Description Short beep 0 5 seconds 1 The NAS is starting up When the reset button...

Page 63: ...ched full capacity A storage pool status error occurred A shared folder is about to reach its full capacity A shared folder has reached its full capacity A shared folder status error occurred A drive...

Page 64: ...ent free drive bays to accommodate all the drives that you are migrating from the source NAS For NAS models that do not support NAS migration see How to Migrate Data and Folder Permissions between QTS...

Page 65: ...e Multimedia features Some multimedia features are disabled by default Migrating a NAS Important Before performing NAS migration ensure that you understand all requirements and possible changes after...

Page 66: ...ID 6 4 One or two member drives fail RAID 10 4 Must be an even number One or two member drives in two different pairs fail RAID 50 6 One disk per subgroup fails RAID 60 8 Two disks per subgroup fail T...

Page 67: ...2 RAID 10 Yes 4 Must be an even number One disk per subgroup fails RAID 50 Yes 6 One disk per subgroup fails RAID 60 Yes 8 Two disks per subgroup fail Triple Mirror Yes Multiple of 3 For example 3 6...

Page 68: ...yQNAPcloud Link myQNAPcloud Link Enables you to access QNAP devices over the internet without configuring complex port forwarding settings Qfinder Pro QNAP utility that lets you locate and access QNAP...

Page 69: ...nsequential damages resulting from the use of the product its accompanying software or its documentation QNAP makes no warranty or representation expressed implied or statutory with respect to its pro...

Page 70: ...d You must make sure that they too receive or can get the source code And you must show them these terms so they know their rights Developers that use the GNU GPL protect your rights with two steps 1...

Page 71: ...the normal form of packaging a Major Component but which is not part of that Major Component and b serves only to enable use of the work with that Major Component or to implement a Standard Interface...

Page 72: ...Modified Source Versions You may convey a work based on the Program or the modifications to produce it from the Program in the form of source code under the terms of section 4 provided that you also...

Page 73: ...brary need not be included in conveying the object code work A User Product is either 1 a consumer product which means any tangible personal property which is normally used for personal family or hous...

Page 74: ...ways as different from the original version or d Limiting the use for publicity purposes of names of licensors or authors of the material or e Declining to grant rights under trademark law for use of...

Page 75: ...th reasonable efforts You may not impose any further restrictions on the exercise of the rights granted or affirmed under this License For example you may not impose a license fee royalty or other cha...

Page 76: ...er pertinent obligations then as a consequence you may not convey it at all For example if you agree to terms that obligate you to collect a royalty for further conveying from those to whom you convey...

Page 77: ...ENDERED INACCURATE OR LOSSES SUSTAINED BY YOU OR THIRD PARTIES OR A FAILURE OF THE PROGRAM TO OPERATE WITH ANY OTHER PROGRAMS EVEN IF SUCH HOLDER OR OTHER PARTY HAS BEEN ADVISED OF THE POSSIBILITY OF...

Page 78: ...ial environment This equipment generates uses and can radiate radio frequency energy and if not installed and used in accordance with the instruction manual may cause harmful interference to radio com...

Page 79: ...64 2006 RoHS RoHS Pb Hg Cd CR VI PBB PBDE 0 0 0 0 0 0 0 0 0 0 0 0 0 0 0 0 0 0 0 0 0 0 0 0 0 0 0 0 0 0 0 0 0 0 0 0 0 0 0 0 0 0 0 0 0 0 0 0 O SJ T11363 2006 X SJ T11363 2006 TS h3087XU RP User Guide Not...

Reviews: