background image

 - 

32 

 
5.


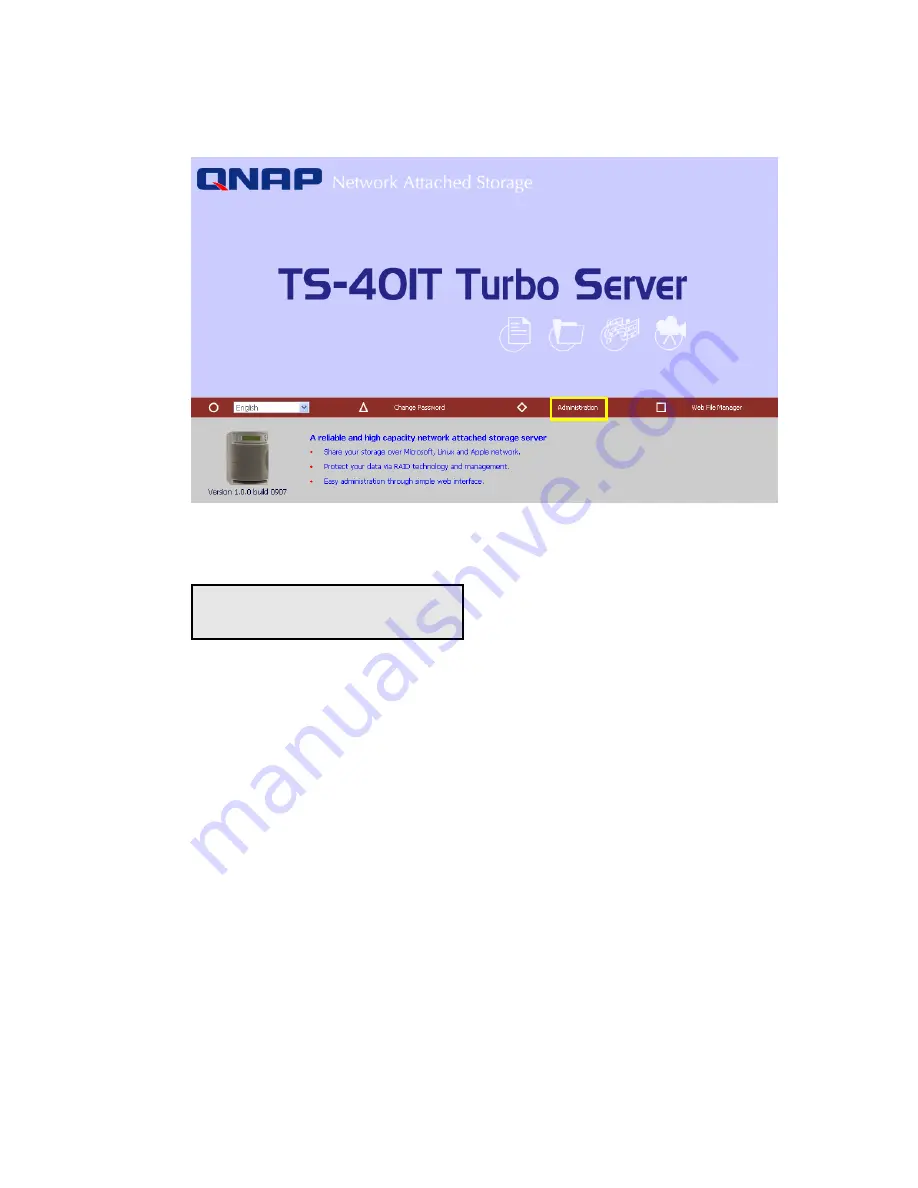
When the administration page is shown, click 

Administration


6.


Enter the user name and password to login. 


Default user name: 

administrator


Password: 

admin


The first time you login TS-401T, Quick Configuration page will be shown.  
Please refer to 6.3 Quick Configuration for more details. 
 
To connect TS-401T by MAC, open a web browser in MAC and enter the IP 
address of TS-401T.  Login the server and continue the software configuration.  
Please use the built-in browser in MAC-Safari for browsing. 

Summary of Contents for TS-401T Turbo Server

Page 1: ...Network Attached Storage TS 401T Turbo Server User Manual ...

Page 2: ... 2 TS 401T Turbo Server User Manual Version 1 0 Copyright 2005 QNAP Systems Inc All Rights Reserved September 8 2005 ...

Page 3: ...software and specifically disclaims its quality performance merchantability or fitness for any particular purpose QNAP reserves the right to revise or update its products software or documentation without obligation to notify any individual or entity CAUTION 1 Back up your system periodically to avoid any potential data loss QNAP disclaims any responsibility of all sorts of data loss or recovery 2...

Page 4: ...rvices of TS 401T 28 5 1 File Server 28 5 2 FTP Server 28 5 3 Backup Server 29 5 4 Network Printer Service 29 Chapter 6 Administer TS 401T 30 6 1 Access Administration Page 31 6 2 Server Administration 33 6 3 Quick Configuration 34 6 4 System Settings 40 6 4 1 Server Name 40 6 4 2 Date Time 41 6 4 3 Language Setting 43 6 4 4 View System Settings 43 6 5 Network Settings 44 6 5 1 TCP IP Configuratio...

Page 5: ... 6 8 Network Share Management 73 6 8 1 Create 74 6 8 2 Property 75 6 8 3 Access Control 75 6 8 4 Delete 76 6 9 System Tools 77 6 9 1 SNMP Settings 77 6 9 2 Alert Notification 78 6 9 3 Restart Shutdown 78 6 9 4 Hardware Settings 79 6 9 5 UPS 80 6 9 6 System Update 82 6 9 7 Change Logo 84 6 9 8 Remote Replication 85 6 9 9 Anti virus Configuration 88 6 9 10 Backup Restore Reset Settings 94 6 9 11 USB...

Page 6: ...er 8 NetBak Replicator 112 Chapter 9 TS 401T Maintenance 126 9 1 Restart Shut down Server 126 9 2 Reset Administrator Password and Network Settings 127 5 1 Disk Failure or Malfunction 128 5 2 Power Outage or Abnormal Shutdown 128 Appendix A Web File Manager 129 Appendix B Configuring AD Authentication 134 Appendix C Messages of Hard Disk and Disk Configuration Status 144 ...

Page 7: ... function without extra installation Supports instant online virus scan to protect data optional Supports hot redundant power supply to increase system reliability optional Provides various practical backup mechanisms 9 Professional remote replication to remote NAS 9 USB 2 0 interface for CD DVD data burning 9 Provides backup software for Windows users instant scheduled backup can be performed wit...

Page 8: ...w Front View LED indicators Power Error Network and Disk LCD panel Enter button Down button HDD 1 HDD 2 HDD 3 HDD 4 Rear View Reset button Power button Gigabit LAN 1 USB ports Power connector ATX power supply Gigabit LAN 2 ...

Page 9: ... 9 Chapter 2 Install TS 401T 2 1 Install Hard Disk Components nTS 401T oHDD tray x 4 included in TS 401T p3 5 SATA hard disk optional qFlat head screw included in TS 401T rScrew driver not included ...

Page 10: ...om TS 401T 2 Place a hard disk in a hard disk tray It is highly recommended that you install disks of the same brand and same size on TS 401T The server may function improperly if disks of different brands and size are installed Please refer to Chapter 2 2 for hard disk recommendation list Tray front ...

Page 11: ...ray Fasten the flat head screws to lock the disk as indicated below 4 When finished open the tray cover of TS 401T and insert the disk to the server Push the disk towards the end until it is locked Note that all disks should be inserted in order from top to bottom HDD1 HDD4 HDD 1 HDD 2 HDD 3 HDD 4 ...

Page 12: ... the type of disk configuration you select for TS 401T If less than 4 disks are installed and the server is turned on the system will beep continuously In such case please go to Hardware Settings in System Tools refer to Chapter 6 9 4 and disable the buzzer You can then continue to use TS 401T ...

Page 13: ...very due to misuse or improper installation of hard disks in any occasions for any reasons Brand Model Name Interface Capacity GB Rotational Speed RPM Buffer Size MB Barracuda 7200 8 SATA NCQ SATA 1 5Gb s 400 7200 8 Barracuda 7200 8 SATA NCQ SATA 1 5Gb s 300 7200 8 Barracuda 7200 8 SATA NCQ SATA 1 5Gb s 250 7200 8 Barracuda 7200 7 SATA NCQ SATA 1 5Gb s 160 7200 8 Seagate Barracuda 7200 7 SATA NCQ ...

Page 14: ...onnect the server by IE browser TS 401T supports printer sharing which allows users in the local network to use printing service You may also connect TS 401T to a CD DVD burner for data backup and restore To access the server connect PC to the same subnet of TS 401T 1 2 3 Connect USB devices to TS 401T TS 401T supports USB printer and CD DVD burner Connect TS 401T to a switch hub router ...

Page 15: ... using printer and CD DVD backup restore service Note To connect TS 401T to a PC please use a network cable to connect the PC to LAN 1 or LAN 2 of TS 401T Connect the power supply and turn on the server For further details about accessing TS 401T please refer to Chapter 6 c Connect the power cord to power supply d Turn on the server a Connect Gigabit port LAN 1 or LAN 2 to a switch hub router by a...

Page 16: ... that the disk size displayed is the total size of all installed disks but may not be the actual disk size you can use If you configure the disks as RAID 1 disk volume your actual disk size you can use is smaller than the displayed disk size on the panel 2 Press Down button again to view system temperature and system fan speed 3 Press Down button again to view CPU temperature and CPU fan speed TS ...

Page 17: ...R CONFIG PAGE 4 Press Down button again to view model number and version information System Setting Function 1 Press Enter button for two seconds to enter configuration page 2 Press Down button to select an item NETWORK SETTINGS POWER DOWN REBOOT SYSTEM and EXIT ...

Page 18: ... to select STATIC IP Then configure the IP address i SET STATIC IP Press Down button to enter 0 255 and press Enter button to set the next number for the IP address ii SET NETMASK Follow the above procedure to set the netmask address iii SET GATEWAY Follow the above procedure to set the gateway address iv SELECT STATIC IP Press Down button to select YES or NO When YES is selected you will be asked...

Page 19: ...utton to confirm shutting down TS 401T REBOOT SYSTEM Press Down button to select REBOOT SYSTEM and press Enter button to confirm restarting the system Exit Configuration Page EXIT Press Enter button and select EXIT then press the button again to confirm exiting the configuration page SELECT 4 EXIT EXIT CONFIG PAGE ...

Page 20: ...search for all available TS 401T within the local network and view the server name IP address and workgroup etc You can also configure the disk name date and time etc via Quick Install Wizard To use Quick Install Wizard run TS 401T CD ROM in your PC and install the program ...

Page 21: ...own Name of server IP address of server Windows workgroup joined by server View the details of selected server Map network drive for the server Refresh the search results within the network Help Exit the program Configure the server name time and network settings System version ...

Page 22: ...onfigure TS 401T Select a TS 401T displayed on Quick Install Wizard and click Configure Enter the administrator password Upon successful login the following screen will appear Enter the configuration values and click OK ...

Page 23: ...ser Note You may have to restart TS 401T after changing the network configuration Set the name date and time for TS 401T The length cannot exceed 14 characters The system will obtain IP address automatically To use fixed IP address for connection enter the IP address subnet mask and gateway for the server ...

Page 24: ... 24 2 View TS 401T details Select a TS 401T available on Quick Install Wizard and click Details The following screen will be shown ...

Page 25: ... 25 3 Map drive a Select a TS 401T and click Map Drive b Select the correct network share and click Map Network Drive Then select the drive letter for the connection ...

Page 26: ... 26 c Enter the user name and password for the network drive 4 Search for all available TS 401T again To refresh the search results click Refresh to display all available servers within the network ...

Page 27: ... you have any enquiries about Quick Install Wizard when using the program you can click the Help button to view the help text 6 Enter the homepage of TS 401T Double click on TS 401T to enter the administration page ...

Page 28: ...n please refer to Chapter 4 b By samba TS 401T supports Microsoft MAC and Linux NFS OS for data sharing to enable you to share data across different platforms please refer to Chapter 7 1 7 3 c By Web File Manager TS 401T provides a simple to use web administration interface for you to access share folders upload and download files from TS 401T please refer to Chapter Appendix A 5 2 FTP Server TS 4...

Page 29: ...eplication Remote replication is a built in backup feature of TS 401T You can set up instant or scheduled backup to replicate the data of TS 401T to another NAS server Please refer to Chapter 6 9 8 c USB CD DVD Restore Backup You can connect USB CD DVD burner to the high speed USB 2 0 transfer interface of TS 401T and enjoy data backup and restore functions to and fro TS 401T and CD DVD Please ref...

Page 30: ...not support DHCP protocol TS 401T will use the default settings as below IP Address 192 168 0 1 Subnet Mask 255 255 255 0 When TS 401T boots up the LCD panel will display current IP address settings If your network does not support DHCP protocol you must configure your TS 401T to proper LAN settings before using it for the first time If you are not sure about the LAN settings please contact your n...

Page 31: ...ns 3 Launch the web browser Enter the IP address of TS 401T to access the administration page You can check the IP address of TS 401T on the LCD panel see Chapter 3 OR 4 Install and Quick Installation Wizard see Chapter 4 Search for TS 401T in the network and double click the server name on the list ...

Page 32: ...ssword admin The first time you login TS 401T Quick Configuration page will be shown Please refer to 6 3 Quick Configuration for more details To connect TS 401T by MAC open a web browser in MAC and enter the IP address of TS 401T Login the server and continue the software configuration Please use the built in browser in MAC Safari for browsing ...

Page 33: ... Volume Format Disk Volume View Disk Volume Status User Management Users User Groups Quota Create Create Multiple Users Change Password Create Private Network Share Assign User Groups Quota Settings Delete Create Create Private Network Share Assign Users Delete Create Property Access Control Delete Alert Notification Restart Shutdown Hardware Settings UPS System Update Remote Replication Active Us...

Page 34: ...ion to complete the settings of TS 401T If you have any questions during web administration please click the help button on the top right hand corner of the page Other buttons are described as below Return to previous page Return to home page Logout system Step 1 Enter the server name ...

Page 35: ...strator password or select to use the original password Step 3 Enter the date time and select the time zone for the server Step 4 Select the language the server uses to display files and directories The default setting is English ...

Page 36: ... Step 5 Enter the IP address subnet mask and default gateway for the server Select network interface configuration fail over or load balance Step 6 Select the network file services to provide on the server ...

Page 37: ... 37 Step 7 Configure disk volume on the server Step 8 Configure the method of user authentication Please refer to Chapter 6 5 2 for further information ...

Page 38: ... 38 Step 9 Manage users and user groups of this server ...

Page 39: ... 39 Step 10 Manage network shares on this server Step 11 Finish It may take several to tens of minutes to complete Quick Configuration depending on your system settings ...

Page 40: ...ver name date time and view system settings 6 4 1 Server Name Enter the name of TS 401T The server name can be 14 characters long at maximum which can contain alphabets numbers and hyphen The server does not accept names with space period or names in pure numbers ...

Page 41: ...r location If the settings are incorrect the following problems may occur 9 When using a web browser to access or save a file the display time of the action will be incorrect 9 The system event log time will be incorrect compared to the actual time when an action occurs ...

Page 42: ...e and maximum value is 99 days To enable multiple NTP servers you can select Enable NTP server and enter the IP address or domain name of the servers You can enter 3 NTP servers at maximum If the system fails to connect to the first NTP server it will try to connect the second one automatically so on so forth You can click Test to try to connect to the NTP server If there is no specified IP addres...

Page 43: ...401T will be created using Unicode encoding If your FTP clients or PC does not support Unicode e g Windows 95 98 ME OS is used select the language your PC supports here in order to view the files and directories on the server properly 6 4 4 View System Settings You can view all current system settings e g server name on this page ...

Page 44: ... 44 6 5 Network Settings 6 5 1 TCP IP Configuration ...

Page 45: ...nables you to perform Fail Over or Load Balance functions Fail over ensures server availability to the network If the primary port is disconnected due to a hardware or cable problem the secondary port will replace its network identity If the failed port resumes the network connection it will also resume the role as the primary interface ...

Page 46: ...ftware adaptive agent will repeatedly analyze the traffic flow from the server and distribute the packets based on the destination address Load balance can only occur on Layer 3 routing protocols IP or NCP IPX Multicast Broadcast and non routing protocols such as NetBEUI and Microsoft IPX are transmitted over the primary port ...

Page 47: ... port to have a unique IP which allows users on different network areas to share one TS 401T and maintain their independence from one another in the network When using this mode fail over cannot be used and only LAN 1 can be configured as DHCP server ...

Page 48: ... to use the default setting that the server will determine network speed automatically Obtain IP address settings automatically via DHCP If your network supports DHCP TS 401T will automatically use DHCP protocol to retrieve the IP address and related information Use static IP address To use fixed IP address for network connection enter fixed IP address subnet mask and default gateway ...

Page 49: ...ou can enable this option to provide IP address settings to the clients Start IP address The first IP address to be dynamically allocated for DHCP service End IP address The last IP address to be dynamically allocated for DHCP service Lease time Define the lease time for the dynamic IP address Primary DNS server When the system allocates an IP address to your computer the primary DNS server addres...

Page 50: ...domain for user authentication 9 AD Domain Member TS 401T supports Windows 2003 AD Active Directory to provide quick and direct import of user accounts to the existing AD server available in your network This function helps you to save time and effort on creating user accounts and passwords and lowers IT maintenance cost by automatic configuration procedure Server Description Describe TS 401T for ...

Page 51: ... do not have a WINS server on your network enter 0 0 0 0 in the field for WINS server IP address 9 Domain Master There is a unique Domain Master Browser for collecting and recording resources and services available for each PC in the network or workgroup of Windows When a domain master browser Windows NT 200x XP PC exists already in the network there is no need to configure TS 401T as the domain m...

Page 52: ...s assigned with multiple zones assign a zone name to TS 401T If you do not want to assign a network zone enter an asterisk to use the default setting This setting is disabled by default 6 5 4 Linux NFS Service To use TS 401T on Linux OS computer or server enable Linux NFS service TS 401T supports NFS version 2 0 and 3 0 This setting is disabled by default ...

Page 53: ... Service Select whether to enable disable Unicode Support The default setting is No If your FTP client does not support Unicode e g Windows 95 98 ME OS is used select a supported language setting in System Settings Language Setting page so that the folders and files on FTP can be properly shown please refer to Chapter 6 4 3 Note The language of file names on share folder should match the language ...

Page 54: ...s formatted before enabling this function The system will use HDD 1 for printer sharing service by default If the HDD 1 fails HDD 2 will be in use so on so forth To use this function connect the server to a USB printer and then click Enable network printer service Enter the printer name and description optional and click Apply Note Network printer service is supported in Windows OS only ...

Page 55: ... on Client Side 1 Connect a USB printer to TS 401T 2 After correctly enabling a USB printer on TS 401T a printer icon should be shown in the share folder of the server Right click the printer icon and click Open or Connect ...

Page 56: ... 56 3 Install the printer driver 4 When finished you can start to use network printer service ...

Page 57: ... 57 6 5 8 View Network Settings You can view current network settings and status in this section ...

Page 58: ... 58 ...

Page 59: ...and volume status of TS 401T 6 6 1 Create Disk Volume TS 401T can accommodate four disks at maximum You can set the disk volume to the following configurations by clicking on the icons on Create Disk Volume page a Single Disk Volume You can create an individual disk volume In case of disk crash all data will be lost ...

Page 60: ...onfiguring RAID 5 disk volume at least 3 disks are required c RAID 1 Mirroring Disk Volume Mirroring Disk protects your data by automatically backing up the contents of one disk onto the second disk of a mirrored pair This protects your data if one of the disks fails However the storing capacity is equal to a single disk as the second disk is used to automatically back up the first one d RAID 0 St...

Page 61: ...ger disk Files will be saved on physical disks sequentially but does not have a disk failure file protection function The overall capacity of linear disk is the sum of all disks 6 6 2 Delete Disk Volume To delete a disk volume select the disk volume to remove and click OK ...

Page 62: ...ne and click OK You can check the Fix errors box and the server will fix errors automatically during disk checking 9 Disk Volume Operation Report After click OK on Examine Disk Volume page a page like below will display to show the current status and information of disk volume operation ...

Page 63: ... of physical disks and logical volumes in the section Note When configuring disk volume make sure there are no active users connecting to TS 401T to avoid any potential damage to the disks You can check all currently active users in Statistics Logs Active Users refer to Chapter 6 10 1 and inform those users to logout before configuring disk volume ...

Page 64: ...efault administrator has access to system administration and cannot be deleted o Guest This is a built in user and will not be displayed on User Management page When you use a non registered user name to login the server will recognize the user as a guest and will allow limited access A guest does not belong to any user group p Anonymous This is a built in user and will not be displayed on User Ma...

Page 65: ...te a new user 9 User name The user name must not exceed 32 characters It is case insensitive and can contain double byte characters such as Chinese Japanese and Korean except 9 Password The password is case sensitive and can be 16 characters long at maximum It is recommended to use a password of at least 6 characters You can perform the following settings for users ...

Page 66: ...ryone All registered users belong to everyone group You cannot delete this group You can manage user groups with the following options User groups name must not exceed 256 characters It is case insensitive and can contain double byte characters such as Chinese Japanese and Korean except the following ones To properly manage security it is very important to manage users and user groups You may set ...

Page 67: ...Jones Lee for Administration Department and Ms Jane Wu for Sales Department The IT Department therefore needs to create two user accounts for them to access company data on TS 401T i To create a user account go to User Management Users Click Create ii Enter the user name Jones Lee Jane Wu and password Check the box Continue to set the user groups to which this user belongs and click OK ...

Page 68: ...roups the users belong to on the right list i e Mr Jones Lee for Administration Dept and Ms Jane Wu for Sales Dept and click Add Then click Close iv After creating the users the users will appear on the list on Create User Page ...

Page 69: ...y Administration Department only please go to User Management User Groups page Select the user group Administration Dept and click Create Private Network Share on the right 2 Enter the network share name media Select to disk volume that the share will be created in and specify the path automatically or manually Enter the comment for the network share e g media folder for Admin Dept and click Apply...

Page 70: ... 70 3 You can see the folder media in Network Share Management page 4 Enter Access Control You can see that only Administration Dept has full access right to the folder ...

Page 71: ...uota for all users ii Quota size on each disk volume Please refer to the following example to configure the quota setting of users The IT department is planning to set the disk quota of Mr Jones Lee from Administration Department and Ms Jane Wu from Sales Department on TS 401T The disk quota is 2000MB for Mr Jones Lee and 4000MB for Ms Jane Wu 1 Please go to Quota page in User Management to enable...

Page 72: ... Lee on User page and click Quota Settings on the right 3 Enter the quota size 200MB and click OK 4 Follow the same steps and enter the quota size 4000MB for Jane Wu and click OK The quota setting is successfully applied ...

Page 73: ... network storage is file sharing In a standard operation environment you can create different network share folders for various types of files or provide different file access rights to users or user groups There are four options in Network Share Management ...

Page 74: ...aracters 9 Disk volume This area shows the disk volume status 9 Path All data are stored under the assigned path onto the disk volume You can select Specify path automatically or assign a path manually The path cannot exceed 256 characters and cannot contain the characters below 9 Comment Enter a brief description for the share folder The comment cannot exceed 128 characters ...

Page 75: ...he network share is created you can assign access rights to users or user groups 9 Deny access Access to the network share will be denied when this option is selected 9 Read only Users can read the files only on the network share when read only is assigned 9 Full access Users with full access are allowed to read write create or delete files and folders on the network share ...

Page 76: ... 76 6 8 4 Delete Select a share and click delete Click OK to confirm ...

Page 77: ...ement of TS 401T 6 9 1 SNMP Settings Enable SNMP Simple Network Management Protocol service and complete all necessary settings to manage network components of the server by SNMP When enabling SNMP Trap Notification a message will be sent to a specified trap host when an error occurs ...

Page 78: ...ill be sent to the administrator automatically You can refer to Event Logs section in Statistics Logs refer to Chapter 6 10 2 to check all happened errors and warnings If your mailbox requires SMTP authentication enter the user name and password Note It is recommended to send a test e mail to make sure you can receive the alert mails 6 9 3 Restart Shutdown Select to restart or shut down TS 401T ...

Page 79: ...disk will go to standby mode if there is no access within the specified period iv Enable buzzer When buzzer is enabled an alert sound will be played in case of system error v Power Supply Type Select power supply type There is one power supply by default Do NOT change the position of default power supply To use a second power supply you can purchase from the distributor To use two power supplies f...

Page 80: ...ut down automatically by probing the power status of the connected UPS unit 9 Enable UPS support To activate the UPS support you can select this option You can set the shutdown timer to turn off the system automatically after the system detects the AC power is abnormal In general the UPS can keep supplying the power for the system for about 5 10 minutes depending on the maximum load of the UPS and...

Page 81: ... model you are using is not available on the list please contact our technical support IP Address of UPS If you have selected APC UPS with SNMP for UPS model enter the IP address of the UPS Note When UPS support is not enabled the Test button will not function ...

Page 82: ...p com tw Read the release notes carefully to make sure you need to upgrade the firmware Step 2 Before upgrading system firmware back up all disk data on the server to avoid any potential data loss during system update Step 3 Click the Browse button to select the correct firmware image for system update Click Update System to update the firmware Note System update may take tens of seconds to severa...

Page 83: ... 83 TS 401T firmware version ...

Page 84: ... 84 6 9 7 Change Logo You can choose a personal picture to display on the login page of TS 401T The size of the picture cannot exceed 20K bytes ...

Page 85: ...remote folders on another server The files will be compressed before the replication process in order to save time for data transfer Make sure a network share is created before creating a remote replication job Using Remote Replication Login TS 401T go to Remote Replication in System Tools ...

Page 86: ...all settings and click OK to save or Cancel to quit Note To use remote replication enable Microsoft Networking service make sure the destination network share and directory have been created and the user name and password are valid to login the destination folder ...

Page 87: ... 87 ii Edit a Select the job to be edited b Click Edit c Modify the settings d Click OK to save or Cancel to quit iii Delete a Select the job to be deleted b Click Delete ...

Page 88: ...ed and DNS settings are properly set Then go to Anti virus Configuration page and enter activation code purchased from the distributor Enter activation code when the following screen appears The following screen will appear if an invalid code is entered Attention Note that you may have a valid activation code entered but an unknown error notification is shown In such case please check the DNS sett...

Page 89: ...orrect code is entered You can view anti virus information in the table at the bottom As anti virus function is not enabled anti virus status will be disabled It is recommended to select Automatic Update when you enable anti virus configuration ...

Page 90: ...ation anti virus status will be Start Auto Update or Downloading The status should be Enabled Auto update or Ready to indicate anti virus function is enabled successfully You need to update web content manually to acquire the latest data as shown below ...

Page 91: ...s all detected files infected with virus This folder cannot be shown from Network Share Management but can be viewed by Network Neighborhood or other file services Note Quarantine folder cannot be deleted When you enter a new activation code quarantine folder will not be created if it has already existed ...

Page 92: ...r Details will be recorded in Event Logs Quarantine infected file s When infected files are detected they will be moved to Quarantine immediately Details will be recorded in Event Logs Delete infected file s Infected files will be deleted immediately when they are detected Details will be recorded in Event Logs Log only No action taken When infected files are detected the system will only save the...

Page 93: ... 93 Viewing Details of Infected Files To view the details of infected files of the network share go to Event Logs of Statistics Logs A warning message will be shown in the table ...

Page 94: ... backup the setting s select the appropriate option s and click Backup To restore a backup settings file click Browse to select the file and click Restore To reset the setting s to factory default s select the appropriate option and click Reset ...

Page 95: ... 95 6 9 11 USB CD DVD Backup Restore USB Backup Restore function enables you to back up local data to CD DVD discs via USB CD DVD burner and CD DVD data to local disk Using USB Backup Restore ...

Page 96: ... on the burner and input a writable disc b Click Re detect The system will display information of the detected burner c Click Eject Disc to eject the disc from the burner d Insert the disc again and click Re detect and continue to use writing and loading functions ...

Page 97: ...e Directory select a network share from the drop down menu and enter a directory name You can also use stroke to indicate multiple directories e g sales jenny c Select Write Speed d Click Write to disc to write data to the disc To view updated writing status click Refresh e The disc will be ejected after burning ...

Page 98: ...m the drop down menu and enter a directory name You can also use stroke to indicate multiple directories e g sales jenny c Select Overwrite existing files to overwrite existing files in the directory or Skip existing files to skip loading files that have existed in the directory during loading process d Click Load to load data to destination path e The disc will be ejected after loading ...

Page 99: ...ged on to Web File Manager 6 10 2 Event Logs TS 401T can store thousands of recent event logs including warning error and information messages In case of system malfunction event logs can be retrieved to analyze system problems 6 10 3 DHCP Logs When DHCP service is enabled you can refer to DHCP logs to monitor all assigned dynamic addresses client MAC addresses and other information ...

Page 100: ...of your TS 401T When the server is found double click on the server name to connect c You may also use Search for Computers function to look for your TS 401T in Windows Under Windows OS please follow these steps i Open My Network Places ii Under the tool bar click Search iii Enter the name of TS 401T in Computer Name field iv Click Search When TS 401T is found double click the item to access the s...

Page 101: ... 101 2 Once the connection to TS 401T is successful all listing on your available network share will be displayed Use the option Map Network Drive to map the folder s as your network drive ...

Page 102: ... an Apple MAC user you can access TS 401T by the following ways 1 Using Network Browser a Choose Network Browser in Apple menu b In Network Browser choose AppleTalk A list of computers on the AppleTalk network will appear Select TS 401T ...

Page 103: ... 103 c Enter the login name and password or use Guest to enter Click Connect d When TS 401T is connected all network shares will be shown ...

Page 104: ... 104 e Choose a network share to connect The network share will appear on the desktop ...

Page 105: ... 105 2 Using Chooser a Select Chooser on Apple menu bar b Click on AppleShare The name of TS 401T will appear on the right side of the window ...

Page 106: ... 106 c Use the mouse to highlight TS 401T and click OK d Enter the correct login name and password or use Guest to login and then click Connect ...

Page 107: ... 107 e All available network shares will be listed Select a network share and click OK f Close the Chooser program Double click on the icon on the desktop to access the files ...

Page 108: ...y use the following command mount t nfs 192 168 0 1 public mnt pub Note You must login as root user to initiate the above command 2 Login as the user id you define you can use the mounted directory to access your network share files 7 4 By Web Browser Other than OS support your TS 401T also provides a convenient web file management interface that allows using a standard web browser to access your ...

Page 109: ...he server or access the public share folders as guest Please go to Network Settings FTP service and enable FTP service before using FTP service Follow the steps below to use FTP service 1 Open an IE browser and type ftp server IP or ftp server name OR 2 By Web File Manager of TS 401T a Go the TS 401T administration and click Web File Manager Enter user name and password to login TS 401T ...

Page 110: ... 110 b Click the share folder in FTP section c When the ftp folder is shown enter user name and password ...

Page 111: ... 111 d The share folder will be shown You can then manage the folder by dragging and dropping files to it as well as rename or delete the files ...

Page 112: ...kup The system will filter all files belonging to these file types when backing up data Schedule You can specify a schedule for backing up data with this option e g 12 00 every day or 05 00 every Saturday Monitor When this option is enabled the system will upload all files or folders to the server instantly for backup when the files or folders are modified 2 Restore Select this option to restore b...

Page 113: ...NetBak Replicator in the CD ROM 2 Follow the steps to install NetBak Replicator 3 Click OK when the following message appears You can start to use NetBak Replicator immediately Upon successful installation a shortcut icon will be shown on the Desktop ...

Page 114: ...re using NetBak Replicator please login TS 401T administration and go to Network Share Management to create a share folder for backup 2 Run NetBak Replicator Click All TS 401T and their share folders within the network will be displayed ...

Page 115: ...ppear on the left list Select a server and a share folder on the right NetBak Replicator also supports backup via WAN you can enter the IP address of TS 401T for data backup directly and select a share folder Then click OK 4 Enter the user name and password to login the server ...

Page 116: ...ct All Select all folders The column on the left shows all available folders and the right column shows the files in the folders Clear All Clear selection of all folders Select My Document Select all folders in My Document Close When clicking this button NetBak Replicator window will minimize and an icon will be displayed in system tray To restore or exit the program right click the icon and selec...

Page 117: ... 117 5 You can start the backup procedure upon successful connection to the TS 401T Backup Select files and folders for backup ...

Page 118: ... 118 9 Start When you have selected the files for backup to TS 401T click Start on NetBak Replicator The program will start to copy the selected files to the specified share folder on TS 401T ...

Page 119: ... 119 9 File Filter Click File Filter on NetBak Replicator main page to select file format to be skipped from backup Then click OK ...

Page 120: ... 120 9 Schedule Click Schedule on NetBak Replicator main page Then check the box Enable Backup Schedule and select the frequency and time for backup Click OK to confirm ...

Page 121: ...e system will upload all files or folders to the server instantly for backup when the files or folders are modified Other files will be gray and cannot be selected Click Monitor again to cancel monitoring An icon will appear on task bar of Windows when monitoring is in process ...

Page 122: ...g this function NetBak Replicator will record all current settings of the user including whether or not monitor function is enabled When the user login again this program will load the previous recorded settings for users to manage data backup ...

Page 123: ...ginal position Select the location that the data will be restored to b Select new restore position Click to select the directory to restore data to or select a previously chosen location from the drop down menu c Select the folder s and sub folder s for restoring data on the right list and click Start ...

Page 124: ...e has already existed on the target folder you can select to 9 Recover all files 9 Pop up a request dialog 9 Skip this file If an error happens in the process of file restoring you can select to 9 Stop the restoring process 9 Pop up a request dialog 9 Skip restoring this file ...

Page 125: ...ave all logs on NetBak Replicator click this button All logs will be saved as text file b Clear All Click this button to clear all logs c Option Select the type of logs to be recorded Record all logs or Record error logs only ...

Page 126: ...w on system maintenance 9 1 Restart Shut down Server Follow the steps below to restart or shut down TS 401T 1 Ask all active users of TS 401T to save their files and disconnect from the server 2 Enter the administration page and select Restart Shutdown in System Tools 3 Click Restart to reboot the server or Shut Down to turn off the server You can perform these actions by the LCD panel ...

Page 127: ...TS 401T 1 Press the reset button of TS 401T for a few seconds A beep sound will be heard 2 Login TS 401T with the default user name and password Default user name administrator Password admin Note To reset the system by the reset button the option Enable configuration reset switch in Hardware Settings must be activated ...

Page 128: ...mal Shutdown In case of power outage or improper shutdown of TS 401T the system will resume to the state before it is shut down If your server does not function properly after restart please do the following 1 If the system configuration is lost configure the system again 2 In the event of abnormal operation of the server contact customer service for technical support To avoid the above situations...

Page 129: ...Launch the web browser and go to TS 401T home page Select Web File Manager and enter the correct login name and password You may also enter guest in the login name field with no password to access the network shares on TS 401T as an anonymous guest Note Make sure a network share has been created before using Web File Manager ...

Page 130: ...Click on a file displayed on the web page The information of the file will be displayed If your browser does not support the file format the download window pops up automatically Once the file is downloaded you can open it on your computer Create folder i Select a network share or folder in which you want to create a new folder ii Click Create Folder on the toolbar iii Enter the name of the new fo...

Page 131: ...delete ii Click Delete on the toolbar iii Confirm to delete the file or folder To delete all files and folders click Select All and then Delete Upload file i Open the folder to upload file to ii Click Browse to select the file iii Click Upload Download file i Select a file to download ii Right click the mouse and select Save Target As to save the file Logout To exit Web File Manager click Logout ...

Page 132: ...d in Chinese you may have to configure the browser settings Take Internet Explorer as an example follow the steps below to configure the settings 1 Click on Tools in IE browser 5 Restart the browser 2 Click Internet Options 3 Cancel this option 4 Click OK ...

Page 133: ...older Refresh reload the current page Home return to network share list home page Create folder Rename file or folder Delete file or folder Select all Cancel selection Logout Full access network share folder Read only network share folder Malfunction network share folder ...

Page 134: ... Authentication AD environment mixed mode can be supported by TS 401T For example qatest com tw and sub2 qatest com tw are domains controlled by Windows 2003 server and sub1 qatest com tw domain is controlled by Windows 2000 server ...

Page 135: ...ice Pack 1 8 When TS 401T is added to AD domain the authority of everyone will not work everyone is the original account of TS 401T but doesn t include AD Therefore the authority has to be reset 9 The DNS setting on Windows 2000 server should be added as Active Directory DNS the server should be rebooted after DNS setting is set 10 You should use the full domain name on the AD setting of TS 401T F...

Page 136: ...136 Adding TS 401T to Windows Server 2003 Active Directory Domain 1 Go to TCP IP Configuration in Network Settings Enter the IP address of primary DNS server You can inquire AD domain via this DNS server ...

Page 137: ...main Member and enter the domain name and the user name with administrator access right to that domain Note a Make sure that a fully qualified domain name such as qatest com tw has been filled in b Make sure the user name with administrator access right to that domain ...

Page 138: ... the settings in step 2 domain name domain user name and the password When the following message appears after applying the settings in step 2 check the time zone settings Make sure the difference of your time and that of AD server is less than 5 minutes If the time difference is larger than 5 minutes you will not be able to add the domain member ...

Page 139: ...ing of domain member you can view the list for domain users and local users in User Management 5 Go to Access Control in Network Share Management to configure the access control right of AD users for all available network shares ...

Page 140: ... 140 Using AD users to access services To access services like FTP Network Neighborhood or Apple Talk with an AD user account add DomainName before the user name when logging in ...

Page 141: ...sub1 and the user who has administrator access right for identification Note a Please notice that TS 401T and Windows 2000 2003 server must be in the same section or the system will show the following error message b Make sure that a domain name such as sub1 has been filled in c Make sure the user name with administrator access right to that domain ...

Page 142: ...ppears after applying the settings in step 2 check the time zone settings Make sure the difference of your time and that of AD server is less than 5 minutes If the time difference is larger than 5 minutes you will not be able to add the domain member 3 Upon successful adding of domain member you can view the list for domain users and local users in User Management ...

Page 143: ... users to access services To access services like FTP Network Neighborhood or Apple Talk with an domain user account add DomainName before the user name when logging in Note To join AD domain again set TS 401T as standalone server in Microsoft Networking section Make sure all domain users are removed in User Management before joining TS 401T to AD domain ...

Page 144: ... on TS 401T the first time or the disk on the same TS 401T model is used Users can re configure disk volume R W error Disk fails 9 When R W error is shown users should back up data immediately and replace the failed disk Disk Configuration RAID Configuration English Display Status Description Initializing Initializing disk Formatting Formatting disk Creating Creating RAID configuration Removing Re...

Page 145: ...p disk data immediately and replace the failed disk to rebuild RAID configuration Note 1 When R W error is displayed for hard disk status or Not active or In degraded mode is displayed for RAID configuration please replace the hard disk immediately to ensure RAID data protection can work properly QNAP is not responsible for any data loss caused by delay in replacing failed disks in a RAID configur...

Reviews: