background image

16

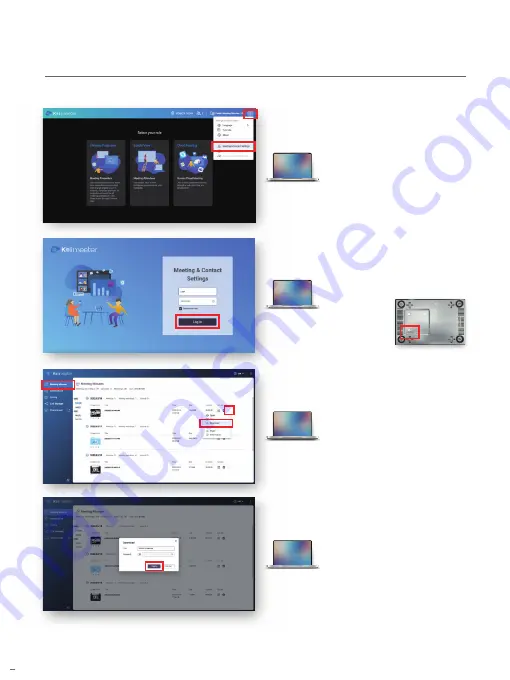
Download Meeting Recordings

4.  Click the top-right hamburger 

icon and click 

Meeting & 

Contact Settings

.

5.  Log in to your account.

6.  Click 

Meeting Minutes

.

7.  Click the hamburger icon under 

Actions and click 

Download

.

8.  Click

 Apply

 to download the 

meeting recording. You can 
password protect the recording 
if necessary.

• Default username: "user" 
• Default password: The device MAC address

Note: Check the 
KoiBox sticker for 
the MAC address.

Summary of Contents for KoiBox-100W

Page 1: ...KoiBox 100W Quick Start Guide www qnap com...

Page 2: ...cord Meetings 1 12 Record Meetings 2 13 Play Meeting Recordings 14 Download Meeting Recordings 15 Join Cloud Meetings in a Browser 17 Join Zoom Meetings 19 Join Skype Meetings 21 Host and Join Meeting...

Page 3: ...in menu 2 In the main menu select Private Meeting using the arrow keys and press OK 3 Select Address Book using the arrow keys and press OK 4 Choose a group using the arrow keys and press OK 5 Choose...

Page 4: ...menu select Private Meeting using the arrow keys and press OK 3 Select Dial Pad using the arrow keys and press OK 4 Enter a KoiCode number using the arrow keys and press OK 5 Select Call using the ar...

Page 5: ...he main menu select Private Meeting using the arrow keys and press OK 3 Select Dial Pad using the arrow keys and press OK 4 Enter an SIP IP using the arrow keys and press OK 5 Select Call using the ar...

Page 6: ...een when KoiBox receives a call 2 Choose to answer the call using the arrow keys and press OK Answer Incoming Calls Your KoiBox KoiCode and SIP IP are displayed on the main menu Other parties can call...

Page 7: ...ter the Screen Sharing IP in your web browser and log in to KoiMeeter Project Wirelessly Note Only Chrome and Firefox support wireless projection Skip this step if you are not using Chrome with macOS...

Page 8: ...roject Wirelessly 4 Choose Wireless Projection 5 Choose what to share and click Share Note You can choose to play sound in the screen with Entire Screen or Chrome Tab if you are using Chrome with Wind...

Page 9: ...3 Enter the Screen Sharing IP in your web browser and log in to KoiMeeter Add Contacts Note Only Chrome and Firefox support wireless projection Skip this step if you are not using Chrome with macOS 3...

Page 10: ...4 Click the top right hamburger icon and click Meeting Contact Settings 5 Log in to your account 6 Choose AddressBook 7 Click Add Device Note Select Category to add a group Default username user Defa...

Page 11: ...to download a template CSV file 3 Open the template CSV file Enter your contacts information under the following columns 4 Click Import 5 Select the CSV file and click Open to import the contacts con...

Page 12: ...e main menu select Record using the arrow keys and press OK 3 Read the warning message Click OK to start recording or Cancel to abort Record Meetings 1 4 Press the down arrow key to display the menu a...

Page 13: ...arrow key to display the menu Select Record and press OK 2 Read the warning message Click OK to start recording or Cancel to abort Record Meetings 2 3 Press the down arrow key to display the menu and...

Page 14: ...u select Recordings using the arrow keys and press OK Play Meeting Recordings 3 Select a video using arrow keys and press OK to play the video 4 Press the down arrow key to display the menu Use the me...

Page 15: ...the Screen Sharing IP in your web browser and log in to KoiMeeter Download Meeting Recordings Note Only Chrome and Firefox support wireless projection Skip this step if you are not using Chrome with...

Page 16: ...to your account 6 Click Meeting Minutes 7 Click the hamburger icon under Actions and click Download 8 Click Apply to download the meeting recording You can password protect the recording if necessary...

Page 17: ...e arrow keys and press OK 3 Enter the IP address in red circle in PC browser Join Cloud Meetings in a Browser Note A mouse and keyboard is required Refer to steps 6 1 to 6 4 for getting an invitation...

Page 18: ...gs in a Browser Teams invitation link 6 1 Skype invitation link 6 2 Zoom invitation link 6 3 Google Meet invitation link 6 4 Note KoiBox supports most cloud meeting services such as Teams Skype Zoom G...

Page 19: ...the main menu select Cloud Meeting using the arrow keys and press OK 3 Select Zoom using the arrow keys and press OK Join Zoom Meetings Note A mouse and keyboard is required e g https zoom us 9774155...

Page 20: ...20 Join Zoom Meetings 6 Paste the last part of the invitation link and click OK 7 Join the Zoom meeting...

Page 21: ...e main menu select Cloud Meeting using the arrow keys and press OK 3 Select Skype using the arrow keys and press OK Join Skype Meetings Note A mouse and keyboard is required e g join skype com y6vLEBi...

Page 22: ...22 Join Skype Meetings 6 Paste the last part of the invitation link and select OK 7 Join the Skype meeting...

Page 23: ...n menu select Cloud Meeting using the arrow keys and press OK 3 Select Microsoft Teams using the arrow keys and press OK Host and Join Meetings using Microsoft Teams Note A mouse and keyboard is requi...

Page 24: ...s 6 Choose what app to use This example uses Continue on this browser 7 Start or join a meeting 8 In the meeting click screen sharing to share your screen Note KoiBox 100W supports the display of Powe...

Page 25: ...yed on your screen 3 Enter the Screen Sharing IP in your web browser and log in to KoiMeeter Note Only Chrome and Firefox support wireless projection Skip this step if you are not using Chrome with ma...

Page 26: ...ange Password and enter the following 4 Click the top right hamburger icon and click Hardware Settings 5 Log in to your account 6 Click user 7 Select Options Default username user Default password The...

Page 27: ...d on your screen 3 Enter the Screen Sharing IP in your web browser and log in to KoiMeeter Note Only Chrome and Firefox support wireless projection Skip this step if you are not using Chrome with macO...

Page 28: ...password The device MAC address Note Check the KoiBox sticker for the MAC address 4 Click the top right hamburger icon and click Meeting Contact Settings 5 Log in to your account 6 Choose Settings 7 E...

Page 29: ...splayed on your screen 3 Enter the Screen Sharing IP in your web browser and log in to KoiMeeter Note Only Chrome and Firefox support wireless projection Skip this step if you are not using Chrome wit...

Page 30: ...Default password The device MAC address Note Check the KoiBox sticker for the MAC address 4 Click the top right hamburger icon and click Meeting Contact Settings 5 Log in to your account 6 Choose Set...

Page 31: ...Sharing IP displayed on your screen 3 Enter the Screen Sharing IP in your web browser and log in to KoiMeeter Note Only Chrome and Firefox support wireless projection Skip this step if you are not usi...

Page 32: ...assword The device MAC address Note Check the KoiBox sticker for the MAC address 4 Click the top right hamburger icon and click Meeting Contact Settings 5 Log in to your account 6 Choose Settings 7 Se...

Page 33: ...of the Screen Sharing IP displayed on your screen 3 Enter the Screen Sharing IP in your web browser and log in to KoiMeeter Note Only Chrome and Firefox support wireless projection Skip this step if y...

Page 34: ...address Note Check the KoiBox sticker for the MAC address 4 Click the top right hamburger icon and click Meeting Contact Settings 5 Log in to your account 6 Choose Settings 7 Select Enable on Auto rec...

Page 35: ...download qnap com service qnap com install qnap com Printed in Taiwan...

Reviews: