


"
()
®
®
&
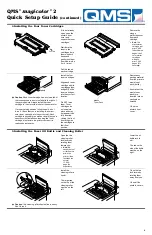
Holding a stack
of about 250
sheets with one
hand, fan the
sheets with the
other hand. Take
off the top and
bottom sheets.
Remove the
media cassette
from the printer.
Adjust the media
guides to fit the
size paper
you’re loading.
Push the media
pressure plate
down to lock it in
position.
Caution
: Do not overfill the cassette. The media
cassette holds 250 sheets of 20 lb (75 g/m
2
)
paper. The paper should fit easily between the
guides. Make sure the paper corners are not bent
upwards by the guides.
Load the paper.
A fill limit mark is
on the inside of
the cassette.
The paper
should be
aligned face up,
the top toward
the rear of the
cassette.
Slide the media
cassette back
into the printer
until it latches.
#$$ %$.#+( /�!.&1$0
$0. )
Lower input feeder kit contents:
• Input feeder unit
• Letter/A4 media cassette
• Two small metal brackets with thumbscrews
• Two plastic side covers
»
Note: There may be other pieces shipped with the lower input feeder;
however, they are not required for this procedure.
Remove the feeder from the shipping carton, and place it on a flat surface.
Remove any tape and packing material from the feeder.
»
Note: Save the packing material in case you have to move the feeder to a
new location.
WARNING!
If consumables are installed, be sure to keep the printer
level when moving it to prevent accidental spills.
ACHTUNG!
Achten Sie bitte darauf, daß der Drucker mit eingebauten
Tonerkartuschen nur waagerecht transportiert wird.
Move the input
feeder to a table
or flat surface
near the printer.
Set the printer
on top of the
input feeder.
Be sure to align
the printer and
input feeder as
precisely as
possible.
Install the two
metal brackets
underneath the
side of the
printer.
Holding the
bracket at a
slight angle,
slide it up into
the hole under-
neath the printer
before setting it
to vertical.
Make sure that
the hole in each
metal bracket is
lined up with the
corresponding
hole on the input
feeder.
Use the thumb-
screws to attach
the two brackets
to the lower
input feeder.
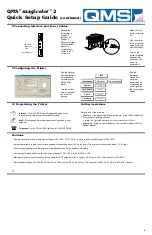
Remove the
lower input
feeder cover
plate. You will
switch this cover
plate with the
one from the
printer after the
cables have
been connected.
Locate the cable
at the left rear of
the feeder, and
connect it to the
printer.
Reinsert the two
cover plates.
»
Note: If you move the printer with the lower input feeder
attached, lift the unit by the four bottom corners, not by the
feeder’s cassette slot and not by the printer itself.
Snap the plastic
side covers onto
the appropriate
sides of the
input feeder.
!
"#$
%
!
&%
!
'
'