background image

35

3


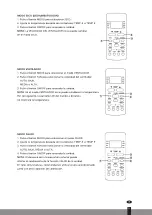
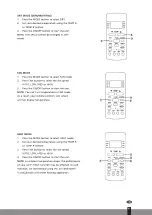
2.   Annuler l’une ou l’autre fonction en réglant sa minuterie sur 0,0h.


Réglage MINUTERIE ALLUMÉE ET ÉTEINTE (exemple)


Gardez à l’esprit que les périodes que vous définissez pour les deux fonctions se rapportent à des 


heures après l’heure actuelle. 


        Exemple : 

si 

la 

minuterie 

actuelle 


est à 13 h, pour régler la minuterie 


       steps 

comme 

indiqué 

ci-dessus, 

l’appareil


        s’allume 

2,5 

heures 

plus 

tard 


  at 6:00PM. 


(15 h 30) et s’éteint à 18 h.


F

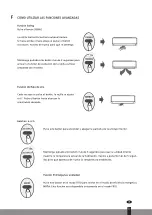
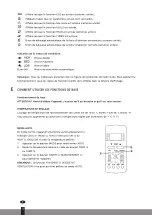
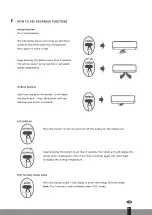
  COMMENT UTILISER LES FONCTIONS AVANCÉES


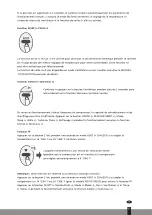
Fonction Swing (« Balayage »)


Appuyer sur le bouton Swing (« Balayage »).


La fente d’aération horizontale pivotera 


automatiquement vers le haut et vers le bas 


lorsque vous appuyez sur le bouton Swing 


(« Balayage »). Appuyer à nouveau pour l’arrêter.


En maintenant ce bouton enfoncé pendant 


plus de 2 secondes, la fonction de balayage de 


la fente d’aération verticale est activée. 


(Dépendant du modèle)


Airflow direction (« Direction du flux d’air »)


Chaque fois que vous appuyez sur le bouton, il 


ajuste la fente d’aération de 6°. Appuyer sur le 


bouton jusqu’à ce que la direction de votre 


choix soit atteinte.

Démarrage de 
la minuterie

L’appareil

S’ALLUME

L’appareil

S’ÉTEINT

2,5 heures plus tard

5 heures plus tard

Summary of Contents for S 2326

Page 1: ...2335 S 2353 SM 23 SCM 52 SCM 54 REMOTE CONTROL 2 5 3 4 1 9 BEDIENUNGSANLEITUNG MANUAL DEL USUARIO MANUEL D UTILISATION USER MANUAL MANUALE UTENTE GEBRUIKERSHANDLEIDING MANUAL DE UTILIZA O 2 14 26 38...

Page 2: ...ZWEIFELSFALL AN IHREN H NDLER Vielen Dank dass Sie sich f r unser Klimager t entschieden haben Bitte lesen Sie diese Gebrauchsanweisung Bedienungsanleitung sorgf ltig durch bevor Sie Ihr Klimager t in...

Page 3: ...N D ANZEIGEN AUF DEM FERNBEDIENUNGSBILDSCHIRM E VERWENDUNG DER GRUNDFUNKTIONEN F VERWENDUNG DER ERWEITERTEN FUNKTIONEN WICHTIGER HINWEIS Bitte lesen Sie diese Bedienungsanleitung aufmerksam bevor Sie...

Page 4: ...er Bedienungsanleitung GBESONDERE ANMERKUNG Die Tasten Ihrer Klimaanlage k nnen im Design leicht von dem gezeigten Beispiel abweichen Wenn das Innenger t keine spezifische Funktion hat wird durch das...

Page 5: ...dienung muss innerhalb einer Entfernung von 8 Metern vom Ger t benutzt werden Das Ger t erzeugt einen Signalton wenn es das Infrarotsignal der Fernbedienung empf ngt Vorh nge andere Materialien und di...

Page 6: ...enn dieses Ger t den Radio oder Fernsehempfang st rt was durch Ein und Ausschalten des Ger ts festgestellt werden kann sollte der Benutzer versuchen die St rungdurch eine oder mehrere der folgenden Ma...

Page 7: ...atische L ftungsgitterbewegung f r die senkrechten Lamellen zu aktivieren bei einigen Modellen 5 SLEEP Spart w hrend der Schlafenszeit Energie 6 DIRECT Zum Ausrichten des Luftflusses 7 ECO Zum Wechsel...

Page 8: ...eine Zeit f r TIMER OFF eingestellt wurde Zeigt den Temperatur Sollwert oder die Zimmertemperatur oder in der Einstellung TIMER die Zeit Wird angezeigt wenn die ECO Funktion aktiviert ist bei einigen...

Page 9: ...2 Stellen Sie mit der Taste TEMP oder TEMP die gew nschte Temperatur ein 3 Dr cken Sie die Taste ON OFF um das Ger t einzuschalten HINWEIS FAN SPEED kann im AUTO Modus nicht eingestellt werden K HLMO...

Page 10: ...er Au entemperatur kann sich auf die Heizfunktion HEAT Ihres Ger ts auswirken Wir empfehlen diese Klimaanlage in solchen F llen in Kombination mit anderen Heizungen zu verwenden Einstellen des TIMERs...

Page 11: ...eilige Funktion einstellen nach der aktuellen Uhrzeit richten F VERWENDUNG DER ERWEITERTEN FUNKTIONEN Swing Funktion Dr cken Sie die SWING Taste Die horizontale Lamelle bewegt sich automatisch nach ob...

Page 12: ...Sollwert bleibt unver ndert HINWEIS Wenn Sie die ECO Taste dr cken den Modus ndern oder den Temperatur Sollwert auf unter 24 C 75 F einstellen wird der ECO Modus deaktiviert Wenn der Temperatur Sollw...

Page 13: ...leistung unzureichend sein Dr cken Sie die Taste ON OFF Mode Sleep Turbo oder Clean w hrend des Betriebs um die Lautlos Funktion zu deaktivieren FP Funktion Dr cken Sie diese Taste im Heizmodus HEAT z...

Page 14: ...USO 2 EN CASO DE DUDA P NGASE EN CONTACTO CON SU DISTRIBUIDOR Muchas gracias por adquirir nuestro aire acondi cionado Lea atentamente este manual cuidado samente antes de utilizar su aire acondiciona...

Page 15: ...C BOTONES Y FUNCIONES D INDICADORES DE LA PANTALLA REMOTA E C MO UTILIZAR LAS FUNCIONES B SICAS F C MO UTILIZAR LAS FUNCIONES AVANZADAS NOTA IMPORTANTE Lea atentamente este manual antes de utilizar su...

Page 16: ...o G NOTA ESPECIAL Los dise os de los botones de su unidad pueden ser ligeramente diferentes a los del ejemplo mostrado Si la unidad interior no tiene una funci n determinada pulsar el bot n de esa fun...

Page 17: ...CONSEJOS PARA EL USO DEL MANDO A DISTANCIA El mando a distancia debe utilizarse a una distancia m xima de ocho metros de la unidad La unidad emitir un pitido al recibir la se al del mando a distancia...

Page 18: ...ecte el equipo a una toma de corriente o a un circuito diferente al que est conectada la antena receptora Consulte al distribuidor o a un t cnico experimentado de televisi n o radio si necesita ayuda...

Page 19: ...ALTA 13 TIMER ON Configura el temporizador para encender la unidad para ver las instrucciones consulte la sec ci n C mo utilizar las funciones b sicas 14 TIMER OFF Configura el temporizador para apaga...

Page 20: ...trica AJUSTE DE LA TEMPERATURA El rango de temperatura de funcionamiento para las unidades es de 16 30 C 60 86 F 20 28 C 68 82 F La temperatura establecida se puede aumentar o disminuir en incrementos...

Page 21: ...encender la unidad NOTA En el modo VENTILADOR no se puede establecer la temperatura Por consiguiente la pantalla LCD del mando a distancia no mostrar la temperatura MODO CALOR 1 Pulse el bot n MODO p...

Page 22: ...acia la unidad y espere un segundo para activar la opci n TIMER OFF NOTA 1 Al establecer el momento de encendido TIMER ON o de apagado TIMER OFF el tiempo aumentar en intervalos de 30 minutos cada vez...

Page 23: ...vez que se pulse el bot n la rejilla se ajusta r 6 Pulse el bot n hasta alcanzar la orientaci n deseada PANTALLA LED Pulse este bot n para encender y apagar la pantalla de la unidad interior Mantenga...

Page 24: ...actual o reanudar la configuraci n anterior Pulse este bot n cuando el mando a distancia est encendido y el sistema volver autom ticamente a la configuraci n anterior incluidos el modo de funcionamien...

Page 25: ...emperatura de 16 C 60 F o 20 C 68 F en algunas unidades La unidad funcionar a alta velocidad del ventilador mientras el compresor est encendido con la temperatura autom ticamente NOTA Esta funci n sol...

Page 26: ...LA PREMI RE UTILISATION 2 EN CAS DE DOUTE DEMANDEZ CONSEIL VOTRE DISTRIBUTEUR Merci beaucoup d avoir achet notre climati seur Veuillez lire attentivement ce manuel avant d utiliser votre climatiseur...

Page 27: ...FONCTIONS D INDICATEURS D CRAN DISTANCE E COMMENT UTILISER LES FONCTIONS DE BASE F COMMENT UTILISER LES FONCTIONS AVANC ES NOTE IMPORTANTE Veuillez lire attentivement le pr sent manuel avant d utilis...

Page 28: ...e climatiseur G NOTE SP CIALE La conception des boutons de votre appareil peut diff rer l g rement de l exemple illustr Si l unit int rieure n a pas de fonction particuli re appuyer sur le bouton de c...

Page 29: ...ipaux non tri s Se r f rer aux lois locales pour une limination correcte des piles CONSEILS POUR L UTILISATION DE LA La t l commande doit tre utilis e moins de 8 m tres de l appareil L appareil met un...

Page 30: ...es mesures suivantes R orienter ou d placer l antenne r ceptrice Accro tre la s paration entre l quipement et le r cepteur Brancher l quipement dans une prise sur un circuit diff rent de celui auquel...

Page 31: ...cran LED et l alarme du climatiseur de l unit int rieure selon le mod le ce qui cr e un environnement confortable et silencieux 11 TEMP Augmente la temp rature par incr ments de 1 C 1 F La temp ratur...

Page 32: ...de fa on claire Mais pendant le fonctionnement seuls les signes de fonction relatifs sont affich s dans la fen tre d affichage E COMMENT UTILISER LES FONCTIONS DE BASE Fonctionnement de base ATTENTION...

Page 33: ...gler la temp rature d sir e l aide du bouton TEMP ou TEMP 3 Appuyer sur le bouton ON OFF MARCHE ARR T pour d marrer l appareil REMARQUE la VITESSE DE VENTILATION ne peut pas tre modifi e en mode SEC M...

Page 34: ...outon TIMER ON MINUTERIE ALLUM E pour lancer la s quence de temps de MARCHE 2 Appuyer sur le bouton Temp haute ou basse plusieurs fois pour d finir l heure souhait e pour allumer l appareil 3 Pointer...

Page 35: ...wing Balayage Appuyer sur le bouton Swing Balayage La fente d a ration horizontale pivotera automatiquement vers le haut et vers le bas lorsque vous appuyez sur le bouton Swing Balayage Appuyer nouvea...

Page 36: ...r gl e est inf rieure 24 C 75 F Si la temp rature r gl e est sup rieure 24 C 75 F appuyer sur le bouton ECO la vitesse de ventilation passera Auto et la temp rature r gl e restera inchang e REMARQUE...

Page 37: ...ieux certaines unit s En raison du fonctionnement basse fr quence du compresseur la capacit de refroidissement et de chauffage peut tre insuffisante Appuyer sur le bouton ON OFF MARCHE ARR T Mode Slee...

Page 38: ...IONS FOR USE FIRST 2 IN CASE OF ANY DOUBT CONTACT YOUR DEALER Thank you very much for purchasing our air conditioner Please read this owner s manual carefully before using your air conditioner Keep it...

Page 39: ...MOTE CONTROLLER C BUTTONS AND FUNCTIONS D REMOTE SCREEN INDICATORS E HOW TO USE BASIC FUNCTIONS F HOW TO USE ADVANCED FUNCTIONS IMPORTANT NOTE Please read this manual carefully before operating your n...

Page 40: ...iption of how to use your air conditioner G SPECIAL NOTE Button designs on your unit may differ slightly from the example shown If the indoor unit does not have a particular function pressing that fun...

Page 41: ...t dispose of batteries as unsorted municipal waste Refer to local laws for proper disposal of batteries TIPS FOR USING REMOTE CONTROL The remote control must be used within 8 meters of the unit The un...

Page 42: ...ect the equipment into an outlet on a circuit different from that to which the receiver is connected Consult the dealer or an experienced radio TV technician for help Changes or modifications not expr...

Page 43: ...llowing order AUTO LOW MED HIGH 13 TIMER ON Sets timer to turn unit on see How to Use Basic Functions for instructions 14 TIMER OFF Sets timer to turn unit off see How to Use Basic Functions for instr...

Page 44: ...e for units is 16 30 C 60 86 F 20 28 C 68 82 F You can increase or decrease the set temperature in 1 C 1 F increments AUTO MODE In AUTO mode the unit will automatically select the COOL FAN or HEAT ope...

Page 45: ...to start the unit NOTE You can t set temperature in FAN mode As a result your remote control s LCD screen will not display temperature HEAT MODE 1 Press the MODE button to select HEAT mode 2 Set your...

Page 46: ...unit and wait 1sec the TIMER OFF will be activated NOTE 1 When setting the TIMER ON or TIMER OFF the time will increase by 30 minutes increments with each press up to 10 hours After 10 hours and up t...

Page 47: ...press the button it will adjust the louver by 6 Press the button until the direction you prefer is reached LED DISPLAY Press this button to turn on and turn off the display on the indoor unit Keep pr...

Page 48: ...button again to stop it SHORTCUT function Some units Used to restore the current settings or resume previous settings Push this button when remote controller is on the system will automatically revert...

Page 49: ...tion Press this button 2 times during one second under HEAT Mode and setting temperature of 16 C 60 F or 20 C 68 F some units The unit will operate at high fan speed while compressor on with temperatu...

Page 50: ...DI DUBBI CONTATTARE IL RIVENDITORE Grazie per aver acquistato il nostro condiziona tore d aria Prima di utilizzare il condizionatore d aria leggere attentamente il presente prima di utilizzare il cond...

Page 51: ...ONI D INDICATORI DELLO SCHERMO REMOTO E COME UTILIZZARE LE FUNZIONI DI BASE F COME UTILIZZARE LE FUNZIONI AVANZATE NOTA IMPORTANTE Leggere attentamente questo manuale prima di azionare la propria unit...

Page 52: ...G NOTA SPECIALE I design dei pulsanti sull unit specifica potrebbero differire leggermente dall esempio mostrato Se l unit interna non ha una specifica funzione l uso del pulsante associato a tale fu...

Page 53: ...CONSIGLI PER L USO DEL TELECOMANDO Il telecomando deve essere utilizzato entro 8 metri di distanza dall unit L unit emette un suono alla ricezione del segnale del telecomando Tende altri materiali e l...

Page 54: ...ore Collegare il dispositivo in un circuito elettrico differente da quello in cui risulta essere collegato l apparato ricevente Consultare il rivenditore o un tecnico radiotelevisivo esperto per ulter...

Page 55: ...l ventilatore nel seguente ordine AUTO LOW MED HIGH 13 TIMER ON Imposta il timer per l accensione dell unit per istruzioni vedere Come utilizzare le funzioni di base 14 TIMER OFF mposta il timer per s...

Page 56: ...funzionamento per le unit 16 30 C 60 86 F 20 28 C 68 82 F La temperatura impostata pu essere aumentata o ridotta in incrementi di 1 C 1 F MODALIT AUTO In modalit AUTO l unit selezioner automaticament...

Page 57: ...vviare l unit NOTA in modalit FAN non possibile impostare la temperatura Di conseguenza lo schermo LCD del telecomando non indicher la temperatura MODO DI RISCALDAMENTO 1 Premere il pulsante MODE per...

Page 58: ...ella temperatura 3 Puntare il telecomando verso l unit e attendere 1 secondo TIMER OFF si attiver NOTA 1 Impostando TIMER ON o TIMER OFF il tempo aumenter in incrementi di 30 minuti a ogni pressione f...

Page 59: ...Ogni volta che si preme il pulsante questo rego ler l aletta di 6 Premere il pulsante fino a rag giungere la direzione preferita DISPLAY LED Premere questo pulsante per accendere e spegnere il display...

Page 60: ...a Funzione SHORTCUT alcune unit Utilizzato per ripristinare le impostazioni correnti o per riprendere le impostazioni precedenti Premendo questo pulsante quando il telecomando attivo il sistema torner...

Page 61: ...Funzione FP Premere questo pulsante 2 volte per un secondo in modalit HEAT e impostare la temperatura a 16 C 60 F o 20 C 68 F alcune unit L unit funzioner con la ventola ad alta velocit con il compre...

Page 62: ...NEEM IN GEVAL VAN TWIJFEL CONTACT OP MET UW DEALER Hartelijk dank voor de aankoop van onze airconditioner Lees deze gebruiksaanwijzing handleiding zorgvuldig door voordat u uw airconditioner gebruikt...

Page 63: ...NOPPEN EN FUNCTIES D INDICATOREN OP HET SCHERM VAN DE AFSTANDSBEDIENING E BASISFUNCTIES GEBRUIKEN F GEBRUIK VAN GEAVANCEERDE FUNCTIES BELANGRIJKE OPMERKING Lees deze handleiding zorgvuldig door voorda...

Page 64: ...IALE OPMERKING Het ontwerp van de knoppen op uw unit kan enigszins afwijken van het afgebeelde voorbeeld Als de binnenunit een bepaalde functie niet heeft gebeurt er niks wanneer de betreffende knop o...

Page 65: ...RUIK VAN DE AFSTANDSBEDIENING Gebruik de afstandsbediening binnen een straal van 8 meter van de unit De unit zal gaan piepen als hij het signaal van de afstandsbediening ontvangt Gordijnen overige mat...

Page 66: ...pnieuw of verplaats deze Vergroot de afstand tussen het apparaat en de ontvanger Sluit het apparaat aan op een wandcontactdoos in een andere stroomkring dan waarop de ontvanger is aangesloten Vraag de...

Page 67: ...urende 3 seconden tegelijkertijd worden ingedrukt schakelt de tempera tuurweergave tussen C en F 12 FAN SPEED Selecteert de ventilatorsnelheid in de volgende volgorde AUTO LAAG MED HOOG 13 TIMER ON St...

Page 68: ...hem in gebruik neemt TEMPERATUUR INSTELLEN De bedrijfstemperatuur voor de units ligt tussen 16 30 C 60 86 F 20 28 C 68 82 F U kunt de ingestelde temperatuur in intervallen van 1 C 1 F verhogen AUTO M...

Page 69: ...araat te starten LET OP In de modus VENTILEREN kunt u geen temperatuur instellen Daarom wordt er op het lcd scherm van uw afstandsbediening geen temperatuur weergegeven VERWARMEN 1 Druk op de MODE kno...

Page 70: ...en wacht 1 seconde om TIMER UIT te activeren OPMERKING 1 Tijdens het instellen van TIMER AAN of TIMER UIT neemt de tijd bij elke druk op de knop met 30 minu ten toe tot een maximum van 10 uur Tussen...

Page 71: ...knop wordt de stand van de lamel 6 gewijzigd Druk net zo vaak op de knop totdat de gewenste richting is bereikt LED WEERGAVE Druk op deze knop om het display van de binnenunit aan en uit te zetten Als...

Page 72: ...schakelen Funzione SHORTCUT alcune unit Wordt gebruikt om de huidige instellingen te herstellen of eerdere instellingen te hervatten Druk op deze knop als de afstandsbediening is ingeschakeld het syst...

Page 73: ...telde temperatuur van 16 C 60 F of 20 C 68 F sommige modellen 2 keer binnen n seconde op deze knop De unit gaat nu werken met een hoge ventilatorsnelheid bij ingeschakelde compressor en met een automa...

Page 74: ...2 EM CASO DE D VIDA CONTACTE O SEU REVENDEDOR Muito obrigado por ter adquirido o nosso apa relho de ar condicionado Por favor leia este manual do propriet rio antes de utilizar o seu aparelho de ar co...

Page 75: ...E FUN ES D INDICADORES DO ECR DO CONTROLO REMOTO E COMO UTILIZAR AS FUN ES B SICAS F COMO UTILIZAR AS FUN ES AVAN ADAS NOTA IMPORTANTE Leia este manual atentamente antes de colocar em funcionamento a...

Page 76: ...ar condicionado G NOTA ESPECIAL O design dos bot es da sua unidade pode ser ligeiramente diferente do exemplo apresentado Se a unidade interior n o tiver uma fun o em particular pressionar o bot o des...

Page 77: ...REMOTO O comando deve ser utilizado a menos de 8 metros da unidade A unidade emite um sinal sonoro quando o sinal remoto recebido Cortinas outros materiais e a luz do sol direta podem interferir com o...

Page 78: ...num circuito diferente daquele ao qual o recetor est ligado Pe a ajuda ao revendedor ou a um t cnico de r dio TV experiente As altera es ou modifica es que n o forem expressamente aprovadas pela parte...

Page 79: ...idades da ventoinha na seguinte ordem AUTO LOW MED HIGH AUTOM TICO BAIXO M DIO ALTO 13 TIMER ON Define o temporizador para ligar a unidade consulte Como utilizar as fun es b sicas para obter instru es...

Page 80: ...el trica e que h corrente dispon vel REGULA O DA TEMPERATURA O intervalo operacional de temperatura das unidades de 16 30 C 60 86 F 20 28 C 68 82 F Pode aumentar ou diminuir a temperatura definida em...

Page 81: ...r a unidade NOTA n o poder definir a temperatura no modo FAN Em resultado disso o ecr LCD do seu comando remoto n o apresentar a temperatura MODO DE AQUECIMENTO 1 Prima o bot o MODE para selecionar o...

Page 82: ...para a unidade e aguarde 1 segundo o TIMER OFF temporizador para desligar ser ativado NOTA 1 Quando definir TIMER ON ou TIMER OFF o tempo aumentar em incrementos de 30 minutos com cada premir de bot...

Page 83: ...ar De cada vez que premir o bot o ajustar a grelha em 6 Prima o bot o at alcan ar a dire o que preferir ECR LED Prima este bot o para ligar e desligar o visor na unidade interior Continue a premir es...

Page 84: ...un o SHORTCUT algumas unidades Utilizado para restaurar as defini es actuais ou retomar as defini es anteriores Prima este bot o quando o comando remoto estiver ligado o sistema reverter automaticamen...

Page 85: ...n o FP Prima este bot o 2 vezes durante um segundo no modo HEAT e defina a temperatura para 16 C 60 F ou 20 C 68 F algumas unidades A unidade funcionar com uma maior velocidade da ventoinha enquanto o...

Page 86: ...efono consultate www qlima com N Hvis du trenger informasjon eller hvis du har et problem med produktet kan du g til nettsidene www qlima com Alternativt kan du kontakte med PVG forbrukertjeneste tele...

Reviews: