Qdos Stair Mounting Kit Installation Manual Download Page 6

10

11

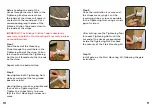
Before feeding the end of the 

straps through the small hole in the 

Tightening End, measure where 

the inside of the straps will come in 

contact with the round post. Cut a 

corresponding length piece of the 

Silicone Friction Tape and attach to 

the inside of the straps.

IMPORTANT:

 The Silicone Friction Tape is absolutely 

necessary to hold the Stair Mounting Kit securely in place 

on round banisters.

Step 7


Feed the end of the Mounting 

Strap through the small hole in the 

Tightening End of the strap. Pull on 

the strap and attach the Tightening 

Nut that will thread onto the threads 

on the strap.

Repeat with the bottom strap.
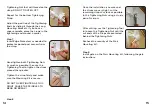
Step 8


Hand tighten both Tightening Nuts 

while ensuring that the long wood 

board is vertical.

Hand tighten as much as possible and 

then use the Tightening Tool.

Tighten the straps firmly to insure 

that the Stair Mounting Kit does not 

move. 

Step 9


Once the installation is secure and 

the straps are very tight, cut the 

remaining strap as close as possible 

to the Tightening Nuts using a sturdy 

pair of scissors.

After cutting, use the Tightening Tool 

to loosen Tightening Nuts until the 

cut end of the straps are protected 

inside the Tightening Nut. Recheck 

the security of the Stair Mounting Kit. 

Step 10


Install gate on the Stair Mounting Kit, following the gate 

instructions.

Summary of Contents for Stair Mounting Kit

Page 1: ...the need to screw into them It will create an even and secure surface to help you mount the gate properly If you have banisters on both sides you will need one Stair Mounting Kit on each side Importa...

Page 2: ...k Opening Size Measure the opening and confirm that your gate will fit in the opening including the Stair Mounting Kit that will add 1 5 3 8 cm to each side where it is used SQUARE post banister 1 7 2...

Page 3: ...where the Long Mounting Brackets will fit on a flat surface of the post banister Hold each Long Mounting Bracket against board and mark the locations on the backside of the long wood board Step 4 Thre...

Page 4: ...g Kit is secure Step 8 Once the installation is secure and the strap is very tight cut the excess strap as close as possible to the Tightening Nut using a sturdy pair of scissors After cutting use the...

Page 5: ...ion towards the top and one location towards the bottom where the round post banister is evenly thick for a vertical installation Mark the top and bottom Mounting Bracket locations on the backside of...

Page 6: ...t that will thread onto the threads on the strap Repeat with the bottom strap Step 8 Hand tighten both Tightening Nuts while ensuring that the long wood board is vertical Hand tighten as much as possi...

Page 7: ...on the top Bracket about 2 5 cm below the handrail on the lower spindle and the bottom Bracket 2 4 5 10 cm above the stair Mark the Mounting Bracket locations on the backside of the long wood board St...

Page 8: ...the Tightening Tool to tighten the straps around the spindles Tighten the strap firmly and make sure the Mounting Kit is secure DO NOT OVER TIGHTEN AS THIS MIGHT CAUSE THE SPINDLES TO BEND OR BREAK St...

Page 9: ...istributed by Regal Lager Inc Kennesaw GA 30144 USA 1 800 593 5522 www QdosSafety com support qdos zendesk com 2020 Qdos All rights reserved Qdos is a trademark of Regal Lager Inc Made in China 06 202...

Reviews: