background image

3. Settings 

-16- 

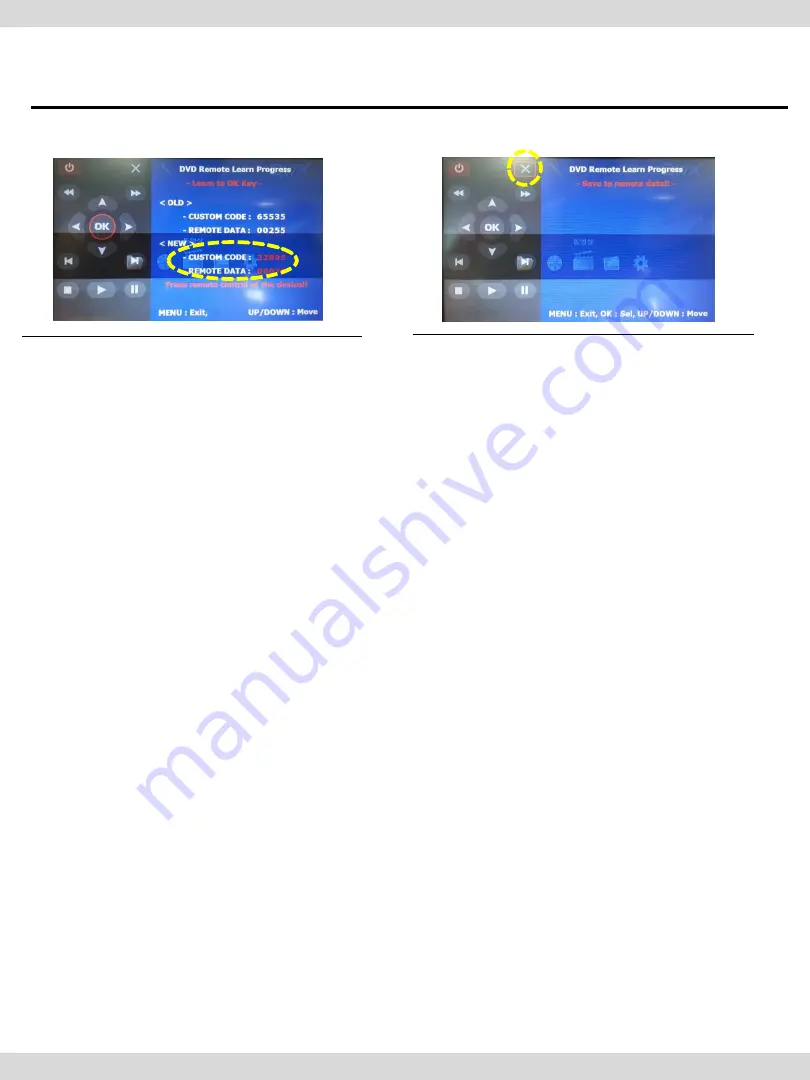
3.5 DVD, DTV I-DRIVE  input 

example) continued.. 

c. The values that you 

registered will appear as 

green text in the marked 

area on pressing the button. 

And the values will be saved 

automatically.  

d. Register remain buttons’ 

value in OSD menu like the 

above-mentioned. 


 After register, select “INPUT” 

in OSD menu and press “OK”. 

Then you can see 

confirmation window as 

shown above. At the 

moment, if you choose “YES”, 

all the values that you 

entered will be saved. 

If you select “NO”, the values 

won’t be saved.  


(If data is saved, DVD TYPE and 

DTV TYPE will be changed to 

“USER” automatically.) 


If you see “SUCCESS” on 

screen, the data is saved 

clearly and you can control 

DVD via touch screen. BUT, 

you MUST change the option 

in DVD(DTV)/UTIL/FACTORY 

to “USER”. 

Summary of Contents for QPI-BM12 V1.4

Page 1: ...Your best partner for better driving Release Date 2013 06 25 Model QPI BM12 Main V1 4 IF Product Code QPI BM12 1306 009...

Page 2: ...ion is complete test all vehicle electrical systems to ensure they operate correctly including lights horn brake lights and emergency flashers According to our sales policy any problems caused by user...

Page 3: ...or 2 Installation 2 1 Installation Diagram 2 2 Installation 3 Settings 3 1 DIP Switch 3 2 Remote Control 3 3 Car Model and Navi Model 3 4 Factory Mode 3 5 DVD DTV I DRIVE input 3 6 Original Button Usa...

Page 4: ...Camera input 1 Analog RGB input Navigation system output 1 LCD input Car system input 4 MULTIMEDIA INTERFACE output specification 1 LCD output 5 Power specification Input power 8VDC 18VDC Consumed po...

Page 5: ...on screen Improved Screen Display user oriented interface Mode change through original button I DRIVE MENU BUTTON Provide power cable to connect with rear camera Support PIP display show original Navi...

Page 6: ...Analog RGB CVBS Rear camera Car Screen Input CAR MAIN BOARD A V 2 A V 3 VIDEO CIRCUIT VIDEO MUX MCU Power Input 8VDC 18VDC POWER CIRCUIT Dip S W A V OUT HEADREST MONITOR Remote control Switch for sour...

Page 7: ...ER cable 7P 1EA HPOWER0002 HARETC0002 HAVCAB0002 Remote control 1ea REMOTE0001 HARETC0001 HIRCAB0002 TOUCH OUT cable 1ea HTOUCH0004 LCD Cable 1ea HLCDCA0019 TOUCH IN cable 1ea HTOUCH0010 RGB cable 1ea...

Page 8: ...1 Specifications 5 1 5 Exterior MODE IR POWER TOUCH OUT TO NAVI TOUCH IN FROM LCD R CAM RGB IN AV IN OUT LCD OUT TEST Dimension Width 150 4mm Length 99 4mm Height 2 3 2mm LCD IN LED DIP S W...

Page 9: ...AR C Audio L Audio R AV OUT Video REAR C SAFE F CAM DET CAN L CAN H ACC 12V 24V GND Connect Interface CAN High green brown with car s yellow red cable Connect Interface CAN Low green with car s yellow...

Page 10: ...tion See left picture Remove original LCD cable from monitro and connect with provided LCD cable Connect the original LCD cable with LCD IN on the interface Precaution Do not connect power cable with...

Page 11: ...rovided CAN Low See picture above Connect provided CAN H cable green brown with original CAN H cable yellow red Connect CAN L cable green with original CAN L cable green brown Provided CAN High Power...

Page 12: ...6 5 OFF 8 8 10 2 6 Setup of car type ON Solid GUI model OFF Standard GUI model 7 Setup of rear camera use ON CVBS4 OFF MAIN 8 Reset factory settings not use for user ON Product factory reset OFF DEFA...

Page 13: ...s the factory mode Moving rightward If you press this button 2 seconds long you can reset all the data about user environment What is Hot Key function You can use this function via pressing number 1 b...

Page 14: ...FAULT default 400X234 low resolution KD 900 WVGA 800x480 in high resolution for Chinese LS 901 WQVGA 800x480 in high resolution for Chinese Taiwan WP9200 WVGA 800x480 in high resolution for Israel GI...

Page 15: ...ter returning navigation or original mode DEFAULT Selecting AV sound just before changing navigation or original mode from the AV mode AV 1 3 Sound of the selected AV source 1 3 UTIL1 FACTORY RESET FA...

Page 16: ...nction or not ON OFF UTIL2 I_DRV REMOTE Choose DTV and navi model to be control I_DRV function LI 1DISC NEC 6DISC USER when using IR MEMORY Select navigation model Setting on RGB Mode Select DVD model...

Page 17: ...ndle for mode change ON OFF UTIL2 IR MEMORY To register DVD DTV remote control the remote control value must be registered and can be control with I Drive To use this function in I_DRV I_DRV REMOTE se...

Page 18: ...VD remote control button value input select menu you want to save To register DVD remote control button value select IR MEMORY DTV and follow below instructions Example a After select OK button on OSD...

Page 19: ...oned After register select INPUT in OSD menu and press OK Then you can see confirmation window as shown above At the moment if you choose YES all the values that you entered will be saved If you selec...

Page 20: ...e mode TEL Press longer Change mode Press shorter Go back to Original image MENU Press shorter Making Selection Press shorter Change mode Audio Button 8 Press shorter Change mode Change Car Aux Revers...

Page 21: ...rter Go back to Original image MENU Press shorter Select Press shorter Change mode Audio Button 8 Press shorter Change mode Change Car Aux AV1 AV2 AV3 Press this button in the direction of 6 O clock A...

Page 22: ...nnect CAN cable of the power cable to the CAN cable of the car SAFE ENABLE If your car is connected with CAN cable and it is in ON state you can NOT watch DVD or A V except original image or navigatio...

Page 23: ...3 Settings 20 3 7 Rear Camera 6 5 Rear display setting Rear camera full screen QDIS PIP screen QDIS 1 series Press shortly on steering wheel to select rear camera screen and PIP screen...

Page 24: ...mera 8 8 Rear camera full screen PIP screen 1 series Press button about 2 seconds long on I Drive and select one among 4 options QDIS QDIS Rear display setting For PDC solid set DIP S W 6 ON Rear came...

Page 25: ...In H POSITION use on remote control to adjust parking guideline left and right Go to Factory Menu choose PAS SETUP by using OK button change H POS V POS H POS V POS In V POSITION use on remote contro...

Page 26: ...GE Set OSD language only support English and Chinese TRANS Adjust OSD transparency H POSITION Move OSD horizontally V POSITION Move OSD vertically IMAGE BRIGHTNESS CONTRAST SHARPNESS UTIL FACTORY RESE...

Page 27: ...TRAST SATURATION HUE SHARPNESS OSD LANGUAGE Set OSD language only support English and Chinese TRANS Adjust OSD transparency H_POSITION Move OSD horizontally V_POSITION Move OSD vertically UTIL FACTORY...

Page 28: ...the rear camera on the screen A Set the DIP switch 7 as state ON Q Set mode not appear A Check DIP Switch Q OEM image is not displayed A Check interface s LCD In Out cable connection If the status kee...

Page 29: ...RM 404 4TH FLOOR B DONG WOORIMLIONSVALLY 371 28 GASAN DONG GEUMCHEON GU SEOUL KOREA TEL 82 2 868 3627 9 FAX 82 2 2026 5987...

Reviews: