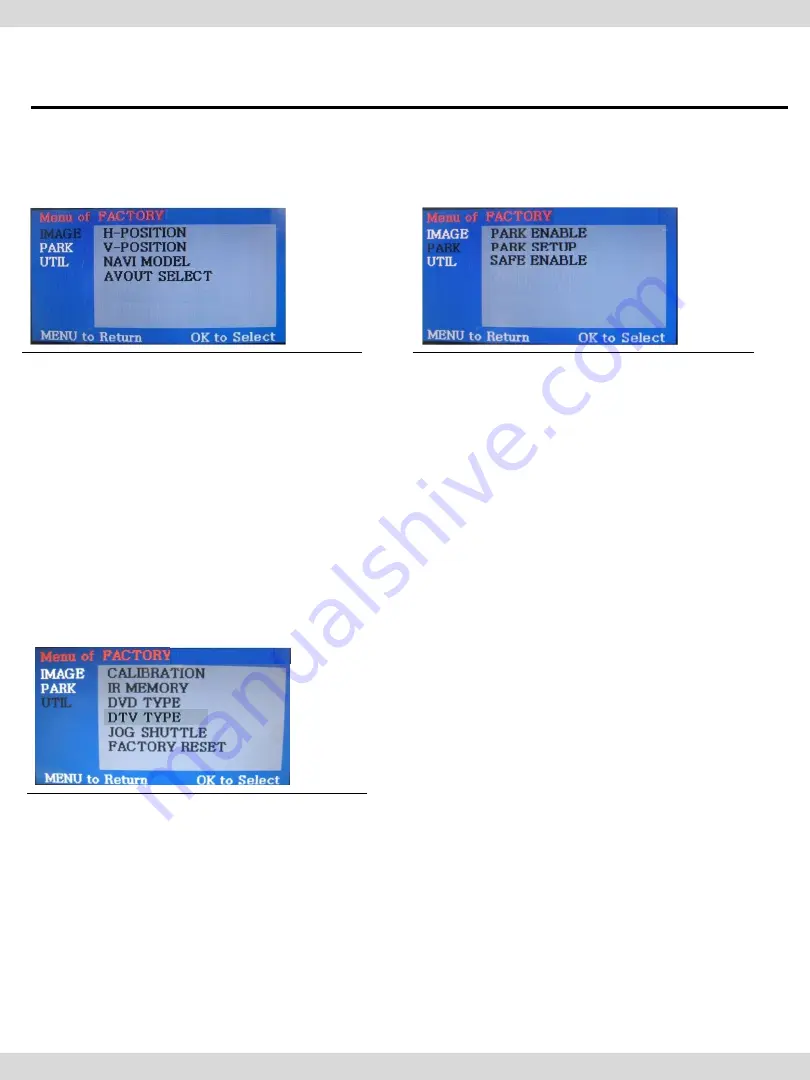
Qdis LVTX-1CH Manual Installation Download Page 19

3. Setting 

-13- 

3.4 Factory Mode 

 UTIL 


* CALIBRATION : Touch calibration 

IR MEMORY : 

To register value of buttons on  

                        the remote controller 


DVD TYPE : Setup for the type of DVD 

DTV TYPE :  Setup for the type of DTV 

* JOG SUTTLE : Setup for use of JOG SUTTLE  

                   DVD, DTV control   

                   OSDmenu ON/OFF setting 

* FACTORY RESET : reset 

 PARK 


* PARK ENABLE : 

Setup of rear view 

parking guide line


PARK SETUP : 

Control over position 

of rear view parking guide line


* SAFE ENABLE : 

To select whether to 

use SAFE function  (NOT to allow 

watch video while driving) or not


 IMAGE 


* H-POSITION : 

Control over 

horizontal movement of screen


* V-POSITION : 

Control over vertical 

movement of the screen


* NAVI MODEL : DEFAULT,  

  KD900(WVGA), MD7000(WVGA),        

  MYVI(WVGA),PAPAGO(WVGA) 

  GN3000(WVGA), ICUBE(WVGA) 

  MYVI(WVGA), I-ONN(WVGA) 

* AVOUT SELECT : DEFAULT, AV1,  

  AV2, AV3 

FACTORY mode – 

Factory mode: press 

 button 5 seconds long


Summary of Contents for LVTX-1CH

Page 1: ...Your best partner for better driving...

Page 2: ...on is complete test all vehicle electrical systems to ensure they operate correctly including lights horn brake lights and emergency flashers According to our sales policy any problems caused by user...

Page 3: ...1 Installation Diagram 2 2 Use caution 2 3 Installation 3 Settings 3 1 DIP switch 3 2 Remote control 3 3 OSD On Screen Display 3 4 Factory Mode 3 5 Rear Parking Guidelines 3 6 Touch Calibration 3 7 Re...

Page 4: ...LTIMEDIA INTERFACE output specification 1 LCD output LCD performance 1 Audio output 2 CVBS output 4 Power Spec Input Power 8VDC 18VDC Consumption Power 4WATT Max 5 Switch Input mode AV mode skip Able...

Page 5: ...1 Specifications 2 Able to adjust DVD NAVI display on screen Improved Screen Display user oriented interface Add SAFE function Displaying the main page while driving 1 2 Features...

Page 6: ...ut Analog RGB CVBS Rear camera Car Screen Input CAR MAIN BOARD A V 2 A V 3 VIDEO CIRCUIT VIDEO MUX MCU Power Input 8VDC 16VDC POWER CIRCUIT Dip S W A V OUT HEADREST MONITOR Remote control Switch for s...

Page 7: ...CPASS0581 LABEL LABELS0160 REMOTE CONTROL 1ea REMOTE0001 HLVDSC0020 A V cable 1ea HAVCAB0002 TOUCH OUT cable 1ea HTOUCH0004 REAR CAMERA POWER cable 1ea HARETC0002 IR cable 1ea MODE cable 1ea RGB cable...

Page 8: ...ecifications 5 1 5 Exterior Dimension Width 125mm Length 105mm Height 21mm SUB BOARD LVDS IN COMAND IN LCD OUT T S OUTPUT T S INPUT LED POWER RGB IN 2 R CAM AV IN OUT DIP Switch TOUCH OUT TO NAVI LVDS...

Page 9: ...n Diagram IR AV2 DVD AUX ON N C CAN L CAN H IR AV3 DTV IR AV1 NAVI PARKING SAFE REAR OPT2 N C MODE Toggle S W IR PB12 N C GPIO ZO MMI GND ACC RGB REAR 9V OUT GND AV1 AV2 AV3 REAR C Audio L Audio R AV...

Page 10: ...2 Installation 8 2 3 Installation The back side of OE monitor looking is like this picture Please remove the back cover Please remove OE board inside and please disconnect the OE steel plate...

Page 11: ...2 Installation 8 2 3 Installation Please find out OE FPC cable and OE touch cable OE FPC Cable OE Touch cable Please disconnect the cables After that please remove OE board...

Page 12: ...sub board as like the below picture please use a kind of double tape And please connect OE FPC cable to LCD OUT connector and OE touch cable to T S INPUT connector Please connect provided 60P FFC cabl...

Page 13: ...tallation 8 2 3 Installation Please re mount OE board and please connect provided FFC cables to OE board Please refer to below picture After that please connect LVDS cable to cub board of LVDS IN conn...

Page 14: ...As shown above connect the provided CAN H wire green brown to original CAN H wire white blue and connect provided CAN L wire green to original CAN L wire white yellow CAN Low CAN High Power cable Fin...

Page 15: ...o USE 7 Rear Camera ON External A S rear camera OFF OEM rear camera 8 No USE ON DOWN OFF UP For example DIP S W input mode in case of using AV3 Navi RGB No use for OEM navigation Rear Camera in case o...

Page 16: ...ode switching UI Display MENU Activating OSD menu OK Making a selection changing image display Moving upward Moving downward Moving leftward If you press this button 2 seconds long you can access the...

Page 17: ...SITION Vertical movement of the OSD window IMAGE BRIGHTNESS CONTRAST SHARPNESS USER IMAGE To choose the option among 4 prepared color shade COLOR RED Adjusting red GREEN Adjusting green BLUE Adjusting...

Page 18: ...he language displaying on touch OSD Chinese English only TRANS Transparency control of the OSD H_POSITION Horizontal movement of the OSD window V_POSITION Vertical movement of the OSD window UTIL FACT...

Page 19: ...E Setup of rear view parking guide line PARK SETUP Control over position of rear view parking guide line SAFE ENABLE To select whether to use SAFE function NOT to allow watch video while driving or no...

Page 20: ...ive gear position DISABLE No display locked in any gear position PARK ENABLE A If you set PARK ENABLE as ON state there will be the rear view parking guide line as shown above picture B Press the OK b...

Page 21: ...to set YES on Factory mode Then you can see touch calibration on screen about 2 seconds long as shown above After the word touch calibration disappear touch calibration function will implement Just t...

Page 22: ...ote control And follow the instruction below Instruction a Select POWER in OSD menu then press OK on remote control as shown above b If the marked area flickers as shown above press POWER button on th...

Page 23: ...ed After register select INPUT in OSD menu and press OK Then you can see confirmation window as shown above At the moment if you choose YES all the values that you entered will be saved If you select...

Page 24: ...and set the DVD TYPE DTV TYPE to USER Unless you do this process after saving the data you can NOT control DVD DTV via touch screen DVD TYPE NEC SANYO DV 108 SANYO 1 SANYO 2 USER DTV TYPE PIONEER PANA...

Page 25: ...Switching mode by CAN wire Mode Switching In case of CAN connection Driver can switch modes with the this button Press long mode switch Press short return to main image find this button from back of t...

Page 26: ...n has been done well Q Displayed image color is not proper too dim or not suitable color A Factory Mode Unit and try Factory reset if it still does not work contact the manufacturer for the further in...

Page 27: ...RM 404 4TH FLOOR B DONG WOORIMLIONSVALLY 371 28 GASAN DONG GEUMCHEON GU SEOUL KOREA TEL 82 2 868 3627 9 FAX 82 2 2026 5987...

Reviews: