background image

72

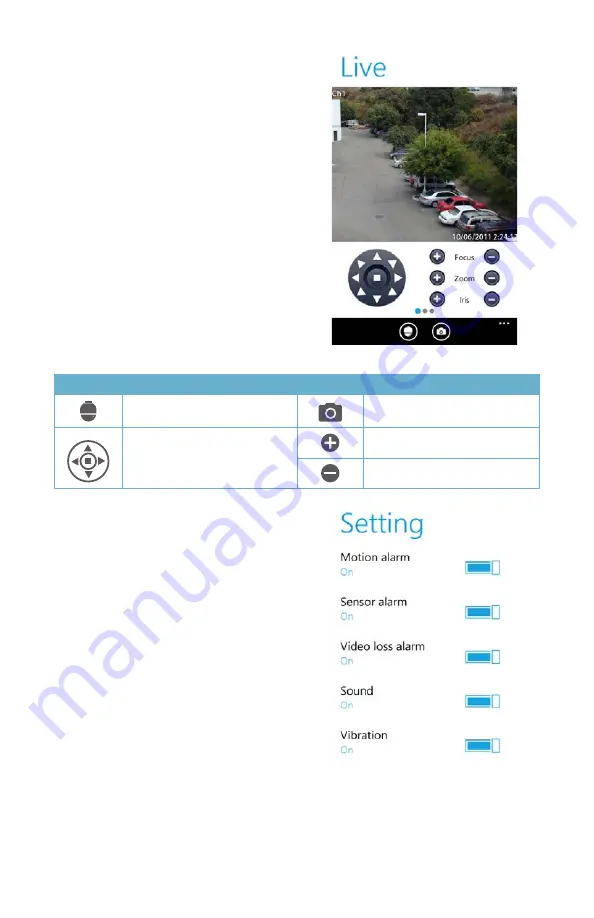
Pressing the 

PTZ

 icon at the bottom of the 

screen switches to the PTZ controls. You 
must have a PTZ camera connected to the 
DVR. The operation of the PTZ camera is the 
same as on the DVR itself or when using the 
WebClient plugin on the computer.

Clicking on the 

Camera

 icon at the bottom 

of the screen takes a snapshot which can be 
viewed using the 

Image

 button in the 

Main


menu.

PICTURE 4-62

PICTURE 4-63

The 

Settings

 menu allows you to adjust how 

your phone notifies you of events as well as 
what events generate an alarm. 

The 

Log

 menu shows a record of user 

operations, motion alarms and video loss 
alarms.

The 

Information

 window shows information 

about your mobile device, the software and 
the DVR’s frimware.

Device ID:

 This is the ID of the DVR you are 

connected to. This can be set on the DVR in 
the 

System

 tab shown in 

SECTION 4.1 

of 

the User Manual 

Button

Function

Button

Function

Switches to PTZ interface

Snap picture

Move the dome horizontally 

and vertically. The center 

square stops the movement.

Zoom In/Focus In/Iris Open

Zoom Out/Focus Out/Iris Close

Software Version:

 This is the version of the firmware currently installed on the DVR.

Build Date:

 The date the firmware was released

Software Version:

 The current version of the SuperCam software in use on your phone

Software Build Date:

 The date this version of SuperCam was released

Summary of Contents for QT SERIES

Page 1: ...ONITORING SETUP GUIDE Android Apple Macintosh Computer iOS Setup Guide for Remote Internet and Smartphone Monitoring MyQ See DDNS and Email Notification PC with Windows Operating System QT SERIES DVR...

Page 2: ...ts reserved This manual and software and hardware described herein in whole or in part may not be reproduced translated or reduced to any machine readable form without prior written approval Trademark...

Page 3: ...at www Q see com to check for the latest firmware and sofware updates as well as product announcements Throughout the manual we have highlighted warnings and other important information that will ass...

Page 4: ...on the Network 15 Setting Up DMZ in Router 2 17 2 REMOTE MONITORING 18 2 1 Accessing the DVR From A PC 18 User Account Control for Windows Vista and Windows 7 19 2 2 Accessing the DVR From A Macintos...

Page 5: ...5...

Page 6: ...rld with Internet access And by using Q See s free DDNS service MyQ See com more on this later you ll be able to do so using a conventional web address If you are using a router proceed with Section 1...

Page 7: ...ly and then exit the window Reopen the window to see the updated IP address STEP 5 Write down the 1 DVR s IP Address 2 Subnet Mask and 3 Gateway your Router s address STEP 6 Exit Menu Network Network...

Page 8: ...ng 2Wire brand routers do not have the UPnP feature If you do not have a UPnP enabled Router you will have to utilize another method to forward your ports If you wish to ensure that UPnP is turned on...

Page 9: ...ame router as the DVR open a web browser and enter the Gateway Router s IP address into the browser window s address bar to access your router STEP 2 Locate the DMZ settings in your router Each manufa...

Page 10: ...81 919 622 24 What Port CanYouSeeMe org Open Port Check Tool Check This page will serve as a free utility for remotely verifying a port is open or closed It will be useful for users who wish to check...

Page 11: ...the Setup Menu STEP 3 Uncheck the box labeled Obtain IP Address Automatically STEP 4 Click Apply and then Exit Network Network Substream Substream Other Settings Other Settings Email Email NETWORK NET...

Page 12: ...left of your screen click on the Apply button to save your settings before exiting PICTURE 1 13 PICTURE 1 14 PICTURE 1 15 Network Network Substream Substream Other Settings Other Settings Email Email...

Page 13: ...ain name and having your system send out e mail alerts To access these functions you will have to access your router to obtain your DNS Domain Name System number STEP 1 Open up an Internet Explorer br...

Page 14: ...ings window check the DDNS box and select MyQ See com in the DDNS server pull down menu STEP 4 Enter your account information password and domain name STEP 5 Click the Test button STEP 6 If successful...

Page 15: ...MINE THE NUMBER OF ROUTERS ON THE NETWORK If there is more than one router between the DVR and the Internet it will block communication to and from your system To find out the number of routers on you...

Page 16: ...n is turned off If Multiple Routers are Detected If there are multiple routers you will see a display similar to Picture 1 23 If so it may be preferable to connect your DVR and computer to the router...

Page 17: ...ter 2 into the Internet Explorer browser as in example shown in Picture 1 24 where the IP address of Router 2 is 192 168 1 1 STEP 4 Find the DMZ page in the router settings STEP 5 Enter the WAN IP for...

Page 18: ...te and the add on and want to install it click here Do you want to install this software Name Publisher More options While les from the Internet can be useful this le type can potentially harm your co...

Page 19: ...RE 2 3 PICTURE 2 4 PICTURE 2 6 PICTURE 2 5 USER ACCOUNT CONTROL FOR WINDOWS VISTA AND WINDOWS 7 Some users of computers using Windows Vista or Windows 7 operating systems may receive an error message...

Page 20: ...y Notes All Programs Devices and Printers Default Programs Help and Support Shut down iTunes Adobe Acrobat uac PICTURE 2 9 PICTURE 2 10 PICTURE 2 7 PICTURE 2 8 Windows 7 1 Open up the Start Menu acces...

Page 21: ...b STEP 5 Select Trusted Sites STEP 6 Click on the Sites button PICTURE 2 11 PICTURE 2 12 PICTURE 2 13 STEP 7 Uncheck the Require server verification https for all sites in this zone button STEP 8 Type...

Page 22: ...22 STEP 11 Click the Custom level button STEP 12 Pull down the Reset to menu button and select Low PICTURE 2 14 PICTURE 2 15...

Page 23: ...sure you want to change the setting for this zone STEP 15 Click OK STEP 16 Click Apply STEP 17 Click OK STEP 18 Close Internet Explorer PICTURE 2 16 You are now ready to monitor your DVR from your co...

Page 24: ...rticular computer DVR Firmware and Mac OSX compatibility Apple s recent upgrade of OSX and Safari changed the way they interact with certain programs The current firmware operating system for your DVR...

Page 25: ...n the icon for the WebClientPlugin pkg file either in the Downloads pop up window or the Downloads window in your Dock Once the installer has launched quit out of Safari so that the plug in can be pro...

Page 26: ...be followed by a message indicating that the program was installed correctly Browser Windows Internet Explorer Fine 100 Web Client Page Safety Tools http 10 6 196 6 Protected Mode On LOGIN LOGIN User...

Page 27: ...s http 10 6 196 6 Protected Mode On LOGIN LOGIN User Name Password Language admin English Enter your User Name and Password that are stored on the DVR LIVE VIEW Most of the controls such as Screen Dis...

Page 28: ...able Local Playback lets you review the Client Record video stored on your computer s hard drive The destination for the still images is set in the Config tab in the main menu at the top of the Remote...

Page 29: ...ng up a control panel similar to that seen on the DVR Users have the same level of control as they would at the DVR including activating pre set commands and cruises as well as full manual control But...

Page 30: ...r Sub Stream Sets all channels to master or sub stream Enable Audio Enables or disables audio feed Full Screen The selected live preview will display full screen The tool bar will be hidden Double cli...

Page 31: ...the record date and channels Double click the file name in the record file list box and you can play back that file Play Pause Stop Fast Forward Next Frame Previous File Next File Path Full Screen Pr...

Page 32: ...of the Search window Red box listed as Item 1 in Picture 2 31 PICTURE 2 31 STEP 2 After running the search available events will be displayed in the Data Information section STEP 3 A highlighted date...

Page 33: ...rogress Bar Play Button Play Mode Channel Mode Snap PICTURE 2 32 STEP 6 This will open a window with control buttons at the bottom Control buttons at the bottom allow the user to move through the play...

Page 34: ...hlighted date select recorded channels along with the type of event motion or sensor Then click Search PICTURE 2 33 STEP 2 The list of recorded events will be displayed in the Event List Double click...

Page 35: ...ord Lock Select a recording from the File List box Clicking the Lock button will protect the file from being overwritten or deleted except when the hard drive is reformatted Unlock Unlocks a previousl...

Page 36: ...ive STEP 1 Select channels the start and end time and then click the Search button The search results will be shown in the File List box STEP 2 Select which files to back up by clicking on the appropr...

Page 37: ...nd User settings Select an item from the submenu on the left and the appropriate window will open to the right While one user is changing settings other users are blocked from doing so The list of ava...

Page 38: ...e DVR can use to send out alerts before proceeding For the example below we will use Gmail The settings can be found under Options when logged into your Gmail account Clicking on any of the fields wil...

Page 39: ...or Section 4 5 of the Manual Each mobile device has a dedicated viewer application designed to allow you to remotely monitor and control your system This software is completely free Users of devices...

Page 40: ...at http www q see com support for the most current instructions The QT View software allows you to remotely monitor your QT series DVR see list below using your mobile device and either a wireless or...

Page 41: ...network as your DVR while another would be used when connecting from outside the area Depending on your data plan and whether your device has 3G 4G connectivity you may find it necessary to take step...

Page 42: ...t network and will be connecting to a different network or using the 3G 4G function of your device Local Connection To connect to your DVR using a wireless network that is connected to the same router...

Page 43: ...Name Service MyQ See address you created when configuring your DVR for remote access See Sections 1 2 or 1 6 of the Remote Monitoring Guide respectively for full details on either option You can quic...

Page 44: ...ding your name for this connection the IP address local or Internet and your user name and password PICTURE 4 8 PICTURE 4 7 Editing or Deleting a Server Each server connection features two icons in th...

Page 45: ...Meaning Recording Not Recording Motion Recording Alarm Recording No Camera The icons allow you to control your display including which cameras are being viewed split screen four channel view enable P...

Page 46: ...ras at the same time as well You may reposition the channel feeds in the multi channel viewing modes simply by dragging one screen into the desired position This is especially useful in the asymmetric...

Page 47: ...rst slider allows you to control the speed of the camera s movement from 1 slowest to 8 fastest The second slider allows you to select which Preset point you desire the camera to rotate towards There...

Page 48: ...yed video feeds These images are not saved to the Photos folder on your device but are available for viewing by selecting them from the Image menu located at the upper left of the application s screen...

Page 49: ...h a specific block of time by recorded event or if you have your DVR configured to record all the time you should use the Remote File Search option All four search modes operate much in the same manne...

Page 50: ...that the particular video segment was recorded Depending on the speed of the Internet connections at your DVR and your mobile device you may experience a delay between when you drag the point and whe...

Page 51: ...gs on your DVR itself The local settings are covered in this manual along with the Schedule and PTZ on DVR settings The remainder of the on DVR settings mirror those conducted at the DVR itself and ar...

Page 52: ...ouching the blue area and dragging will return it to gray to deactivate that function You can copy and paste your settings between cameras Be sure to tap on Save to preserve your settings PTZ Settings...

Page 53: ...ow you to access information about your DVR your network and which users are currently logged into your system PICTURE 4 28 The information displayed in these three windows cannot be altered System sh...

Page 54: ...ee through the Android market by searching for Q See Install it just as you would any other Android application If you are using a tablet you will need to download the Q See QT View HD app These are t...

Page 55: ...iew program will require you to log in The first time you will need to enter the address of your DVR If you will be connecting to your DVR on the same network say from within the same building enter t...

Page 56: ...ode Color Meaning Recording Not Recording Motion Recording Alarm Recording Not Connected The icons allow you to control your display including which cameras are being viewed split screen four channel...

Page 57: ...l screen Double tapping on the camera view will return to the split screen mode PTZ Tapping on the PTZ icon will open the PTZ Control window allowing you to control a Pan Tilt Zoom camera connected to...

Page 58: ...ed channel onto your phone s internal memory You are not able to view recordings or still images stored on your DVR s hard drive only files that are saved onto your phone You can access the images and...

Page 59: ...ing whether the phone should sound an alarm vibrate or both when the program s alarm fuction is triggered Log The Log menu contains a list of all events recorded by QT View Choose to see User Operatio...

Page 60: ...oftware Version This is the version of the firmware currently installed on the DVR Build Date The date the DVR s firmware was released Phone Software Version This shows what version of QT View you are...

Page 61: ...d tablet you will need to install the Q See QT View HD app The program is available for free through the Android market by searching for Q See Install it just as you would any other Android applicatio...

Page 62: ...same network say from within the same building enter the local IP address You will want to create a separate connection for use when you are away from the building housing the DVR In this case you sh...

Page 63: ...T View HD only operates in landscape mode at present You can select which channel you want to view by tapping on the single channel view icon and then selecting the desired channel followed by tapping...

Page 64: ...screen viewing mode A series of indicators and icons appear below the live display regardless of viewing mode The colored indicators show the status of each camera The icons allow you to control your...

Page 65: ...recording will also end when it reaches the maximum file clip size or fills up the available memory both can be set using the Settings menu available at the top of the screen Touching the Snapshot ico...

Page 66: ...ch window Image View Selecting Image from the options along the top of the screen will allow you to review your saved images You will see small previews of each of the saved images Click on the desire...

Page 67: ...ou wish to display Lastly you can set it so that your tablet will emit an audible alarm when motion is detected by your DVR Information The data displayed in this window is your DVR s information Devi...

Page 68: ...on the mobile phone STEP 2 Run Internet Explorer STEP 3 Input the DVR s IP address or DDNS domain STEP 4 You will be asked to download the software PCam Click on the software name to open the downloa...

Page 69: ...lds Server User and Password The User Name and Password are the same as used on the DVR The default is admin and 123456 Click Go to log onto the DVR Successful access will bring up the view from a cam...

Page 70: ...he normal manner PICTURE 4 59 STEP 2 Launch SuperCam and enter the address of the DVR along with the user name and password that you use to access your DVR The default values for those two fields are...

Page 71: ...Function Button Function Live Live view Settings Software settings Image Image view Server List Device list Log Log record Information Device information view Software help center In Live view you ca...

Page 72: ...s motion alarms and video loss alarms The Information window shows information about your mobile device the software and the DVR s frimware Device ID This is the ID of the DVR you are connected to Thi...

Page 73: ...pen the browser on your BlackBerry phone and enter the public IP address or the DDNS domain name of your router to access the DVR STEP 2 You will be prompted to download the SuperCam software Click on...

Page 74: ...vaScript pop ups along with enabling the browser to terminate slow running scripts use background images and support embedded media STEP 3 Then from the Options menu select Cache Operations and click...

Page 75: ...and 123456 If you are monitoring multiple devices previously saved login data for these devices can be accessed using the button on the right PICTURE 4 71 PICTURE 4 72 Main Menu This window contains...

Page 76: ...73 PICTURE 4 75 PICTURE 4 74 PICTURE 4 76 Button Function Button Function Switch channels Switches to PTZ interface Snap picture Full Screen Background alarm Move the dome horizontally and vertically...

Page 77: ...arm Output Type Choose whether the phone alerts you with an audio or vibratory alarm or a combination of both Information View This presents information on the cell phone you are using the SuperCam so...

Page 78: ...78 Digital Peripheral Solutions Inc 8015 E Crystal Drive Anaheim CA 92807...

Reviews: