background image

QSDR74RTB User Manual 


18


Date is depicted in upper right hand corner as illustrated in Picture 27.    Date represents the date current file 

selection was recorded. 


The 24H recorded time line under the Date represents the time line base for recorded material.   


The  0~60 Minute recording time quantum  represents the minute base for all recorded materials.  As 

depicted in Picture 30, the green bar represents the time length of the recorded material in the file you are 

currently playing.     

Recorded File Menu Commands


(Figure 1) 

Play 

10 

All the windows 

Previous recording file 

11 

Add window 

Pause 

12 

Start 

Stop 

13 

Cut 

Previous frame / Next frame 

14 

Delete 

Slow play, Normal play, Fast Play 

15 

Convert AVI 

Next Hour 

16 

On Screen Display 

Capture picture 

17 

Mute switch 

Reduce window 

18 

Volume adjust 


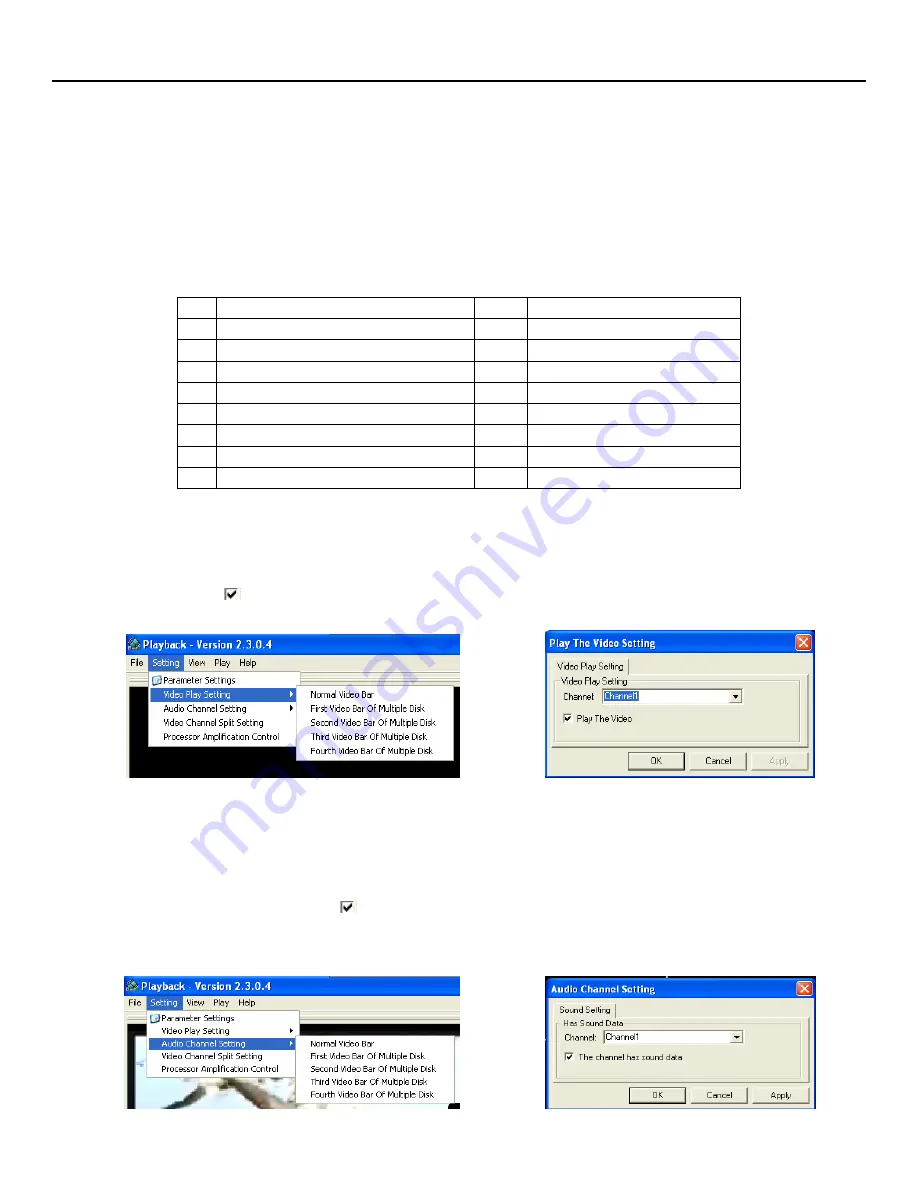
Video Play Settings: 

In your Multimedia player interface, got to the Setting menu on your toolbar.    From there, go to 

Video Play Setting

Normal Video Bar (Picture 28).    This will open up a dialog as illustrated in Picture 29 allowing 

you to choose from a drop down list of which channels to play.    Make your choice from the options provided in the 

drop down list and click 

  next to “Play the Video”. Click Apply then OK.   


Audio Settings:

  In your Multimedia player interface, go to the Setting menu on your toolbar.    From there, go to 

Setting

Audio Channel Setting

Normal Video Bar (Picture 30).    This will open up a dialog as illustrated in Picture 

31 allowing you to choose from a drop down list of which audio channels to play.    Make your choice from the options 

provided in the drop down list and click 

  next to “The channel has sound data”.    Click Apply then OK.  Please 

note that these setting changes will not take effect until you re-start your multimedia player.   


(Picture 28) 

(Picture 29) 

(Picture 30) 

(Picture 31) 

Summary of Contents for QSDR74RTB

Page 1: ...ital Peripheral Solutions Inc 8015 E Crystal Drive Anaheim CA 92807 Website http www Q See com Customer Service Phone 877 998 3440 x 538 Email cs dpsi usa com Tech Support Phone 877 998 3440 x 539 Ema...

Page 2: ...ras and a Monitor 6 3 3 Connecting the Power Supply 6 Chapter 4 DVR Boot up 7 4 1 System Initialization 7 4 2 Main Interface 7 4 3 Pop Up Menu 7 Chapter 5 DVR Menu 8 5 1 Main Menu At a Glance 8 5 2 Ma...

Page 3: ...5 2 8 3 Video Setup 28 5 2 8 4 Language 28 5 2 8 5 Info 28 5 2 8 6 System Maintenance 28 5 3 Menu Lock 29 5 4 Video Search 29 5 5 PTZ Control 29 5 6 Record 30 5 7 Stop Recording 30 Chapter 6 Net Viewe...

Page 4: ...ser Manual 8 1 Operation Function Table 36 8 2 Setting up Alarm Record Mode 37 8 3 Troubleshooting 38 8 4 System Connections 39 8 5 Accessories Included 40 Q See Product Warranty 41 Customer Informati...

Page 5: ...VR unplug it immediately and contact an authorized dealer or service center Warning Use extreme caution when removing the cover of the DVR as you may be subjected to severe electrical shock 8 Handle D...

Page 6: ...tion Supports Mouse Operation for Faster Menu Navigation PTZ Control Supports PTZ camera operations through RS 485 Other Features H 264 Video Compression Format Supports CIF D1 and HD1 Resolution ADPC...

Page 7: ...ce Display 2 Display Screen 13 Play 3 Show Menu 14 Fast Forward 4 Scroll Down in Menu 15 Stop record 5 Scroll Up in Menu 16 Record 6 IR Receiver 17 Menu ESC Left 7 Power LED 18 Enter or Exit PTZ mode...

Page 8: ...t Port 5 Ethernet Port 10 POWER Switch 2 2 2 Remote Control 1 1 8 Channel Select 1 8 Numeric key 2 9 0 Numeric Key 3 ALL Preview all Channels 4 MENU Enter Exit Main Menu 5 Up Key 6 Down Key 7 Left Rig...

Page 9: ...cord settings Playback recorded files Access a pull down menu Control color and volume settings Choose your system s language settings Double clicking the left key of your mouse maximizes the screen v...

Page 10: ...Put the upper cover back carefully re attach screws 3 2 Connecting Your DVR to Cameras and a Monitor Connect camera cable to the Video Input port of the DVR Connect the monitor to the Video Output por...

Page 11: ...camera you choose to zoom in on Double clicking a second time will zoom out of the single camera view and switch you back to multi camera view See Picture 2 Right clicking your mouse will display a po...

Page 12: ...Search Search Playback Detail File Log Search File Backup Camera Recording HDD Management Alarm Setting PTZ Setting Mobile Motion Color Set System User Password System Information Language Select Syst...

Page 13: ...ough the Camera Setup interface you are able to choose a name for each of your connected cameras up to 8 characters long The Camera Setup interface Picture 5 also gives you the ability to choose which...

Page 14: ...o recording This menu also allows you to schedule your recording times and set your recording file sizes Options available include D1 at 704x480 HD1 at 704x240 and CIF at 352x240 The RECORD button on...

Page 15: ...9 pm Alarm recording Record on activity or alarm only 5 2 3 Network Setup The right click menu in the Main Interface mode Picture 3 allows you to access the Main Menu interface Picture 4 To set up the...

Page 16: ...n the ipconfig BLUE arrow in Picture 9 was a single or two digit number you should be ok with any three digit number if the computer IP address ends with a number in the 100s then you should use a num...

Page 17: ...the orange Routers hyperlink in the second paragraph as shown in Picture 12 Find the link to the brand and model of your router from the list of manufacturers and click the next button From there clic...

Page 18: ...ton GREEN box in Picture 16 then click on OK BLUE arrow in Picture 16 This will open a dialog box as shown in Picture 17 Once here scroll down to the ActiveX Controls and Plug Ins and make sure they a...

Page 19: ...that day When you click on the Date from the VIDEO FILE list you can playback the file associated with that date in 4 channel view mode Clicking on the FILE LIST button at the bottom of the VIDEO SEAR...

Page 20: ...back to page before the one you are currently viewing except the first page NEXT Takes you to the page after the one you are currently viewing except the last page LAST When you view other pages click...

Page 21: ...d be 264 extension as illustrated in Picture 25 To play the file click the Play menu on the toolbar of the multimedia player interface as shown in Picture 26 Doing this will generate a pop up window a...

Page 22: ...e adjust Video Play Settings In your Multimedia player interface got to the Setting menu on your toolbar From there go to Video Play Setting Normal Video Bar Picture 28 This will open up a dialog as i...

Page 23: ...your HDD does not need to be formatted TOTAL SPACE refers to the total space size of your HDD FREE SPACE refers to the total amount of unused space available on the Hard Drive USABLE REC TIME refers t...

Page 24: ...ameras to suit the needs of your actual application environment should you need to take into account such things as movement that is ongoing and not obtrusive The HDD LOSS tab allows you to choose fro...

Page 25: ...r Email server s website SMTP Server indicates server address you use Sender Email indicates sender s email address The email address should be consistent with the server you use That is to say when y...

Page 26: ...DVR Refer to Section 5 2 3 Network Setup for complete directions for how to do this You also need to go to the Main Menu then Devices then Mobile and enter your user name and password and set the Ser...

Page 27: ...rver Port you setup in the DVR it needs to be forwarded to the IP address of the DVR setting range is between 1024 and 65535 the default setting is 18600 Note this port is in addition to the ports use...

Page 28: ...left to right the buttons on your main menu interface work with your PTZ camera as follows Navigate video image Left Right Up Down Zoom In and Zoom Out Increase or Decrease Focus Increase or Decrease...

Page 29: ...lation process has been initiated you will receive a prompt asking you if you would like to install the QQEye program Picture 48 Click the Yes button on the lower left hand side of the prompt and cont...

Page 30: ...rch the App Store for APlayer click the FREE button to begin the download note that you must have an iTunes account to download applications 5 Once you have downloaded the APlayer application click on...

Page 31: ...ll be triggered You can choose which areas to protect by clicking on the individual squares of the grid as illustrated by the red blocks chosen in Picture 58 Motion triggered recording will not occur...

Page 32: ...System Language to adjust your system s Language preferences The System Language menu will appear as illustrated in Picture 63 Choose the language you want to use on your DVR from the drop down menu t...

Page 33: ...he PTZ option from your pop up menu From the PTZ Camera interface you can Zoom in and out adjust the camera Focus and increase or decrease the brightness of your image Click Z Z keys to zoom In or out...

Page 34: ...king on your mouse and clicking on Start Record from the pop up menu will allow you to start manual recording 5 7 Stop Recording Right clicking on your mouse and clicking on Stop Record from the pop u...

Page 35: ...riencing difficulties initiating the log in screen make sure your browser s safety level or firewall settings are not set too high Refer to section 5 2 3 Network Setup to ensure that your network conf...

Page 36: ...desired date Picture 71 The buttons at the bottom of your Net Viewer interface screen are as follows Play Button Play Pause recorded footage Stop Button Stop playing recorded footage F F Button Fast...

Page 37: ...rs of motion detect recording video loss notification HDD space notification HDD loss notification and your alarm output and record time settings For more details on how to configure the options of th...

Page 38: ...menu bar 6 2 2 PTZ and Live Play Controls 1 PTZ Panning Direction Controls the panning direction of your PTZ Camera 2 Zoom Focus and Iris Increase or decrease the zoom focus or brightness of your pic...

Page 39: ...60 Min Backup USB flash drive Removable HDD USB Burner and Network Backup to AVI File Format Playback Mode PLAY SLOW FWD Frame by Frame Audio Input Output 4 CH Input 1 CH Output Alarm Type Motion Sens...

Page 40: ...rd Setting or modifying user password Alarm Setting Setting HDD lost HDD space video loss I O status alarm management and Email alarm Motion Detection Setting on off status of MD select sensitivity an...

Page 41: ...ective after restart System Info Modify MAC address Mp Monitoring Set relative parameters Other PTZ setting Recording set and Language select etc 8 2 Setting up Alarm Record Mode Please note means Ala...

Page 42: ...type and the size supported by the DVR However once you install the hard drive in your DVR it will be formatted for use in the DVR and will not be read by your PC Q Do I have to stop recording to pla...

Page 43: ...39 8 4 System Connections Diagram is for reference only to show where to attach various devices to the DVR The cameras external alarms USB flash drives monitors and computers are not included with the...

Page 44: ...QSDR74RTB User Manual 40 8 5 Accessories Included...

Page 45: ...vice scope of our company 1 Equipment damage caused by improper operation 2 Improper equipment operation environment and conditions e g improper power extreme environmental temperatures humidity light...

Page 46: ...in this document is the intellectual property of Q See No part of this manual may be reproduced copied translated transmitted or published in any form or by any means without our company s expressed w...

Reviews: