ONE YEAR LIMITED WARRANTY
Ai Research warrants to the original retail purchaser, this product to be free from defective workmanship and material when used under normal conditions in
accordance with the product's printed instructions for a period of one (1) year from date of purchase. Ai Research agrees to remedy any such defect or to furnish
a new part in exchange for the defective one at no charge for parts or labor.
This warranty is limited to Ai Research products and specifically excludes consequential damage to other associated equipment which may result for any reason
from use with this product. In no event shall Ai Research be liable for incidental or consequential damages or have any liability with respect to defects other than
the obligations set forth above. Some states do not allow limitations on how long an implied warranty lasts, and/or the exclusion or limitation of incidental or
consequential damages, so the above limitations or exclusions may not apply to you. This warranty gives you specific rights and you may also have other rights
which vary from state to state.
This warranty does not cover the following:
• Damages caused by water, neglect, abuse, misuse,
• Improper installation or operation.
• Damages caused by acts of God or nature.
• Damages occurring during shipment of the product to Ai Research for repairs.
• Any product which is modified without consent of Ai Research.
If you need warranty service, take the following steps:
1.Save your sales receipt for warranty registration and service.
2.Contact the dealer from whom you bought Q-Logic. They will give you instructions for warranty service.
3.If no dealer is available, call Q-logic for further Instructions: (800) 680 - 2375.
You must receive an RA# before returning any defective parts.
SHIPPING ADDRESS:
Q-Logic
2805 E. 6th
Stillwater, OK
74074-6513
For other cool Q-Logic products
visit our website!
http://qlogic.ws
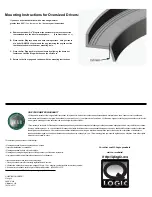
A. Remove the rubber Qx
e
Ring from the enclosure to remove the section
that extended into the driver mounting hole. (See illustration. > > > )
B. Place the Qx
e
Ring face down on a safe cutting surface. Using scissors
of a knife
CAREFULLY cut around the ring removing the angled section
that had extended into the driver mounting hole.
C. Place the Qx
e
Ring back into the enclosure by aligning the bump out
features on the Qxe Ring with those on the enclosure.
D. Return to the front page and continue with the mounting instructions.
If you have a cast basket driver with a mounting diameter
greater than 9.25" (Yes, there are a few.) here are your instructions.
Mounting Instructions for Oversized Drivers:


