background image

CABLE/SATELLITE REMOTE CONTROL

The Q Acoustics system has been designed for easy integration into your home entertainment system as it 

has the ability to be controlled by many types of PROGRAMMABLE REMOTE CONTROL. This may include the 

remote control for your SATELLITE and CABLE system if it has PUNCH THROUGH capability. Punch through 

is the common term for being able to programme your remote control to send IR codes to both a TV and an 

AV Preamplifier/Processor. To use punch through you normally select the TV you wish to support first, and 

then the AV Preamplifier/Processor.

The unit uses the PHILIPS RC5 protocol for AV Preamplifiers/Processors. Programming your remote with 

PHILIPS AV codes should allow you to control volume and mute of your unit. In some cases you may also be 

able to control standby and source select with buttons such as              and    . 

Manufacturers often offer several PHILIPS code options for their remote controls. We recommend that you 

work through the PHILIPS code list for your remote and experiment with each one until you find one that 

works well with the unit. It is easiest to recognise when one is working by pressing the volume up/down 

buttons.

We cannot guarantee that the unit will work with your particular remote as the IR codes it sends are outside 

our control, however by supporting the commonly used Philips standard we hope to have made it as easy 

as possible to gain control of your device with the remote control of your choice.

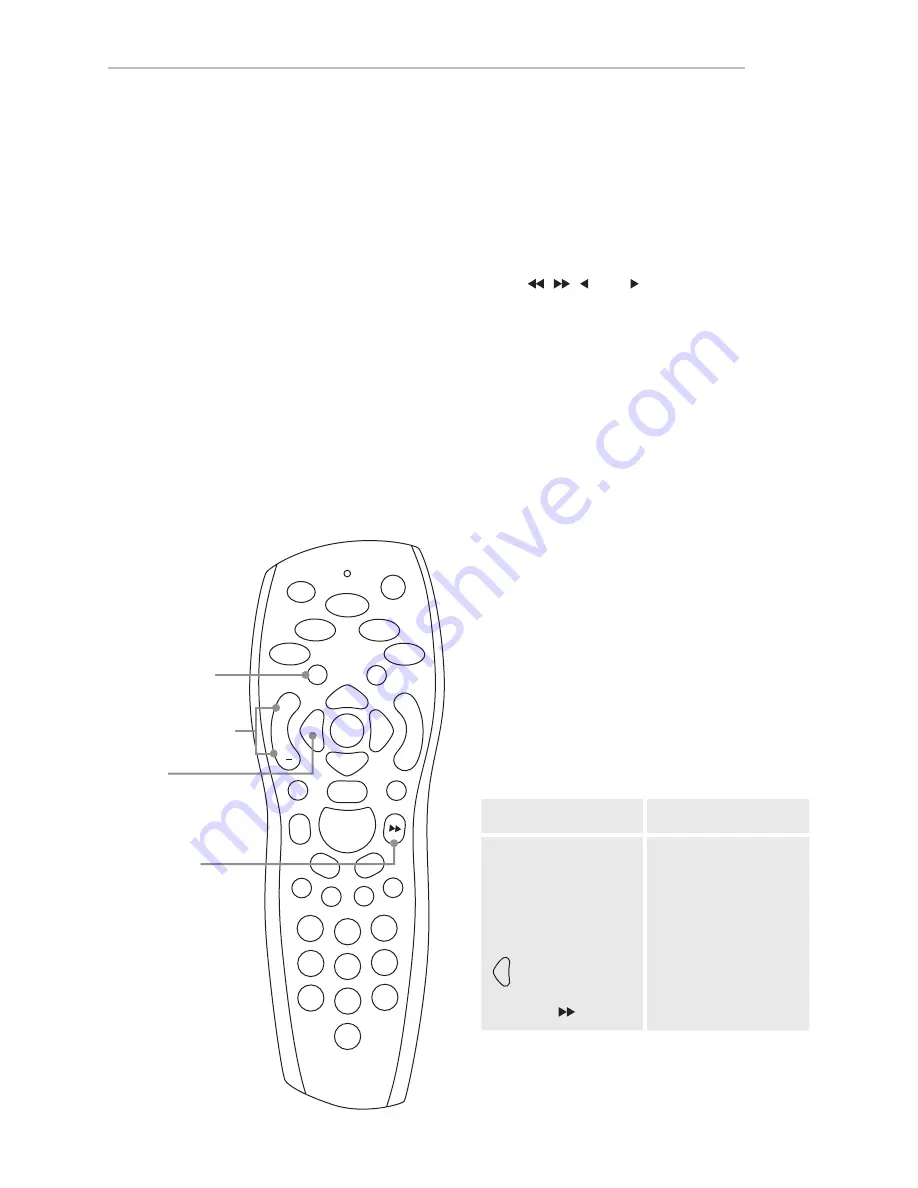
Below we show how two typical programmable remote controls can be set up.

• 

Press the “TV” button (top left of remote).

• 

Point remote away from receiver,

press and hold “ 0”.

• 

The remote’s LED will flash red twice.

• 

Enter “1217”. The remote’s LED will flash

red twice to confirm correct code.

• 

Press and hold “ 1”.

• 

The remote’s LED will flash red twice.

• 

Press TV and


your remote controls will now work 

as below:

Button

Function

Vol +

Volume up

Vol -

Volume down

Mute 

(short press)

Mute

       or  Mute 

(long press)

Standby


Source select

Instructions

16

TYPE 1 (SATELLITE)

TV

1

+

2

3

6

5

4

7

8

9

0

SELECT

VOL

MUTE

Volume up / down

Mute / Standby

Standby

Source select

Summary of Contents for Media BT3

Page 1: ...www Qacoustics co uk EN...

Page 2: ......

Page 3: ...the following EEC Directives their supporting Statutory Instruments and relevant Standards where applicable as follows EC Council Directive on electromagnetic compatibility 2004 108 EC Applicable stan...

Page 4: ...e user s authority to operate this device Third parties In the unlikely event that you pass this product on to a third party include these operating instructions with the product Service Refer all ser...

Page 5: ...rnings carefully before installation and use to ensure the safe and satisfactory operation of this product We hope you enjoy the Q Acoustics experience 1 x Active Right Speaker 1 x Lithium Battery 3V...

Page 6: ...g to pure audio as the original mix engineer intended The left and right speakers each have our award winning combination of 100mm woofer and 30mm dome tweeter providing focused channel separation mus...

Page 7: ...Instructions 7 Attaching the Feet 1 3 2 4...

Page 8: ...used in both vertical and horizontal orientations to suit your preferred setup When using this product in the horizontal orientation you may rotate the Q Acoustics logo by gently pulling and rotating...

Page 9: ...REAR PANEL 1 2 5 9 8 4 6 7 3 Instructions 9 1 Digital Optical Input 2 Analogue Line In 1 3 Analogue Line In 2 4 Subwoofer Out 5 Bluetooth Pair Button 6 Power Switch 7 AC Input 8 Output Speaker Termin...

Page 10: ...TE 2 3 Analogue Inputs Line In 1 Line In 2 The unit has two options for Analogue Audio connection Line In 1 Connect the RCA L R audio output from a TV or other source to the LINE IN 1 sockets using th...

Page 11: ...PAIR with a device should no other devices currently be PAIRED and in range This Bluetooth Pair button is used to manually drop the current connection and pair with a new device 6 Power Switch Turns...

Page 12: ...3 Insert battery with side up and slide drawer back into remote Caution Danger of explosion if battery is incorrectly replaced Replace only with the same or equivalent battery type CR2025 Warning Do...

Page 13: ...ration the unit will automatically select the audio source A Connected Bluetooth source that starts to play has the highest priority followed by Digital and finally Analogue The Auto Source Selection...

Page 14: ...input and the LED will turn Blue Please Note Although starting to Play a track on the connected source will cause the unit to switch to Bluetooth the unit will stay on Bluetooth until the source is d...

Page 15: ...s of the first device will be lost Once the unit is connected with a device it will stop automatically searching for other devices to pair with or connect to To connect to another device either discon...

Page 16: ...at you work through the PHILIPS code list for your remote and experiment with each one until you find one that works well with the unit It is easiest to recognise when one is working by pressing the v...

Page 17: ...remote Point remote away from receiver press and hold Clear Vol The remote s LED will flash green twice Enter 1247 The remote s LED will flash green twice to confirm correct code Press TV and your rem...

Page 18: ...akers Enclosure type 2 way reflex Mid range driver 100mm Tweeter 30mm Power consumption Standby 0 5 Watts No signal idle 14 Watts Rear panel marked line ratings 100 240V 50 60Hz 100W Bluetooth Bluetoo...

Page 19: ...period Q Acoustics will at its option repair or replace any product found to be faulty after inspection by the company or its appointed distributor or agent Misuse and fair wear and tear are not cover...

Page 20: ...Q13924 IS_r7 www Qacoustics co uk...

Reviews: