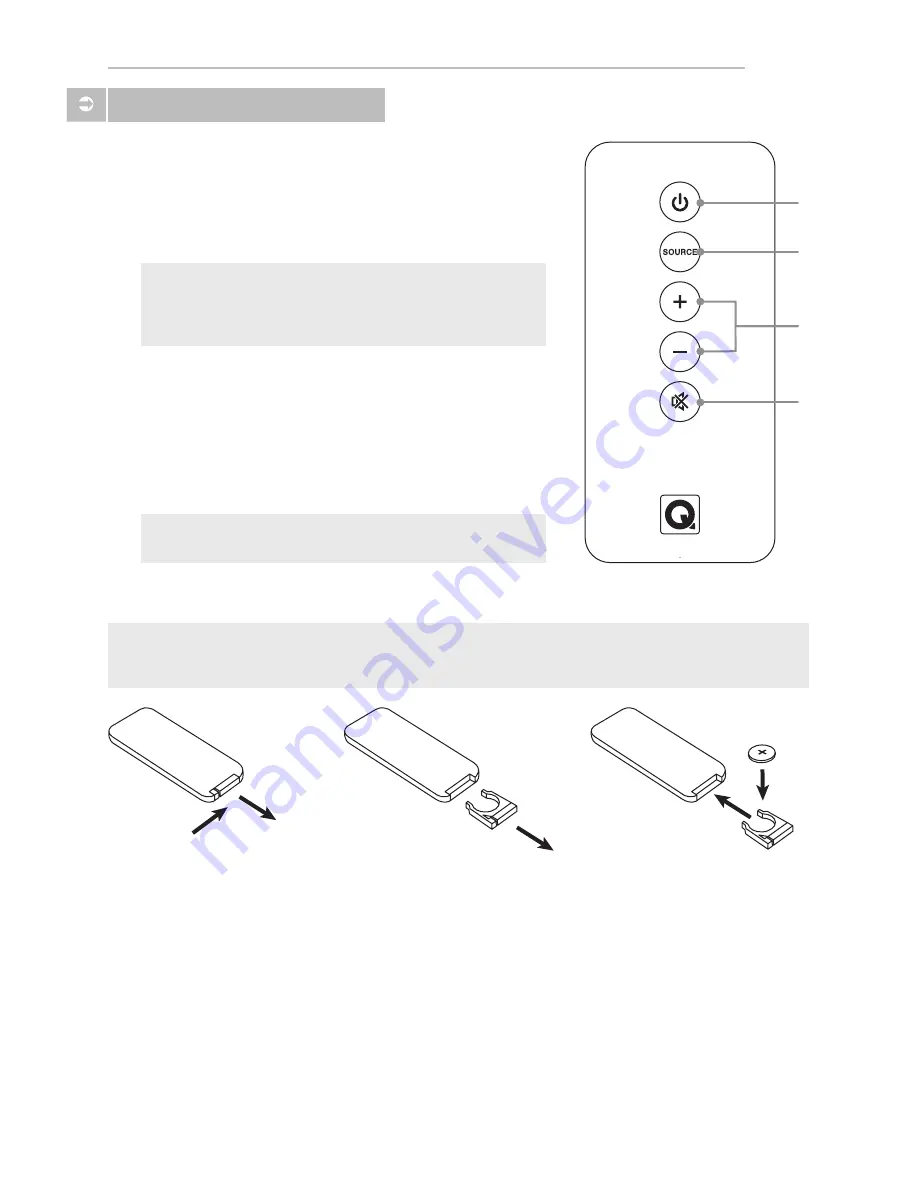
background image

Instructions

12

Remote Control

1. Power

Press this button to turn the unit Standby ON/OFF. 

(POWER SWITCH on the rear panel must be switched to ON)

2. Source Select

Press this button to manually select the audio input source. 

The status LED will change colour accordingly. 

3. Volume Up / Down

Press VOL + to increase the volume. Press VOL – to reduce 

the volume.

4. Mute

Press this button once to MUTE the unit (no audio output 

from the speakers). Status LED will SLOW FLASH to indicate 

MUTE. Press this button again to un-mute the unit (audio 

output from the speakers).

1

2

3

4

REMOTE CONTROL BATTERY REPLACEMENT

1. Push small tab toward

battery slot.

2. Pull battery drawer out.

3. Insert battery with “+” 

side up and slide drawer 

back into remote.

Caution:

Danger of explosion if battery is incorrectly replaced.

Replace only with the same or equivalent battery type (CR2025)

Warning:

Do not expose batteries to excessive heat such as direct sunlight, fire or the like.

Dispose of dead batteries in accordance with local regulations.

Caution:

When replacing the lithium battery in the remote, make sure that the replacement battery is inserted in correct polarity. 

Place the battery so that its positive (+) side faces up with the tray held so the surface with the dot and (+) is facing up.

Important Note:

When the Source button is used, the unit will stay on the selected 

source and stop auto-source selection. Auto-source selection will 

be resumed after the unit has been put in standby.

Please Note:

Long press of Mute will also put the unit into standby.

Summary of Contents for Media BT3

Page 1: ...www Qacoustics co uk EN...

Page 2: ......

Page 3: ...the following EEC Directives their supporting Statutory Instruments and relevant Standards where applicable as follows EC Council Directive on electromagnetic compatibility 2004 108 EC Applicable stan...

Page 4: ...e user s authority to operate this device Third parties In the unlikely event that you pass this product on to a third party include these operating instructions with the product Service Refer all ser...

Page 5: ...rnings carefully before installation and use to ensure the safe and satisfactory operation of this product We hope you enjoy the Q Acoustics experience 1 x Active Right Speaker 1 x Lithium Battery 3V...

Page 6: ...g to pure audio as the original mix engineer intended The left and right speakers each have our award winning combination of 100mm woofer and 30mm dome tweeter providing focused channel separation mus...

Page 7: ...Instructions 7 Attaching the Feet 1 3 2 4...

Page 8: ...used in both vertical and horizontal orientations to suit your preferred setup When using this product in the horizontal orientation you may rotate the Q Acoustics logo by gently pulling and rotating...

Page 9: ...REAR PANEL 1 2 5 9 8 4 6 7 3 Instructions 9 1 Digital Optical Input 2 Analogue Line In 1 3 Analogue Line In 2 4 Subwoofer Out 5 Bluetooth Pair Button 6 Power Switch 7 AC Input 8 Output Speaker Termin...

Page 10: ...TE 2 3 Analogue Inputs Line In 1 Line In 2 The unit has two options for Analogue Audio connection Line In 1 Connect the RCA L R audio output from a TV or other source to the LINE IN 1 sockets using th...

Page 11: ...PAIR with a device should no other devices currently be PAIRED and in range This Bluetooth Pair button is used to manually drop the current connection and pair with a new device 6 Power Switch Turns...

Page 12: ...3 Insert battery with side up and slide drawer back into remote Caution Danger of explosion if battery is incorrectly replaced Replace only with the same or equivalent battery type CR2025 Warning Do...

Page 13: ...ration the unit will automatically select the audio source A Connected Bluetooth source that starts to play has the highest priority followed by Digital and finally Analogue The Auto Source Selection...

Page 14: ...input and the LED will turn Blue Please Note Although starting to Play a track on the connected source will cause the unit to switch to Bluetooth the unit will stay on Bluetooth until the source is d...

Page 15: ...s of the first device will be lost Once the unit is connected with a device it will stop automatically searching for other devices to pair with or connect to To connect to another device either discon...

Page 16: ...at you work through the PHILIPS code list for your remote and experiment with each one until you find one that works well with the unit It is easiest to recognise when one is working by pressing the v...

Page 17: ...remote Point remote away from receiver press and hold Clear Vol The remote s LED will flash green twice Enter 1247 The remote s LED will flash green twice to confirm correct code Press TV and your rem...

Page 18: ...akers Enclosure type 2 way reflex Mid range driver 100mm Tweeter 30mm Power consumption Standby 0 5 Watts No signal idle 14 Watts Rear panel marked line ratings 100 240V 50 60Hz 100W Bluetooth Bluetoo...

Page 19: ...period Q Acoustics will at its option repair or replace any product found to be faulty after inspection by the company or its appointed distributor or agent Misuse and fair wear and tear are not cover...

Page 20: ...Q13924 IS_r7 www Qacoustics co uk...

Reviews: