background image

CONTENTS


1. SAFETY INSTRUCTION

2. COMPONENTS OF CLEANER


2.1 PARTS NAME 

      2.2 TECHNICAL PARAMETER


3. OPERATION INSTRUCTION


 3.1 QUICK USER GUIDE 

      3.2 CLEANING/STOP/SLEEP 

      3.3 CLEANING MODES SELECTION 

      3.4 PRE-SET TIMER


4. MAINTENANCE 


4.1 CLEANING SIDE BRUSH  

      4.2 CLEANING THE DUST BOX AND FILTER 

      4.3 CLEANING THE INFRARED RECEIVER

            AND CHARGING CONNETOR 

      4.4 ASSEMBLY THE MOPPING PAD 

5. FAILURE CHECKING  

6. ACCESSORIES LIST 

1

2-4

2-4

4

5-8

5

6

6-7

8

9-11

9

9

10

11

12

13

Summary of Contents for Pure Clean PUCRC99

Page 1: ...PUCRC99 User Manual ...

Page 2: ... USER GUIDE 3 2 CLEANING STOP SLEEP 3 3 CLEANING MODES SELECTION 3 4 PRE SET TIMER 4 MAINTENANCE 4 1 CLEANING SIDE BRUSH 4 2 CLEANING THE DUST BOX AND FILTER 4 3 CLEANING THE INFRARED RECEIVER AND CHARGING CONNETOR 4 4 ASSEMBLY THE MOPPING PAD 5 FAILURE CHECKING 6 ACCESSORIES LIST 1 2 4 2 4 4 5 8 5 6 6 7 8 9 11 9 9 10 11 12 13 ...

Page 3: ...ll items such as clothing power cords cables and loose fringes of rugs to prevent any possible jam of the robot s side brush or suction nozzle 11 Check the anti falling function first if there is stair or overhanging area To avoid the possibility of damage and injury it is better not to use in area with no protection railings 12 In case the robot will not be used for a long period of time turn off...

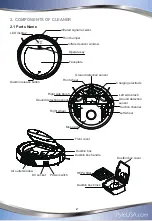
Page 4: ...ont wheel Ground detection sensor Dustbin release button Ground detection sensor Ground detection sensor Charging electrode Left side brush Right side brush Mop pad Suction channel Left wheel Right wheel Front cover Dustbin box Dustbin box handle DC socket Power switch Air outlet window Dustbin box cover HEPA filter Dustbin box block 2 ...

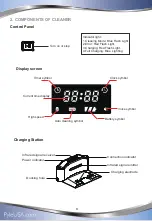
Page 5: ... Light 3 Charging Red Flash Light 4 Full Charging Blue Lighting Display screen Timer symbol Clock symbol Voice symbol Battery symbol Auto cleaning symbol High speed Current time display Infrared signal receiver Power indicator Docking hole Connection indicator Infrared signal emitter Charging electrode Charging Station 3 ...

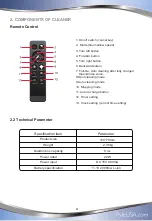
Page 6: ...kward button 7 Full Go Auto cleaning after fully charged Open Close voice 8 Spot cleaning mode 9 Auto cleaning mode 10 Mopping mode 11 Auto recharge button 12 Timer setting 13 Clock setting current time setting POWERFUL VOICE FULL GO Specification item Parameter 20W DC 15V 600mA 11 1V 2000mA Li ion 2 35kg 0 4L 310 78mm Product size Weight Dustbin box capacity Power rated Power input Battery specif...

Page 7: ...arge button on remote controller Figure B Reminders The red indicator light flashes when charging the unit The battery symbol is flashing too After full charged the Indicator light switches to blue light When blue indicator light is lit this means the unit is connected to charging station Only shows the connect status not for charging indicator If unit is not used for long time fully charge it and...

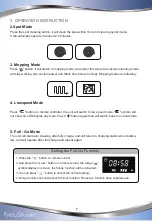
Page 8: ...it under stand by mode then unit will go on sleep mode Or if the unit is idle for 1 minute under stand by mode the unit will switch to sleep mode automatically Reminders If the unit is under sleep mode press or remote controller to switch on the unit 3 3 Cleaning modes selection 1 Auto mode Clear up the garbage or obstacles in the cleaning area before cleaning Press the Auto cleaning button it wil...

Page 9: ...l switch to low speed mode symbol will not show on LED display any more Press button again then will switch back to normal mode 5 Full Go Mode The unit will start auto cleaning after fully charge and will return to charging station when battery low and will operate after full charge and repeat again Setting the Full Go Function 1 Press the button on remote control 2 And press the button on remote ...

Page 10: ...button to set the hour or minute 4 After setting press the Timer button to confirm setting timer symbol display on screen 5 You can press button to cancel the current setting Set the current time Clock 1 Press the button on remote control the clock symbol display on screen 2 Press button to select the hour or minute 3 Press button to set the hour or minute 4 After setting press the Clock button to...

Page 11: ...ke out the brush then clean the side brush or replacement it 4 2 Cleaning the dust box and filter Please clean the dustbin box on time after working cleaning step as following operation figure Reminders Take out the dustbin box and check if needed then cleaning it Please clean HEPA filter around 10 15 days in water or brush and assemble it after blow dry by hairdryer A B C C D E 9 ...

Page 12: ... Infrared Receiver and Charging Connector Please use the dry soft cloth to clean the charging electrode and sensor in front of the unit Reminders Please clean the charging electrode on time to avoiding charging issue Charging electrode ...

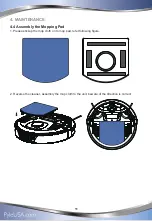
Page 13: ... 4 MAINTENANCE 4 4 Assembly the Mopping Pad 1 Please stickup the mop cloth on to mop pad refer following figure 2 Reverse the cleaner assembly the mop cloth to the unit beware of the direction is correct ...

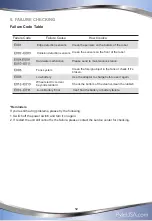
Page 14: ...he sensors on the bottom of the robot Collision detection sensors Clean the sensors on the front of the robot Failure Code Failure Cause How to solve Hardware malfunction Please send to maintenance station Fans system Clean the foreign object in the fans or check if it s broken Low battery Use the adaptor to charge before use it again Li ion Battery Error Can t find the battery or battery failure ...

Page 15: ...he product specification without notice No Description Q ty 1 2 3 4 5 6 7 8 9 10 11 1 1 1 1 1 2 2 1 2 1 1 Robot cleaner including Li ion battery Charging station Remote controller Adaptor Clean brush HEPA filter 1pc packed in robot cleaner Side brushes Mop pad Mopping cloth Instruction manual Warranty card ...

Page 16: ......

Reviews: