background image

1. Press MENU key on the remote control.
2. Press shift        key, until the cursor is placed in front of the
    "AUTO REPEAT " option.
3. Press select         key until the appropriate system is selected.
    ("on" or "off ")
4. On completion, press MENU key to exit the menu. 

11

MENU

OSD                           ON
AUTO PLAY              ON
AUTO REPEAT         ON
RECORD SPEED      EP
VCR OUTPUT CH     CH3
INPUT SIGNAL          TV

SHIFT:          SEL:           END:MENU

MENU

SHIFT:          SEL:           END:MENU

MENU

SHIFT:          SEL:           END:MENU

Setting the OSD (On Screen Display)

Setting the Auto PLAY

Setting the Auto Repeat

OSD                           ON
AUTO PLAY              ON
AUTO REPEAT         ON
RECORD SPEED      EP
VCR OUTPUT CH     CH3
INPUT SIGNAL          CATV

OSD                           ON
AUTO PLAY              ON
AUTO REPEAT         ON
RECORD SPEED      EP
VCR OUTPUT CH     CH3
INPUT SIGNAL          CATV

1. Press MENU key on the remote control.
2. Press shift       key, until the cursor is placed in front of the
    "AUTO PLAY " option.
3. Press select       key until the appropriate system is selected.
    ( "on" or "off" )
4. On completion, press MENU key to exit the menu. 

1. Press MENU key on the remote control.
2. Press select       key until the appropriate system is 
     selected. ( "on" or "off" )
3. On completion, press MENU key to exit the menu. 

SETTING THE MENU

Summary of Contents for PLTVCP85

Page 1: ...VIDEO CASSETTE RECORDER WITH BUILT IN TV TUNER PLTVCP85 ...

Page 2: ...tes the presence of important operating and maintenance servicing instructions RISK OF ELECTRIC SHOCKS DO NOT OPEN CAUTION TO REDUCE THE RISK OF ELECTRIC SHOCK DO NOT REMOVE THE COVER NO USER SERVICEABLE PARTS INSIDE REFER SERVICING TO QUALIFIED SERVICE PERSONNEL CAUTION AVERTISSEMENT POUR PREVENIR LES RISQUES D INCENDIE ET D ELECTROCUTION NE PAS EXPOSER CET APPAREIL A LA PLUIE NI A L HUMIDITE Thi...

Page 3: ... Use only with a cart stand tripod bracket or table recommended When used in vehicles the Video Cassette Recorder must be securely fastened 9 Ventilation Slots and openings in the cabinet are provided for ventilation to ensure reliable operation of the Video Cassette Recorder and to protect it from overheating These openings must not be blocked or covered The openings should never be blocked by pl...

Page 4: ...uipment off and on the user is encouraged to try to correct the interference by one more of the following measures Reorient or relocate the receiving antenna Increase the separation between the equipment and receiver Connect the equipment into an outlet on a circuit different from that to which the receiver is connected Consult the dealer or an experienced radio TV technician for help WARNING Chan...

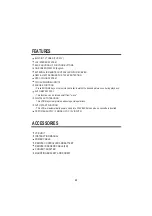
Page 5: ...tch the desired picture once during playback AUTO REPEAT PLAY This function can be turned on off from menu DIGITAL AUTO TRACKING This VCR plays clear pictures without special operations AUTO START FUNCTION This VCR will automatically power on and into PLAYBACK mode when a cassette is inserted DC POWER SUPPLY 2 KINDS OF DC 12V INPUTS FEATURES VCR UNIT INSTRUCTION MANUAL POWER CABLE REMOTE CONTROLLE...

Page 6: ...ther place The VCR can be mounted vertically horizontally or at any angle in between with the supplied mounting brackets The VCR cannot be mounted upside down or on its side VCR is sensitive to dirt and other contaminants Do not mount the unit in direct sunlight or where fluids are likely to spill on or in the unit The VCR is for 12Volt negative ground vehicles only ...

Page 7: ... green The power is on automatically when the cassette is inserted even if the power was off When the cassette is inserted Auto Tracking Adjustment operates automatically Hi Fi DEW HEAT REC 1 4 Eject Key Press this button to eject tape 5 Stop Key Press this button to stop tape FRONT PANEL CONTROLS AND INDICATORS If this key is pressed in the PLAYBACK mode the VCR enters the reverse picture search ...

Page 8: ...V2 Connect these jacks to the audio video out jacks terminal of your game machine or camcorder using the RCA cord For displaying this Front A V lnput connected Input Signal should be set to AV2 in Menu setting mode If this key is pressed in the PLAYBACK mode the VCR enters the forward picture search mode and FF indicator lamp will be blinked If pressed in STOP mode then the tape will fast forward ...

Page 9: ...rd For displaying this Rear A V input connected Input Signal should be set to AV1 in Menu setting mode 1 2 3 4 5 6 7 REAR PANEL CONNECTIONS AND POWER 2 AUDIO VIDEO OUT Connect this terminal to VIDEO AUDIO IN terminal of your TV or Amplifier Monitor using the RCA cord provided 3 IR INPUT Connect this terminal to Remote IR Sensor cable provided ...

Page 10: ...l cable Set TV to channel 3 or 4 to watch video tapes Convert Adapter 6 ANT IN TV CATV Please note We highly recommend to connect the unit corresponding to the 3 wire system of 4 Thus to make sure a proper working of power off tape guide Beyond it the unit will automatically change to standby mode after turning off the vehicle in order to save the car battery 4 DC 12V IN JACK Locking type For car ...

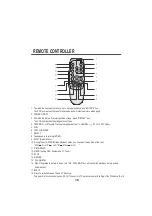
Page 11: ... FAST FORWARD 7 SELECT 8 Tape speed in recording SP EP 9 SHIFT Cursor Move 10 During the Hi Fi STEREO tape playback mode you can select the audio out channel Hi Fi Hi Fi L Hi Fi R Mono Hi Fi 11 RECORDING 12 MENU setting OSD System and TV Tuner 13 STOP 14 REWIND 15 PAUSE STILL 16 When the playback picture is noisy this RE TRACKING key will control the playback picture quality automatically 17 EJECT...

Page 12: ...y Setting the Auto PLAY Setting the Auto Repeat OSD ON AUTO PLAY ON AUTO REPEAT ON RECORD SPEED EP VCR OUTPUT CH CH3 INPUT SIGNAL CATV OSD ON AUTO PLAY ON AUTO REPEAT ON RECORD SPEED EP VCR OUTPUT CH CH3 INPUT SIGNAL CATV 1 Press MENU key on the remote control 2 Press shift key until the cursor is placed in front of the AUTO PLAY option 3 Press select key until the appropriate system is selected o...

Page 13: ...the cursor is placed in front of the VCR OUTPUT CH option 3 Press select key until the appropriate system is selected CH3 or CH4 3 On completion press MENU key to exit the menu MENU OSD ON AUTO PLAY ON AUTO REPEAT ON RECORD SPEED EP VCR OUTPUT CH CH3 INPUT SIGNAL TV SHIFT SEL END MENU Setting the Input Signal Entrance to TV Tuner Operation 1 Press MENU key on the remote control 2 Press shift key u...

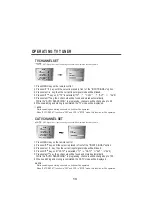
Page 14: ...ING CH 1 Press MENU key on the remote control 2 Press shift key until the cursor is placed in front of the INPUT SIGNAL option 3 Press select key then the current input signal mode will be blinked 4 Press shift key until TV is selected TV CATV AV1 AV2 5 Press select key then channels will be found and stored automatically While the AUTO SEARCHING is progressing channels will be changed up to 69 6 ...

Page 15: ...e can get snowy and the tracking control will have little or no effect If this condition occurs head cleaning cartridges may take care of the problem and restore normal picture We recommend that head cleaning cartridges be used sparingly since they are very abrasive and can damage the video heads during prolonged use If the problem is not resolved with the head cleaning cartridge then the unit nee...

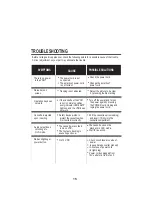
Page 16: ...klighting at power button Before calling service personnel check the following points for a possible cause of the trouble A minor adjustment on your part may eliminate the trouble Check the power cord Change the polarity of power cord Adjust the picture to be clear by pressing the Re tracking Turn off the power and turn on the power again by pressing the POWER cord Unplug and replug the power cord...

Page 17: ...unit for a time to get rid of moisture After 30 minutes if dew indicator is still on completely switch power off from unit and resupply after a minute This can reset dew indicator if moisture eliminated Insert the tape Clean head using tape cartride cleaner Switch TV to video mode with remote control or switch behind control door of TV Low voltage Start the vehicle if not running VCR connected to ...

Page 18: ... In Output terminnals UHF VHF 75 F type connector Desing and specifications are subjected to change without notice FF REW TIME T 120 VIDEO SIGNAL OUTPUT LINE AUDIO SIGNAL OUTPUT LINE OPERATING CONDITION HUMIDITY Approx 5min 1 0Vp p 75 ohm unbalanced NEGATIVE SYNC 6dBm 80 RH MAX Temperature 5 35 41 95 OPERATING POWER VOLTAGE 12 14V AUDIO SIGNAL INTPUT VIDEO SIGNAL INPUT Video In terminal RCA 1 0 Vp...

Reviews: