Pyle view PLTS76DU User Manual Download Page 16

-14-

Basic  Operation

(3)

(5)

(1) (2)

(6)

(4)

(2).  OFF  (Power)  button

        in  any  modes,  touch  the 

“  OFF  ”

  ICON

        to  switch  the  unit  off  . 
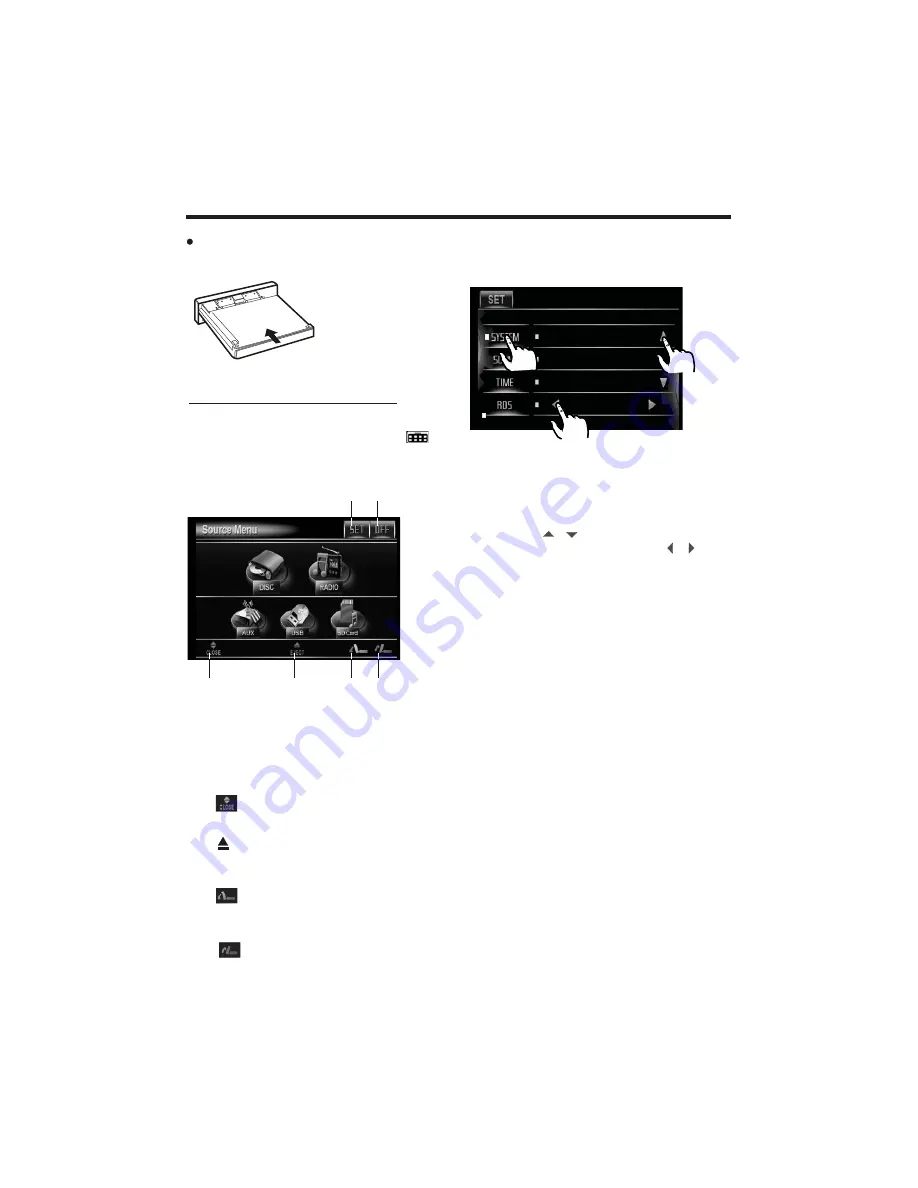
(1).  SET  button

        touch  to  enter  the  SETTING  mode  .


(5).                        Button

                to  adjust  the  angle  of  monitor  down-
                ward  until  your  desired  angle  .
       

(6).                        Button


    to  adjust  the  angle  of  the  monitor 

        upward  until  your  desired  angle  .

(3).                          Button

        Touch  to  close  the  monitor  .


(4).                        Button

                Touch  to  eject  the  disc  form  the 
                disc  slot.
       

TFT  Monitor  Adjustment

In  Radio  mode,  touch  the

“  RADIO  ”


icon  or  In  media  mode  ,  touch  the                       
range  to  enter  the  home  menu,
the  message  like  following  as  below.

When  the  monitor  turns  downward  to
a  certain  angle,  it  will  draw  in  .

FIG.6

 
Touch  the 

“SET”

  ICON  on  touch  screen

to  enter  the  setting  mode,  the  message
will  display  like  following  :

     
Touch 

“SYSTEM” 

on  the  setting  menu, 

touch  the  “          /          ”  ICONS  to  select  the 

adjustment  item,  touch  the    “            /          ” 

ICONS  to  adjust  the  selectment  item,  it 

depends  on  your  habit  to  setup  the  data.


TINT:  0  to  32

    Adjust  the  tint  if  the  human  skin  color  is 

    unnatural.

    -Adjustable  when  “NTSC  “  is  selected  for   

    “NTSC/PAL  “  .


ADJUSTABLE    ITEMS:

COLOR:  0  to  32

Adjust  the  color  for  the  picture-lighter  or 

darker.

CONTRAST:  0  to  32

Adjust  the  contrast  of  the  bright  and  dark 

portion.

BRIGHT:  0  to  32

Adjust  if  the  picture  is  too  bright  or 

too  dark.

BRIGHTNESS

CONTRAST

COLOR

15

      ANIMATION 

    In 

RADIO 

mode,  you  can  change  the 

    playing  time  of  animation  among  of 
   

“OFF,  10S,  30S,  1M,1.5M,  2M,  3M  and  4M  ”. 

      Note:


    Please  set  the  playing  time  of  the  ani

-


mation  to 

“  10S  ”

  for  the  first,  when  you 

    turn  the  unit  on  .   


Note:  the  RDS  icon  displays  only  when
setting  EUR  FREQ  and  power  off  the  unit
and  then  power  on  again.

Summary of Contents for PLTS76DU

Page 1: ...PLTS76DU USER MANUAL 7 Single DIN In Dash Detachable Motorized Touch Screen TFT LCD Monitor w Digital Video CD MP3 MP4 USB SD AM FM RDS Player...

Page 2: ...To ensure safety while driving and to comply with laws drivers should not watch video or operate the video device while driving...

Page 3: ...istening to radio Storing and Listening to a Memory station Automatic memory storing program scanning RDS Function Media Operation Basic Operation Selecting Play Modes On Screen Display Function 28 28...

Page 4: ...ecome clear the temper ature in your car becomes normal DO NOT install any receiver in locations where it may obstruct the steering wheel and gearshift lever operations as this may result in a traffic...

Page 5: ...OURSELF REFER SERVICING TO QUALIFIED PERSONNEL WARNING TO REDUCE THE RISK OF FIRE OR ELECTRIC SHOCK DO NOT EXPOSE THIS EQUIPMENT TO RAIN OR MOISTURE TO REDUCE THE RISK OF FIRE OR ELECTRIC SHOCK AND AN...

Page 6: ...ohol Never use solvents such as benzine thinner or conventional record cleaners as they may mar the surface of the disc Handling and Cleaning Dirt dust scratches and warping disc will cause misoperati...

Page 7: ...tall the unit where it does not get in the driver s way and cannot injure the passenger if there is a sudden stop like an emergency stop If installation angle exceeds 30 from horizontal the unit might...

Page 8: ...T of the both sides away then insert the two KEY PLATE into left and right side of chassis as above illustration Installating the unit DASH BOARD METAL MOUNTING STRAP HEX NUT SPRING WASHER PLAIN WASHE...

Page 9: ...ching Control Panel Before detaching the control panel be sure to turn off the power 1 Press the REL release button and the right hand side of front pane will release REL button 2 Put the front panel...

Page 10: ...ront panel must be attached into the Bulge point of the unit 2 Gently push the right down hand side of the front panel until you feel a Click SEE Precautions Do not touch the contacts on the front pan...

Page 11: ...BWOOFER GREY VIDEO IN YELLOW RCH RED LCH WHITE REAR RCA OUTPUT CABLE FRONT RCA WHITE L FRONT RCA RED R VIDEO OUT YELLOW FRONT RCA OUTPUT CABLE REAR CAMERA INPUT YELLOW BROWN B 12V REAR CAMERA SWITCH B...

Page 12: ...IO setup menu for making changes to the way the soundtrack is reproduced SUBTITLE LOCAL DISTANT In Digital Video Disc Playback mode pressing this button will allow you to change the subtitle language...

Page 13: ...o its prior volume level TITLE PBC A P 18 Display the TITLE menu that is stored in Digital Video disc changing between PBC ON and PBC OFF on the VCD disc In Radio mode press and hold this button to st...

Page 14: ...rting the Battery Note The lithium cell in the battery compartment of remote control has been secured for transport with a foil Before initial use please remove this foil so that the remote control is...

Page 15: ...urn off OPEN CLOSE MONITOR AND ANGLE ADJUSTMENT Touch OPEN button on front panel the monitor will draw out automatically OPEN CLOSE button FIG 1 When the monitor draws out to a certain location it wil...

Page 16: ...the message will display like following Touch SYSTEM on the setting menu touch the ICONS to select the adjustment item touch the ICONS to adjust the selectment item it depends on your habit to setup...

Page 17: ...me format selectment 24H 12H In SETTING mode touch the TIME range to select the time mode SETTING TIME Touch the TIME section on the setting menu touch the ICONS to select the adjustment item touch th...

Page 18: ...reen or press the EQ button on remote control to select one of the preset sound modes ROCK POP JAZZ CLASSIC USER POP USER ROCK CLASSIC JAZZ It depends on your habit to select the Audio mode The inform...

Page 19: ...decrease the volume KNOB BUTTON VOL Briefly press SEL button repeatedly to switch between BASS TRE BAL FADE COLOR BRIGHT CONTR TINT and VOL Long press SEL button to switch REG then briefly press SEL b...

Page 20: ...tomatically search down or up for an available station beginning from the current frequency Briefly pressing or button can manually search down or up for a your desired station beginning from the curr...

Page 21: ...s the button repeatedly to retrieve a station which had been stored in the memory in advance the chose number is shown on display Control Panel 9 REL BUTTON Press it to detach the control panel 11 EJE...

Page 22: ...elow Start Searching For a Station During Radio mode briefly touch to increase frequency by one step of channel spacing Briefly touch to decrease frequency by one step of channel spacing Manual Search...

Page 23: ...ore in Memory Select the frequency band Select the station Keep the desired memory key pressed in until the station is heard again after a brief interruption Retrieve a preset station Touch the 1 6 ra...

Page 24: ...n times some stations divide up their programs into regional programs with varying content REG ON the message REG ON will appears in the display for a few seconds Note the display capacity is limited...

Page 25: ...wn by an AF symbol in the display If the AF symbol appears in the display the AF function is switched on and RDS transmission date is being received PTY FUNCTION In Radio mode touch screen of PTY rang...

Page 26: ...P menu Previous menu On screen display To show hide the clock Loudness Function Subwoofer Function To select the Equalizer mode In any mode press the MODE on the front pane or touch the DISC icon on t...

Page 27: ...DISC playback touch for rapid forward reverse The speed of rapid forward reverse changes according to the disc as follows Pause still picture Touch during playback to temp orarily pause play Touch ag...

Page 28: ...N During DISC playback touch screen of RANDOM section press the 4 RDM button longer on the remote control to play in random Each playing the order is different Depend on the disc used for VCD Touch it...

Page 29: ...the screen along with the elapsed time Digital Video TT 01 01CH 04 31 C 0 02 06 D Touch or Press OSD for fourth time Digital Video TT 01 01CH 04 31 T 0 16 00 E Touch or Press OSD for fifth time Digit...

Page 30: ...io Language Function For Digital Video During Digital Video playback touch the AUDIO section on touch screen or press the AUDIO on the remote Each time the button is pressed or touch number of the aud...

Page 31: ...he unit on it checks to see what kind of monitor is connected which causes a small delay and some flickering of the display image which you may find unpleasant SCREEN SAVER SETUP If the screen display...

Page 32: ...it by pressing the ENTER button PASSWORD SELECTION The password must be used to make changes to the Parental Control menu below The factory default password is 0000 You will be asked for the current...

Page 33: ...ectly the desired language SUBTITLE LANGUAGE SETUP Select the preferred Subtitle language by touching directly the desired language RESTORE EXIT SYSTEM SETUP TV SYSTEM SCREEN SAVER TV TYPE PASSWORD RA...

Page 34: ...settings allow you to set the video signal brightness contrast hue and saturation HUE the hue of the video signal the color of the pictures EXIT OSD LANGUAGE AUDIO LANG SUBTITLE LANG MENU LANG ENGLISH...

Page 35: ...ncoded program There are 8 steps between full compression and off compression SATURATION the saturation of the video signal the vividness of the color all above can be adjusted to your tasters EXIT DY...

Page 36: ...there is an AUX IN jack follow the diagram below to connect analogue replay devices only for the Audio connect if you want to connect the Video please plug the RCA Video input on the back of the unit...

Page 37: ...il the desired mode is found To skip to the next or last track touch or press the or Press the or buttons for Fast Forward or Fast Reverse playback You can use the UP DOWN RIGHT or LEFT buttons to nav...

Page 38: ...read below before you start the operation of memory card File Playback Operation All the SD or MMC memory car playback operation function is same as the operation on CD MP3 WMA Please to MP3 WMA oper...

Page 39: ...een for fast forward fast backward Touch directly to select the play mode and then touch the desired track to play Or Use on the remote control to select the play mode or item then press ENTER button...

Page 40: ...dB 15 dBu 15dBu MW AM Frequency Coverage 522 to1620 KHz 530 to1710 KHz IF 450 KHz 450 KHz Sensitivity S N 20 dB 40 dBu 40 dBu Audio Signal Output 2ch 4ch line out Characteristics 1 Frequency Response...

Page 41: ...rating properly due to noise The antenna cable is not connected Insert the antenna cable firmly The signals are too weak Select a station manually SYMPTOM CAUSE SOLUTION Video image appears black whit...

Page 42: ......

Reviews: