2
Thank you for purchasing this HI-FI product. Taking time to read
these operating instructions carefully before use will acquaint you
fully with all its features and help ensure optimum performance.
Precautions
____________________________
Power plug
- When disconnecting the power cord from the power outlet,
always take hold of the plug, and not the wire, and pull free.
Never connect or disconnect the power plug with wet hands since
you may receive an electric shock.
- Remember to disconnect the power plug from the power outlet
when you do not intend to use the unit for a prolonged period of
time.
Do not remove the case and bottom panel
Any inspections or adjustments inside the unit may lead to
malfunctions and electric shocks. Do not touch any of the inside
parts.
Do not block the ventilation holes
Do not block the ventilation holes on the top of the unit by placing
records or other objects over them.
This will increase the inside temperature and may lead to failure
or malfunction.
Installation precautions
Do not install the unit in any of the following locations since this
may result in deterioration in performance or malfunction:
- Locations exposed to direct sunlight or near objects radiating
heat such as heating appliances.
- Locations exposed to moisture or humidity.
- Locations with poor ventilation exposed to dust and dirt.
- Locations which are unstable and not perfectly flat or which are
susceptible to vibration.
Do not wipe with thinners
Wipe the panels and case from time to time with a soft cloth.
Using any kind of thinner, alcohol or volatile liquid will mar the
surface, cause blotching on the exterior and erase the markings
and should therefore be avoided.
Do not use insecticide sprays in the vicinity.
This unit dissipates the heat most effectively when installed on
a flat surface. Do not stand it up or install it at an angle.
Before connecting the power plug
Before connecting the power plug to an electrical outlet, check to
be sure that the unit is set to the power voltage for your area. If
the voltage of the unit is improperly set, fire hazard or damage to
the unit may result. If you find that the unit is not set to the proper
voltage for your area follow the instructions listed below.
- Unit without voltage selectors switch.
- Unit destined for some areas are not fitted with a voltage
selector switch due to laws and regulations existing in those
areas. In such a case, the power supply voltage is set to the
voltage used in the area where the unit is purchased.
Connections
____________________________
Connection precautions
When connecting, either disconnect the power plug from the
power outlet or turn off the unit
’
s power using the POWER switch.
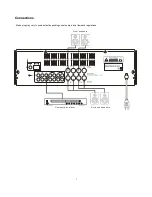
Check the left and right channels and connect properly (Left to L
and Right to R).
Insert the plugs securely. Improper connection can lead to the
generation of noise.
Turntable
Connect the turntable
’
s output cord L (white) plug to the L
PHONO terminal and the R (red) plug to the R terminal.
If your turntable is equipped with a grounding cable, connect it to
the unit
’
s GND terminal. But disconnect it if you notice increased
hum.
- If you use the turntable alongside the unit, hum and noise
pickup may sometimes. In such a case, install the turntable at a
position where hum and noise are not picked up.
Compact disc player
Connect the CD terminals to the OUTPUT terminals on the
compact disc player using the pin-plug cord.
Tuner
Connect the TUNER terminals to the OUTPUT terminals on the
tuner using the pin-plug cord.
DVD Terminal
Connect the DVD terminals to the OUTPUT terminals on the DVD
player using the pin-plug cord.
TAPE Deck
Recording connections
: Connect the TAPE REC terminals to
the input (LINE IN) terminals on the tape deck using the pin-plug
cord.
Playback connections
: Connect the TAPE PLAY terminals to
the output (LINE OUT) terminals on the cassette deck using the
pin-plug cord.
Equalizer Terminals
These terminals are used to connect a graphic equalizer or sound
processor. They also come in handy for connecting an AV
(audio/video) selector unit.
Use pin-plug cords to connect the REC terminals to the INPUT
terminals on the selected component and also to connect the
PLAY terminals to its OUTPUT terminals.
Speaker systems
Connect the speaker systems to the SPEAKERS terminals on the
rear panel of the unit with the speaker cords. Two sets of speaker
systems can be connected, one to front (Main) speakers and one
to rear speakers (Surround) in order to achieve the surround
sound effect.
When viewed from the front (the listening position), the speaker
mounted on the left should be connected to the L terminals, and
the speaker mounted on the right should be connected to the R
terminals. Be sure to connect the polarities of the speaker
systems and the SPEAKER terminals correctly (+ to +, - to -). If
the polarity of one of the speaker systems is connected
improperly, sound in the central area between the speakers will
appear to be missing, and the position of the instruments will not
be clear, resulting in a loss of stereo directionality; so take care
when connecting.
When connecting, do not allow the conductor of the speaker
cords to be exposed from the terminals and come into contact
with other terminals.

