background image

User Manual


PT-PSW-92 


28 


8.


OSD Control 

PT-PSW-92 provides a powerful OSD operation menu, contains 3 parts: optional 
settings, image settings, and system setting etc. 

There are two ways to enter OSD menu: 


Press the MENU button 

  on IR Remote. 


Send the command Menu on RS232 Control Software. 

Operation:   


Press direction buttons on IR Remote to switch between menu options and 
menu pages. 


Press 

OK

 on the IR Remote to confirm the selection. 


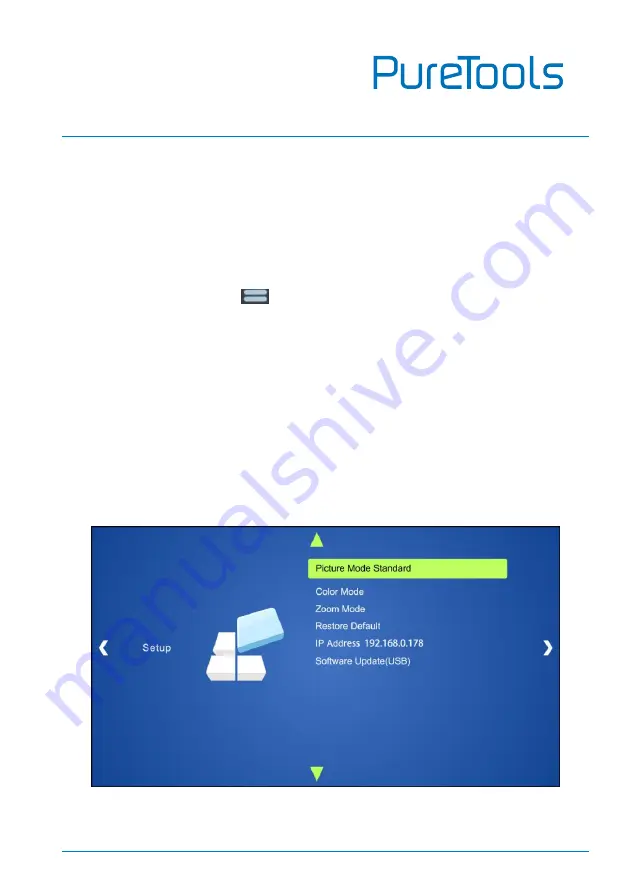
OSD MENU-SETUP 

Including Picture Mode Standard, Color Mode, Zoom Mode, Restore Default, Software 
Update. 


Summary of Contents for PT-PSW-92

Page 1: ...User Manual PT PSW 92 User Manual 4K Scaler Switcher Multiformat Scaling 4K 60Hz 4 2 0 HDMI HDBaseT Out Model PT PSW 92 Designed in Germany 2017 PureLink GmbH All rights reserved VersionV1 0 ...

Page 2: ...ed or reproduced without the prior written consent FCC Statement This equipment generates uses and can radiate radio frequency energy and if not installed and used in accordance with the instructions may cause harmful interference to radio communications It has been tested and found to comply with the limits for a Class B digital device pursuant to part 15 of the FCC Rules These limits are designe...

Page 3: ...07 2006 EU und 2011 65 EU EMC LVD Electro Magnetic Compatibility Low Voltage Directive PureLink GmbH hereby declares that this product PureTools PT PSW 92 complies with Directives 2014 30 EU and 2014 35 EU The full text of the EU Declaration of Conformity is available at the following Internet address http www purelink de ce 4251364706855 _CE pdf ...

Page 4: ... install this product near water Do not put any heavy items on the extension cable in case of extrusion Do not remove the housing of the device as opening or removing housing may expose you to dangerous voltage or other hazards Install the device in a place with fine ventilation to avoid damage caused by overheat Keep the module away from liquids Spillage into the housing may result in fire electr...

Page 5: ...n 6 3 2 System Diagram 6 3 3 Microphone Connection 7 4 Button Control 10 4 1 Manual Switching 10 4 2 Auto Switching 10 4 3 Volume Adjustment 11 5 IR Control 12 5 1 IR Remote Control 12 5 2 IR Pass through Control 13 5 2 1 To Control Far end Source Display 13 5 2 2 To Control Local Source PT PSW 92 14 6 RS232 Control 15 6 1 RS232 Connection 15 6 2 RS232 Control Software 15 6 3 RS232 Command 17 7 GU...

Page 6: ...2 7 1 Control Menu 21 7 2 Volume Menu 22 7 3 Configuration Menu 23 7 4 Password Menu 26 7 5 GUI Update 27 8 OSD Control 28 9 Specification 29 10 Panel Drawing 31 11 Troubleshooting Maintenance 32 12 After Sales Service 33 ...

Page 7: ...th a microphone input that supports phantom power and a balanced stereo audio output for audio reinforcement the PT PSW 92 can handle a myriad of A V applications 1 2 Feature Compliant with HDMI2 0 HDCP2 2 Supports video source auto switching function HDBaseT input with distances up to 230 ft 70m at 1080p and 131 ft 40m at 4Kx2K on a single CAT5e 6 7 cable HDBaseT output with distances up to 328 f...

Page 8: ...caler Switcher 2 x Mounting Ears with 4 Screws 4 x Plastic Cushions 1 x IR Remote 1 x IR Receiver 1 x IR Emitter 6 x 3 Pin Phoenix Connectors 1 x 5 Pin Phoenix Connector 1 x Power Cord HDBaseT Receiver 1 x TPUHPT HDBT 1001 RX HDBaseT Receiver 2 x Mounting Ears with 4 Screws 4 x Plastic Cushions 1 x User Manual Note Please contact your distributor immediately if you found any damage or defect in th...

Page 9: ... 4 HDMI input selector and activity LED 5 HDMI input selector and activity LED 6 HDMI input selector and activity LED 7 HDMI input selector and activity LED 8 VGA input selector and activity LED 9 VGA input selector and activity LED OUTPUT BACK 720P Press this to let the display be black screen or long press for 3 seconds to reset the output resolution to 1280 720p MUTE Press this to mute output V...

Page 10: ...h external audio input 3 HDMI HDMI input port with external audio input support 4k 60Hz 4 4 4 HDCP 2 2 4 HDMI 7 HDMI 4 HDMI input ports support 4k 60Hz 4 4 4 HDCP 2 2 8 VGA 9 VGA 2 VGA input ports with VGA auxiliary audio inputs LINE Line audio input port MIC MIC audio input port DIP switch for selecting the below 3 mode 48V phantom power mode connect with condenser microphone MIC mode connect wit...

Page 11: ...ier wave only to receive IR signal send by IR Remote to control this Scaler Switcher c IR ALL IN IR input port used with far end IR output port Connect with IR Receiver with carrier to receive IR signal from all kinds of IR Remote to control far end devices from local d IR ALL OUT IR output port used with far end IR input port Connect with IR emitter with carrier to send IR signal to control local...

Page 12: ...ower on 3 2 System Diagram Tx Rx IR Emitter Projector PT HDBT 1001 RX IR Receiver Blu Ray Remote CONTROL TCP IP RS232 IR ALL IN IR ALL OUT IR EYE Tx Rx FIRMWARE COM 70V 100V 40W MAX AUDIO AMP OUTPUTS HDMI HDBT PoH L R Tx Rx RS232 AUDIO 1 HDBT PoH 9 VGA 8 VGA 2 DP INPUTS LINE MIC L R 6 HDMI 5 HDMI 3 HDMI 4 HDMI 7 HDMI RS232 Tx Rx 48V LINE MIC PT HDBT 701 TXWP Pad Router Projector Remote Central Con...

Page 13: ...ity When switching to 48V the MIC input will provide a 48V phantom power This is only used for condenser microphone Connect the microphone in this way connects to positive connects to negative and to ground MIC Mode MIC input has a low frequency characteristics and wide frequency response When switch to MIC the microphone input is used for connecting with dynamic microphone There are two different...

Page 14: ...User Manual PT PSW 92 8 Balanced connection connects to positive connects to negative and connects to ground ...

Page 15: ... the microphone input is used for connecting with line audio or wireless microphone output There are two different connection methods Unbalanced connection and connect to ground and connects to signal and connect to ground and connects to signal Balanced connection connects to positive connects to negative and connects to ground ...

Page 16: ...W 92 have the ability to save the last configuration before losing power If the last switching mode is auto switching once rebooted the switcher will automatically enter auto switching mode then detect all inputs and memorize their connection status for future rebooting using If the last displayed signal is still available the unit will output the signal If not the unit will detect all the input s...

Page 17: ...g the DP source device to solve this phenomenon Auto switching function works only when inputting new signal removing a signal or power rebooting 4 3 Volume Adjustment Press Volume Knob to choose AMP SOURCE or MIC audio needed to be adjusted the corresponding LED will turn green and keep on and then adjust the Volume Knob to increase or decrease sound volume ...

Page 18: ...DWON LEFT RIGHT button for value setting or page turn VOL Volume adjusting button After pressing this button the volume adjusting menu will be showed on Display and then press UP DOWON button to increase decrease volume Mute unmute audio Exit button Exit OSD menu or current operation Enter OSD menu or used to return to previous menu Important notice Please use this IR Remote carefully Please wipe ...

Page 19: ...cling or waste regulations 5 2 IR Pass through Control 5 2 1 To Control Far end Source Display Connect an IR Receiver to IR ALL IN port on the PT PSW 92 and then connect IR emitter to the IR OUT ports on the HDBaseT Transmitter and Receiver the far end source display can be control by their IR Remote DVD DVD DVD Remote HDTV Remote HDBaseT Transmitter HDBaseT Receiver HDTV CONTROL TCP IP RS232 IR A...

Page 20: ...emote DVD DVD Scaler Remote DVD Scaler Remote HDBaseT Transmitter HDBaseT Receiver HDTV CONTROL TCP IP RS232 IR ALL IN IR ALL OUT IR EYE Tx Rx COM 70V 100V 40W MAX AUDIO AMP OUTPUTS HDMI HDBT PoH L R Tx Rx RS232 AUDIO 1 HDBT PoH 9 VGA 8 VGA 2 DP INPUTS LINE MIC L R 6 HDMI 5 HDMI 3 HDMI 4 HDMI 7 HDMI RS232 Tx Rx 48V LINE MIC FIRMWARE RS232 IR IN IR OUT HDMI IN HDBT OUT DC 24V ETHERNET ETHERNET Tx R...

Page 21: ...onding file path Basic Settings First to connect PT PSW 92 with all input devices and output devices needed then to connect it with a computer which is installed with RS232 control software Double click the software icon to run this software Here we take the software CommWatch exe as example The icon is showed as below PC CONTROL TCP IP RS232 IR ALL IN IR ALL OUT IR EYE Tx Rx COM 70V 100V 40W MAX ...

Page 22: ...d as below Please set the parameters of COM number bound rate data bit stop bit and the parity bit correctly and then you are able to send command in Command Sending Area Parameter Configuration area Monitoring area indicates if the command sent works Command Sending area ...

Page 23: ...EFT button Key left Right RIGHT button Key right Exit EXIT button exit OSD Key exit Ok OK for OSD selection Key ok Hdbtin Switch to 1 HDBT input Port 1 Dpin Switch to 2 DP input Port 2 Hdmi3 Switch to 3 HDMI input Port 3 Hdmi4 Switch to 4 HDMI input Port 4 Hdmi5 Switch to 5 HDMI input Port 5 Hdmi6 Switch to 6 HDMI input Port 6 Hdmi7 Switch to 7 HDMI input Port 7 VGA8 Switch to 8 VGA input Port 8 V...

Page 24: ...elect embedded audio input for 3 HDMI video signal HDMI audio embedded HDMI audio2 Select embedded audio input for 3 HDMI video signal HDMI audio external Ampadd Increase the volume of AMP audio amp volume xx Ampin Decrease the volume of AMP audio amp volume xx Sourceadd Increase the volume of source audio source volume xx Sourcemin Decrease the volume of source audio source volume xx Micadd Incre...

Page 25: ... external HDMI embedded DP external DP embedded Input Inquire the input source Hdbt Dp Hmdi3 Hmdi4 Hmdi5 Hmdi6 Hmdi7 Vga8 Vga9 Volume Inquire audio volume amp volume xx source volume xx mic volume xx Mute Unmute Svol xx Set the volume of source audio source volume xx Avol xx Set the volume of AMP audio amp volume xx Mvol xx Set the volume of MIC audio mic volume xx ...

Page 26: ...ia front panel button IR Remote and RS232 communication software PT PSW 92 can be controlled via GUI It allows users to interact with PT PSW 92 through graphical icons and visual indicators Type 192 168 0 178 in your browser it will enter the log in interface shown as below ...

Page 27: ... to enter Control menu shown as below Source Click the corresponding button 1 HDBT 2 DP 3 HDMI 4 HDMI 5 HDMI 6 HDMI 7 HDMI 8 VGA or 9 VGA to select video input source or click AUTO to enter auto switching mode Audio Click 2 DP or 3 HDMI to select external audio for DP or HDMI video signal Black Click this to output black screen for display ...

Page 28: ...User Manual PT PSW 92 22 7 2 Volume Menu Click Volume to enter volume menu shown as below The volume of Source MIC and Line audio can be adjusted ...

Page 29: ...nter setting menu shown as below Output Resolution Select the output resolution that you need and then click Confirm to save setting Update Insert the USB flash disk with EDID file software updating file to FIRMWARE port and then click EDID Firmware to start update procedure ...

Page 30: ...ck Network to enter network setting menu shown as below Dynamic or static IP mode can be selected Under static IP mode IP address and subnet mask gateway can be set and make sure the IP addresses are different to avoid IP conflict ...

Page 31: ...User Manual PT PSW 92 25 Click Source Label to enter source label setting menu shown as below The name of source input selection button can be modified as you need ...

Page 32: ...User Manual PT PSW 92 26 7 4 Password Menu Click Password on the top of interface to enter password menu shown as below Admin user password can be modified as you need ...

Page 33: ...sername and password the same as the GUI log in settings modified password will be available only after rebooting to log in the configuration interface After that click Administration at the source menu to get to Upload Program as shown below Select the desired update file and press Apply it will start upgrading then ...

Page 34: ...There are two ways to enter OSD menu Press the MENU button on IR Remote Send the command Menu on RS232 Control Software Operation Press direction buttons on IR Remote to switch between menu options and menu pages Press OK on the IR Remote to confirm the selection OSD MENU SETUP Including Picture Mode Standard Color Mode Zoom Mode Restore Default Software Update ...

Page 35: ...io Inputs for 8 VGA and 9 VGA 1 LINE Audio 1 MIC Audio Audio Input Connector 4 3 5mm Stereo Jacks 2 3 pin Phoenix Connector Audio Input Impedance 10kΩ Audio Output 1 Dual Mono Analog Audio 1 Power Amplifier with Fixed Voltage Audio Output Connector 1 5 pin Phoenix Connector 1 3 pin Phoenix Connector Audio Output Impedance 70Ω Frequency Response 20Hz 20K Hz Stereo Channel Separation 80dB 1KHz Contr...

Page 36: ...User Manual PT PSW 92 30 General Relative Humidity 10 90 External Power Supply 100V 240V AC Power Consumption 45W Max Dimension W H D 436 4mm x 44mm x 276 5mm Net Weight 3 17Kg ...

Page 37: ...User Manual PT PSW 92 31 10 Panel Drawing 44 mm ...

Page 38: ... loose connection Make sure the connection is good The switcher is broken Send it to authorized dealer for repairing POWER indicator doesn t work or no respond to any operation Fail connection of power cord Make sure the power cord connection is good Cannot control the device by control device e g a PC through RS232 port Wrong RS232 communication parameters Type in correct RS232 communication para...

Page 39: ...fee Warranty expiration Factory applied serial number has been altered or removed from the product Damage deterioration or malfunction caused by Normal wear and tear Use of supplies or parts not meeting our specifications No certificate or invoice as the proof of warranty The product model showed on the warranty card does not match with the model of the product for repairing or had been altered Da...

Page 40: ... Technical Support Phone 49 5971 800299 0 Fax 49 5971 800299 99 Technical Support Hours 8 30 AM to 5 00 PM Monday thru Thursday 8 30 AM to 4 00 PM Friday Write to PureLink GmbH Von Liebig Straße 10 D 48432 Rheine www purelink de info purelink de ...

Reviews: