background image

10

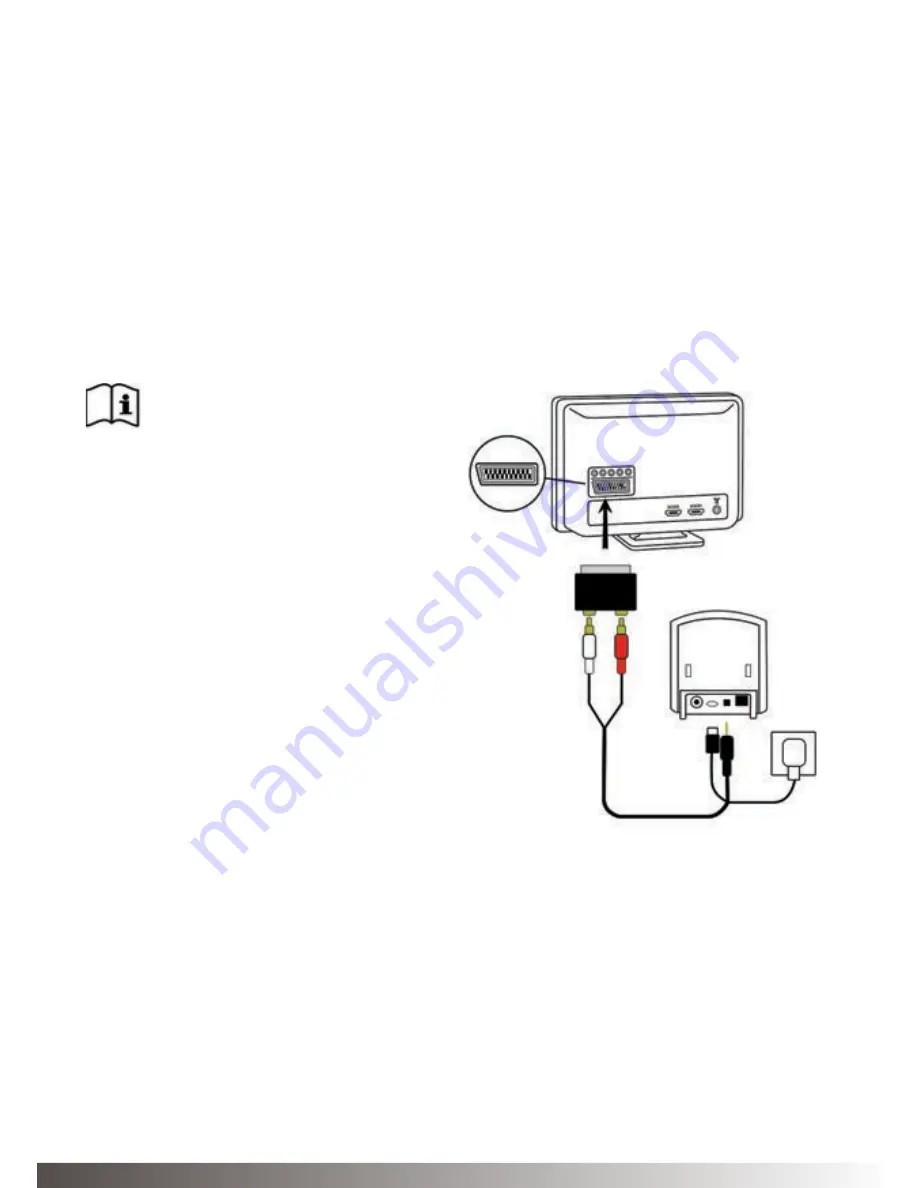
Scart adapter:

1. Connect the power supply to the wall socket and insert the cable into 
the micro-USB socket on TV Streamer 2.
2. Insert the male stereo mini-jack on the audio cable into the female 
stereo mini-jack input on the TV Streamer 2 (4 on page 6).
3. Connect the scart adapter to the red and white plugs at the other end 
of the audio cable.

4. Plug the scart adapter into the audio source’s scart terminal.

Note: The scart output 

terminal is usually located on 
the back or side of the audio 
source. Please consult the 
manual of your audio source if 

additional configuration of the 

scart output is needed.

The TV Streamer 2 supports both 
analogue and digital audio input. When 
using digital audio input the following 
formats are supported:

Dolby Digital
- Channels: Max 5.1
- Bitrate: 32 kbs to 640 kbs
- Sample rate: 32, 44.1 and 48 kHz

Note: Dolby Digital Plus 
(requiring an HDMI interface), 
Dolby TrueHD, Dolby Pro 
Logic, Dolby Digital EX, 
Dolby Digital Surround EX, 
and AAC (Advanced Audio 
Codec) are not supported.

Connecting the TV Streamer 2 to a 
digital audio source (E.g.
TV or Hi-Fi stereo)

Summary of Contents for TV Streamer 2 SAS-3

Page 1: ...Established 1976 V1 0 December 2014 TV Streamer 2 User Guide ...

Page 2: ...ference received including interference that may cause undesired operation Note This equipment has been tested and found to comply with the limits for a Class B digital device pursuant to part 15 of the FCC Rules and ICES 003 of the IC rules These limits are designed to provide reasonable protection against harmful interference in a residential installation This equipment generates uses and can ra...

Page 3: ...EU Products are intended for sale in countries within European Economic Area as well as Switzerland IntendedUse ListofCountries Reorient or relocate the receiving antenna Increase the separation between the equipment and receiver Connecttheequipmentintoanoutletonacircuitdifferentfromthereceiver is connected Consult the dealer or an experienced radio TV technician for help Changes or modifications ...

Page 4: ...ts in countries outside EU and US Please refer to local country requirements for these areas IC 6941C BTB2 Cet appareil numérique de la classe B est conforme à la norme NMB 003 du Canada Operation is subject to the following two conditions 1 this device may not cause interference and 2 this device must accept any interference including interference that may cause undesired operation of the device ...

Page 5: ...ption Getting Started Pairing to your hearing instruments Start and stop streaming Controls Adjustable delay mode Important Information Technical specifications Warranty Troubleshooting guide 6 7 12 14 16 17 18 20 20 21 ...

Page 6: ... socket 2 Pairing button 3 Mono stereo switch 4 Analogue mini jack audio input 5 Optical Toslink audio input 6 Coaxial audio input 7 Increase volume 8 Decrease volume 9 Power light green 10 Activity light yellow 1 2 4 5 7 9 10 3 6 8 ...

Page 7: ...reamer 2 to an analogue audio source E g TV or Hi Fi stereo 1 Connectthepowersupplytothewallsocketandinsertthecableintothe micro USB socket on the TV Streamer 2 2 Insertthemalestereomini jackontheaudiocableintothefemalestereo mini jack input on the TV Streamer 2 4 on page 6 3 Plug the other end audio cord into the AUDIO OUT terminals on the audio source 4 The AUDIO OUT is usually marked L R for le...

Page 8: ...nto the female stereo mini jack input on the TV Streamer 2 4 on page 6 3 Connect the stereo mini jack adapter to the red and white plugs at the other end of the audio cable 4 Plug the stereo mini jack adapter into the audio sources HEADPHONE output terminal or alternatively into your computers audio terminal Note With this installation most audio sources will send sound to both hearing instruments...

Page 9: ...ly only the person wearing the hearing instruments will hear the sound and audio source speakers are muted If muted speakers are not desired please refer to the first installation or the one on the following page Your audio source may support speakers and HEADPHONE being on simultaneously check your audio source manual for instructions ...

Page 10: ...nal is usually located on the back or side of the audio source Please consult the manual of your audio source if additional configuration of the scart output is needed The TV Streamer 2 supports both analogue and digital audio input When using digital audio input the following formats are supported Dolby Digital Channels Max 5 1 Bitrate 32 kbs to 640 kbs Sample rate 32 44 1 and 48 kHz Note Dolby D...

Page 11: ...efore inserting the cable 3 Plug the other end of the optical audio cable into the Digital Audio Out Optical on your audio source Using the coaxial audio input 1 Connect the power supply to the wall socket and insert the cable into the micro USB socket on TV Streamer 2 2 Connect one of the plugs on the coaxial audio cable to the coaxial plug 6 on page 6 on TV Streamer 2 3 Plug the other end of the...

Page 12: ...reamer 2 power supply is plugged into a wall socket and that the green light indicator on the front of the TV Streamer 2 9 on page 6 is ON Your hearing instruments must be OFF open the battery door 2 Press the pairing button on the TV Streamer 2 2 on page 6 once The yellow light indicator on the front of the TV Streamer 2 10 on page 6 will nowblinkonceevery2secondstoindicatethattheTVStreamer2isrea...

Page 13: ...2 Whileinpairingmodeclosethebatterydoorsonthehearinginstruments Pairing the TV Streamer 2 in channel 3 1 Press the pairing button three times The yellow light indicator on the front of the TV Streamer 2 will now blink three times every 2 seconds to indicate that it is ready to be paired in channel 3 2 Whileinpairingmodeclosethebatterydoorsonthehearinginstruments Pairing button pushes 1 2 3 1 2 3 C...

Page 14: ...our hearing instruments and will be followed by the streamed sound 2 If you have a Remote Control optional accessory simply press the streaming button not supported by 680 Series on this Remote Control Once the hearing instruments connect to TV Streamer 2 an audible melody will play in both ears to confirm the presence of streamed audio and a streaming icon will appear in the display The streamed ...

Page 15: ...s on one side will take both hearing instruments back to the last program used With the Remote Control optional accessory you just have to press the P button located in the centre of the key pad This will return the hearing instruments to the last program used You may also press the home button to return to your default settings If you are using the telephone with Phone Clip 2 optional accessory o...

Page 16: ...should only be made one time as TV Streamer 2 will store the latest set volume level Use the Remote Control optional accessory to adjust both the streaming volume level in the hearing instrument Ask your hearing care professional for more information about this accessory The volume can in some cases be further adjusted at the signal source for example by turning the TV volume down This will adjust...

Page 17: ...the pairing button 2 on page 6 for 3 seconds Now the TV Streamer 2 will enter into the adjustable delay mode where the green light indicator on the front of the TV Streamer 2 will blink once every 2 seconds The yellow light indicator will be on whenever an audio signal is present 3 Use the and key 7 and 8 on page 6 on the top of the TV Streamer 2 to increase or decrease the delay of the streamed s...

Page 18: ...ean the device When the TV Streamer 2 is not being used for longer periods of time unplug the power supply from the wall socket General Warnings Keep the TV Streamer 2 out of reach of children under 3 years The TV Streamer 2 uses low powered digitally coded transmissions in order to communicate with other wireless devices Although unlikely nearby electronic devices may be affected In that case mov...

Page 19: ...nstrument and the TV Streamer 2 were given a unique communication network code during the fitting This ensures that TV Streamer 2 will not affect hearing instruments worn by others High powered electronic equipment larger electronic installations and metallic structures may significantly reduce the operating range Use only original accessories Do not make any changes or modifications to the TV Str...

Page 20: ...GHz Operating temperature 0 to 55 C Storage temperature 20 to 60 C Temperature test transport and storage information The product is subject to various tests in temperature and damp heating cycling between 25 C and 70 C according to internal and industry standards Warranty The TV Streamer 2 is covered by a limited warranty issued by the manufacturer for a period of 12 months from the day of the or...

Page 21: ...jects entering the device are NOT covered by the limited warranty and may void it The above warranty does not affect any legal rights that you might have under applicable national legislation governing sale of consumer products Your hearing care professional may have issued a warranty that goes beyond the clauses of this limited warranty Please consult your hearing care professional for further in...

Page 22: ...ments are not within wireless range The TV Streamer 2 is not cabled correctly to the TV The TV Streamer 2 is powered off or the sound from the TV output has been muted Streaming is not supported on the Remote Control for the 680 Series Possible Remedies Carry out pairing process Possible Remedies Ensure that the TV Streamer 2 and hearing instruments are within wireless range and repeat pairing pro...

Page 23: ...ents are on the edge of the wireless range The TV Streamer 2 and hearing instruments are not within sufficient line of sight Cause The audio input level from the TV is too high Possible Remedies Ensure that the TV Streamer 2 and hearing instruments are within wireless range Power on or unmute the TV Possible Remedies Adjust the volume using the and keys on the TV Streamer 2 until the sound is suff...

Page 24: ...another audio output from your TV Alternatively follow the instructions in the Adjustable delay mode section of this user guide If this does not help contact your TV dealer The TV Streamer 2 audio streaming has almost no latency and does not contribute itself to any lip sync error Possible Remedies If possible try using another audio output from your TV Alternatively follow the instructions in the...

Page 25: ...ing instruments are within wireless range and activate streaming again Replace the battery in the hearing instrument with a new one Be aware of information marked with the warning symbol WARNING points out a situation that could lead to serious injuries CAUTION indicates a situation that could lead to minor and moderate injuries Advice and tips on how to handle your accessory better Equipment incl...

Page 26: ...amily member or speaker and stream their voice directly to your ears Wireless signal with up to 7 meters 23 feet range No adapters around your neck Other wireless accessories available for the P Series Phone Clip Stream phone calls and music directly to the ears The Phone Clip streams Bluetooth mobile phone conversations and music directly to your customer s hearing systems A robust signal and eff...

Page 27: ...for their specific personal preference Large and intuitive buttons ensure easy operation and control of volume program and streaming devices such as the TV Streamer 2 and Mini Microphone Adjust volume on one or both hearing systems Change hearing system programs Switch between streaming from TV radio or laptop Balance the hearing system volume with the streaming volume Mute function to block out s...

Page 28: ...Established 1976 www puretone net This user guide is also available on request in large text format ...

Reviews: